Welcome to Tengine’s documentation!
请在页面左下角选择特定版本的文档。
技术亮点
Tengine 由 OPEN AI LAB 主导开发,该项目实现了深度学习神经网络模型在嵌入式设备上的快速、高效部署需求。为实现在众多 AIoT 应用中的跨平台部署,本项目基于原有 Tengine 项目使用 C 语言进行重构,针对嵌入式设备资源有限的特点进行了深度框架裁剪。同时采用了完全分离的前后端设计,有利于 CPU、GPU、NPU 等异构计算单元的快速移植和部署,同时降低评估和迁移成本。
多硬件支持
Tengine 支持多种硬件后端对神经网络模型进行加速推理,包含 CPU(ARM、X86、MIPS、RISC-V)、GPU(Mail、NV、AMD、Adreno、PowerVR)、NPU(VSI、NNIE、DLA)。
高性能
通过提供计算图优化(算子合并、算子移除),实现对原生网络模型结构进行优化,降低计算量。
同时针对不同 CPU 架构,采用精细的手工汇编,实现对计算量要求较高的 Kernel 进行极致优化,充分发挥硬件峰值算力。
异构切图
为了支持不同 SoC 上多种计算单元,Tengine 在加载模型后,获取当前指定硬件加速特性,灵活切分原有计算图,实现算力充分利用,同时提高模型支持的泛化性。
量化支持
支持主流的两种量化策略(对称分通道量化、非对称分层量化)实现模型低比特压缩、性能加速的目的,同时做到无缝对接主流 NPU 加速引擎。
提供低比特量化精度补偿方案。
混合精度
为了充分发挥硬件计算资源,同时保证模型推理精度,支持混合精度计算模式。
轻量级部署
最新的 Tengine 核心模块代码采用 C 语言开发,无第三方库依赖,最小可执行静态库大小 < 100KB,甚至可在主流 MCU 上进行模型部署。
架构设计
Tengine 架构如下图
 Tengine 架构图
支持硬件
ARM CPU
Tengine 已完成对下列 ARM Cortex-A 系列处理器支持:
32bit
Cortex-A5
Cortex-A7
Cortex-A8
Cortex-A9
Cortex-A12
Cortex-A15
Cortex-A17
Cortex-A32
64bit
Cortex-A53
Cortex-A55
Cortex-A57
Cortex-A72
Cortex-A73
Cortex-A75
Cortex-A76
端侧 GPU
通过 ACL 已验证 ARM Mali-GPU 以下系列:
T860
G31
G52
通过 CUDA/TensorRT 已验证 NVIDIA 以下系列:
Jetson NANO
Jetson TX1
Jetson TX2
Jetson XAVIER NX
Jetson XAVIER AGX
通过 OpenCL 已验证以下型号:
测试中
通过 Vulkan 已验证以下型号:
测试中
服务器 GPU
通过 CUDA/TensorRT 已验证 NVIDIA 以下系列:
QUADRO RTX 8000
GeForce RTX 3090
GeForce GTX 1080Ti
NPU
通过 TIM-VX 已验证内置 VeriSilicon VIP8000/VIP9000 NPU 的以下芯片:
A311D
S905D3
iMX.8MP
JLQ
算子支持
| Tengine | Caffe | MXNet | TensorFlow | TF-Lite | ONNX |
|---|---|---|---|---|---|
| Accuracy | √ | ||||
| BatchNormalization | BatchNorm | BatchNorm | FusedBatchNorm | √ | |
| ComposedBN | |||||
| Resize | RESIZE_NEAREST_NEIGHBOR | ||||
| Concat | √ | √ | ConcatV2 | CONCATENATION | √ |
| Const | |||||
| Convolution | √ | √ | Conv2D | CONV_2D | Conv |
| DepthwiseConvolution | DepthwiseConv2dNative | DEPTHWISE_CONV_2D | |||
| ConvolutionDepthwise | |||||
| Deconvolution | √ | √ | Conv2DBackpropInput | ||
| DetectionOutput | √ | ||||
| Dropout | √ | Copy | √ | √ | |
| Eltwise | √ | _minus_scalar | Add | ADD | Add |
| _mul_scalar | Sub | SUB | Sub | ||
| elemwise_add | PROD | ||||
| Rsqrt | RSQRT | ||||
| _div_scalar | RealDiv | DIV | Div | ||
| Log | LOG | ||||
| Exp | EXP | Exp | |||
| Pow | POW | ||||
| Sqrt | SQRT | ||||
| Floor | FLOOR | Floor | |||
| Mul | MUL | Mul | |||
| Minimum | |||||
| AddN | |||||
| Flatten | √ | √ | √ | √ | |
| FullyConnected | InnerProduct | √ | MatMul | FULLY_CONNECTED | Gemm |
| Input | Data | FIFOQueueV2 | |||
| Input | |||||
| LRN | √ | √ | |||
| Normalize | √ | ||||
| Permute | √ | transpose | |||
| Pooling | √ | √ | AvgPool | AVERAGE_POOL_2D | AveragePool |
| GlobalAveragePool | |||||
| MaxPool | MAX_POOL_2D | MaxPool | |||
| PReLU | √ | LeakyReLU | PRelu | ||
| PriorBox | √ | ||||
| Region | √ | ||||
| ReLu | √ | Activation | Relu | Relu | |
| LeakyReLU | LeakyRelu | ||||
| ReLu6 | √ | clip | Relu6 | ||
| Reorg | √ | ||||
| Reshape | √ | √ | √ | RESHAPE | √ |
| ROIPooling | √ | ||||
| RPN | √ | ||||
| Scale | √ | ||||
| Slice | √ | √ | |||
| Softmax | √ | Activation | √ | SOFTMAX | √ |
| SoftmaxWithLoss | |||||
| SoftmaxOutput | |||||
| SoftmaxActivation | |||||
| Split | √ | √ | √ | ||
| DetectionPostProcess | TFLite_Detection_PostProcess | ||||
| Gemm | |||||
| Generic | DecodeWav | ||||
| AudioSpectrogram | |||||
| Mfcc | |||||
| Logistic | LOGISTIC | ||||
| LSTM | RNN | √ | |||
| RNN | √ | ||||
| Tanh | TanH | Activation | √ | √ | |
| Sigmoid | √ | Activation | √ | √ | |
| Squeeze | SQUEEZE | ||||
| Pad | √ | ||||
| MirrorPad | |||||
| StridedSlice | √ | STRIDED_SLICE | |||
| Reduction | √ | √ | Sum | SUM | |
| Mean | MEAN | ||||
| Asum | |||||
| Sqsum | |||||
| Max | |||||
| Min | |||||
| Prod | |||||
| L2 | |||||
| Logsum | |||||
| Logsumexp | |||||
| ArgMax | √ | ||||
| ArgMin | √ | ||||
| TopKV2 | √ | ||||
| Maximum | √ | ||||
| Minimum | √ | ||||
| Addn | add_n | ||||
| SwapAxis | √ | ||||
| GRU | RNN | √ | |||
| Upsample | √ | UpSampling | |||
| ShuffleChannel | √ | ||||
| Resize | √ | ResizeNearestNeighbor | |||
| ResizeBilinear | |||||
| SpaceToBatchND | √ | ||||
| BatchToSpaceND | √ | ||||
| Crop | √ | √ | |||
| Psroipooling | _contrib_PSROIPooling | ||||
| Roialign | _contrib_ROIAlign | ||||
| Expanddims | ExpandDims | ||||
| Unary | √ | ||||
| abs | Abs | ||||
| neg | Neg | ||||
| ceil | Ceil | ||||
| floor | Floor | ||||
| sin | Sin | ||||
| Asin | |||||
| cos | Cos | ||||
| Acos | |||||
| atan | Atan | ||||
| tan | Tan | ||||
| reciprocal | Reciprocal | ||||
| Square | |||||
| Sqrt | |||||
| Rsqrt | |||||
| Exp | |||||
| Log | |||||
| Bias | √ | ||||
| Noop | |||||
| Threshold | √ | ||||
| Hardsigmoid | |||||
| Embedding | √ | √ | √ | ||
| InstanceNorm | √ | ||||
| MVN | √ | ||||
| Absval | √ | ||||
| Cast | √ | ||||
| HardSwish | √ | ||||
| Interp | √ | UpSampling | Upsample | ||
| Selu | |||||
| Elu | √ | LeakyReLU | ELU | √ | |
| BroadMul | broadcast_mul | ||||
| Logical | LOGICALOR | ||||
| LOGICALAND | |||||
| Gather | GATHER | ||||
| Transpose | √ | TRANSPOSE | √ | ||
| Comparison | Equal | EQUAL | |||
| Greater | GREATER | ||||
| GreaterEqual | GREATER_EQUAL | ||||
| Less | LESS | ||||
| LessEqual | |||||
| LESS_GREATER | |||||
| SpaceToDepth | SPACE_TO_DEPTH | ||||
| DepthToSpace | DEPTH_TO_SPACE | ||||
| Reverse | ReverseV2 | REVERSE_V2 | |||
| SparseToDense | √ | SPARSE_TO_DENSE | |||
| Ceil | √ | CEIL | |||
| SquaredDifference | √ | SQUARED_DIFFERENCE | |||
| Round | √ | ROUND | |||
| ZerosLike | |||||
| Clip | Clip | Clip | |||
| Power | Power | ||||
| Tile | Tile | ||||
| L2Normalization | L2_NORMALIZATION | ||||
| L2Pool | L2_POOL_2D | ||||
| Relu1 | RELU_N1_TO_1 | ||||
| LogSoftmax | LOG_SOFTMAX | ||||
| Floor | Floor |
模型支持
Tengine 已完成对主流的计算机视觉模型的进行支持,包括分类、检测、识别、分割、关键点、OCR等功能。
支持的CPU架构:ARM、X86、MIPS、RISC-V ;
支持的GPU架构:NVIDIA valta TensorCore、Adreno、Mali ;
支持的NPU架构:NPU ;
| 类别 | 模型 | 支持平台 |
|---|---|---|
| 分类 | MobileNet V1 | CPU、GPU、NPU |
| 检测 | MobileNet-SSD | CPU、GPU、NPU |
| 识别 | MobileFaceNets | CPU、GPU |
| 检测 | YOLOv3 | CPU、GPU、NPU |
| 检测 | YOLOv3-Tiny | CPU、GPU、NPU |
| 检测 | YOLOv4 | CPU、GPU、NPU |
| 检测 | YOLOv4-Tiny | CPU、GPU、NPU |
| 检测 | YOLOv5 | CPU、GPU、NPU |
| 检测 | YOLOv5s | CPU、GPU、NPU |
| 检测 | YOLOvfastest | CPU、GPU、NPU |
| 人脸 | retinaface | CPU、GPU、NPU |
| 人脸 | ultraface | CPU、GPU |
| 分割 | YOLCAT | CPU、GPU |
| 关键点 | Landmark | CPU、GPU |
| 关键点 | Alphapose | CPU、GPU |
| 关键点 | Openpose | CPU、GPU |
| OCR | crnn_lite_dense | CPU、GPU |
提示:
模型链接来自 Tengine Model Zoo,我们将持续更新;
支持平台列表中的 NPU 中,部分模型采用异构计算实现,即 CPU+NPU。
模型仓库
百度网盘 (提取码:7ke5)
测试方法
Benchmark 是评估目标硬件平台网络模型运行速度的简单途径,只依赖于网络结构(xxx_benchmark.tmfile)即可。
测试模型获取
虽然可以直接使用完整的 tmfile 运行 benchmark 示例,但是我们建议采用 benchmark 专用 tmfile 模型,节省文件传输时间。
使用模型转换工具转换前,设置以下环境变量,将生成不带参数的 tmfile 文件,专门用于 benchmark 测试。
$ export TM_FOR_BENCHMARK=1
将原始框架模型转换为 tmfile benchmark 专用模型,以 Caffe 框架的 mobilenet_v1 举例:
$ ./convert_tm_tool -f caffe -p mobilenet_v1.prototxt -m mobilenet_v1.caffemodel -o mobilenet_v1_benchmark.tmfile
我们已经提前转换了一小部分评估模型在 benchmark/models 中。
获取
默认完成 Tengine 编译,目标平台的 benchmark 可执行程序存放在 build/install/bin/tm_benchmark
使用方法
$ ./tm_benchmark -h
[Usage]: [-h] [-r repeat_count] [-t thread_count] [-p cpu affinity, 0:auto, 1:big, 2:middle, 3:little] [-s net]
khadas@Khadas:~/tengine-lite/benchmark$ ../build/benchmark/tm_benchmark -r 5 -t 1 -p 1
start to run register cpu allocator
loop_counts = 5
num_threads = 1
power = 1
tengine-lite library version: 1.0-dev
squeezenet_v1.1 min = 55.66 ms max = 56.19 ms avg = 56.04 ms
mobilenetv1 min = 103.18 ms max = 105.37 ms avg = 104.26 ms
mobilenetv2 min = 91.46 ms max = 93.07 ms avg = 91.92 ms
mobilenetv3 min = 56.30 ms max = 57.17 ms avg = 56.64 ms
shufflenetv2 min = 29.92 ms max = 30.62 ms avg = 30.29 ms
resnet18 min = 162.31 ms max = 162.74 ms avg = 162.48 ms
resnet50 min = 495.61 ms max = 498.00 ms avg = 496.99 ms
googlenet min = 199.16 ms max = 200.32 ms avg = 199.72 ms
inceptionv3 min = 801.93 ms max = 813.71 ms avg = 807.08 ms
vgg16 min = 866.41 ms max = 877.53 ms avg = 871.45 ms
mssd min = 204.10 ms max = 208.92 ms avg = 206.05 ms
retinaface min = 28.57 ms max = 29.06 ms avg = 28.86 ms
yolov3_tiny min = 233.68 ms max = 235.12 ms avg = 234.19 ms
mobilefacenets min = 44.32 ms max = 44.82 ms avg = 44.60 ms
ALL TEST DONE
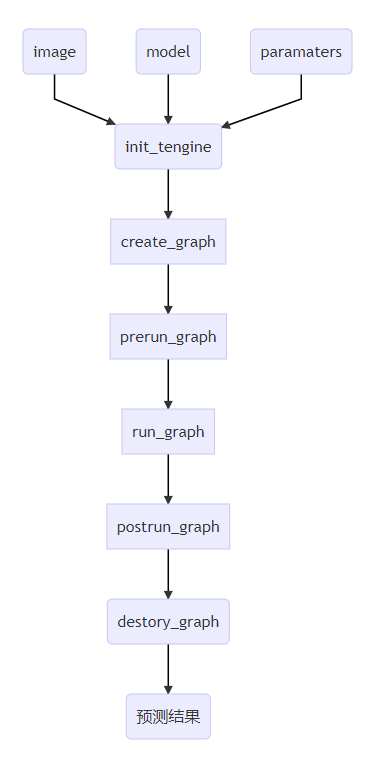
Tengine 推理流程
依照顺序调用Tengine核心API如下:
1. init_tengine
初始化Tengine,该函数在程序中只要调用一次即可。
2. create_graph
创建Tengine计算图。
3. prerun_graph
预运行,准备计算图推理所需资源。设置大小核,核个数、核亲和性、数据精度都在这里。
struct options
{
int num_thread;//核个数设置,
int cluster;//大小核设置,可选TENGINE_CLUSTER_[ALL,BIG,MEDIUM,LITTLE]
int precision;//精度设置,TENGINE_MODE_[FP32,FP16,HYBRID_INT8,UINT8,INT8]
uint64_t affinity;//核亲和性掩码,绑定具体核,
};
4. run_graph
启动Tengine计算图推理。
5. postrun_graph
停止运行graph,并释放graph占据的资源。
6. destroy_graph
销毁graph。
postrun_graph和destroy_graph在执行完模型推理后调用,一般是连续调用。 使用markdown流程图mermaid表示如下:
graph TD
A(init_tengine)
i1(image)-->A
i2(model)-->A
i3(paramaters)-->A
A --> B[create_graph]
B --> C[prerun_graph]
C --> D[run_graph]
D --> E[postrun_graph]
E --> F(destory_graph)
F --> O(预测结果)
 |
|---|
| 图1 推理流程图 |
示例展示
本章节展示的所有示例位于examples 。
准备工作
环境准备
要编译和运行示例程序,你需要准备:
1.一台可以编译C/C++ 的Linux环境的电脑(x86或Arm架构均可)。
2.下载Tengine源码,位于 Tengine 的分支 tengine-lite 上:
git clone -b tengine-lite https://github.com/OAID/Tengine.git Tengine
编译
build.sh 编译脚本默认配置已实现自动编译 examples 中的 demo 程序。
以x86架构为例,编译后demo 存放在 ./build/install/bin/ 目录下:
bug1989@DESKTOP-SGN0H2A:/mnt/d/ubuntu/gitlab/build-linux$ tree install
install
├── bin
│ ├── tm_alphapose
│ ├── tm_classification
│ ├── tm_classification_int8
│ ├── tm_classification_uint8
│ ├── tm_crnn
│ ├── tm_efficientdet
│ ├── tm_efficientdet_uint8
│ ├── tm_hrnet
│ ├── tm_landmark
│ ├── tm_landmark_uint8
│ ├── tm_mobilefacenet
│ ├── tm_mobilefacenet_uint8
│ ├── tm_mobilenet_ssd
│ ├── tm_mobilenet_ssd_uint8
│ ├── tm_nanodet_m
│ ├── tm_openpose
│ ├── tm_retinaface
│ ├── tm_ultraface
│ ├── tm_unet
│ ├── tm_yolact
│ ├── tm_yolact_uint8
│ ├── tm_yolofastest
│ ├── tm_yolov3
│ ├── tm_yolov3_tiny
│ ├── tm_yolov3_tiny_uint8
│ ├── tm_yolov3_uint8
│ ├── tm_yolov4
│ ├── tm_yolov4_tiny
│ ├── tm_yolov4_tiny_uint8
│ ├── tm_yolov4_uint8
│ ├── tm_yolov5
│ └── tm_yolov5s
├── include
│ └── tengine
│ └── c_api.h C预测库头文件
└── lib
├── libtengine-lite-static.a 静态预测库
└── libtengine-lite.so 动态预测库
模型仓库
模型仓库包含了运行examples所需模型、图片和文档。
百度网盘 (提取码:7ke5)
分类任务 - tm_classification.c
Tengine Lite 兼容 Tengine 原有的 C API 供用户使用,这里我们使用 C API 展示如何运行 tm_classification 例程运行 MobileNet v1 分类网络模型,实现指定图片分类的功能。让你快速上手 Tengine Lite C API。这里,我们使用在这个撸猫时代行业从业者大爱的 tiger cat 作为测试图片。
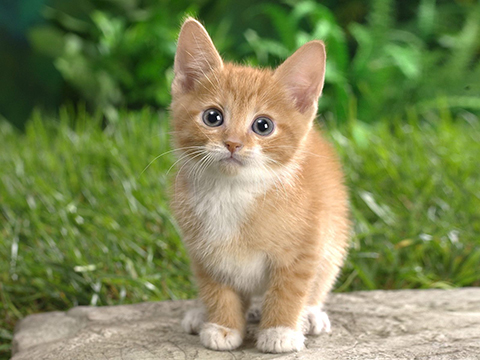
将测试图片和模型文件放在 Tengine-Lite 根目录下,运行:
$ export LD_LIBRARY_PATH=./build/install/lib
$ ./build/install/bin/tm_classification -m models/mobilenet.tmfile -i images/cat.jpg -g 224,224 -s 0.017,0.017,0.017 -w 104.007,116.669,122.679
结果如下:
tengine-lite library version: 1.4-dev
model file : models/mobilenet.tmfile
image file : images/cat.jpg
img_h, img_w, scale[3], mean[3] : 224 224 , 0.017 0.017 0.017, 104.0 116.7 122.7
Repeat 1 times, thread 1, avg time 33.74 ms, max_time 33.74 ms, min_time 33.74 ms
--------------------------------------
8.574144, 282
7.880117, 277
7.812573, 278
7.286458, 263
6.357486, 281
--------------------------------------
人脸关键点检测任务 - tm_landmark.cpp
使用图片:

$ export LD_LIBRARY_PATH=./build/install/lib
$ ./build/install/bin/tm_landmark -m models/landmark.tmfile -i images/mobileface02.jpg -r 1 -t 1
结果如下:
tengine-lite library version: 1.4-dev
Repeat [1] min 8.784 ms, max 8.784 ms, avg 8.784 ms

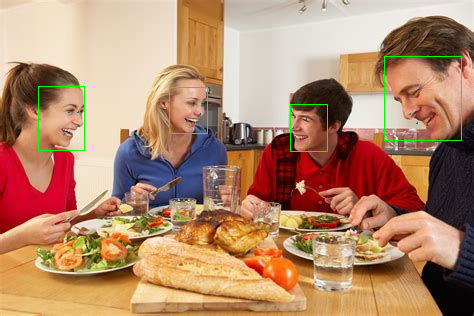
retinaface 人脸检测任务 - tm_retinaface.cpp
使用图片:

$ export LD_LIBRARY_PATH=./build/install/lib
$ ./build/install/bin/tm_retinaface -m models/retinaface.tmfile -i images/mtcnn_face4.jpg -r 1 -t 1
结果如下:
tengine-lite library version: 1.4-dev
img_h, img_w : 316, 474
Repeat 1 times, thread 1, avg time 28.78 ms, max_time 28.78 ms, min_time 28.78 ms
--------------------------------------
detected face num: 4
BOX 1.00:( 38.4053 , 86.142 ),( 46.3009 , 64.0174 )
BOX 0.99:( 384.076 , 56.9844 ),( 76.968 , 83.9609 )
BOX 0.99:( 169.196 , 87.1324 ),( 38.4133 , 46.8504 )
BOX 0.98:( 290.004 , 104.453 ),( 37.6346 , 46.7777 )
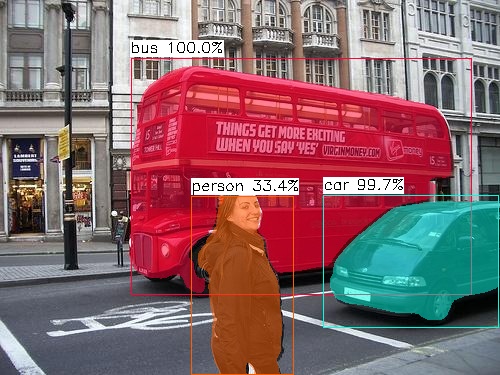
yolact 实例分割任务 - tm_yolact.cpp
使用图片:

$ export LD_LIBRARY_PATH=./build/install/lib
$ ./build/install/bin/tm_yolact -m models/yolact.tmfile -i images/ssd_car.jpg -r 1 -t 1
结果如下:
tengine-lite library version: 1.4-dev
Repeat 1 times, thread 1, avg time 2064.44 ms, max_time 2064.44 ms, min_time 2064.44 ms
--------------------------------------
6 = 0.99966 at 130.82 57.77 340.78 x 237.36
3 = 0.99675 at 323.39 194.97 175.57 x 132.96
1 = 0.33431 at 191.24 195.78 103.06 x 179.22
unet 图像分割任务 - tm_unet.cpp
使用图片:
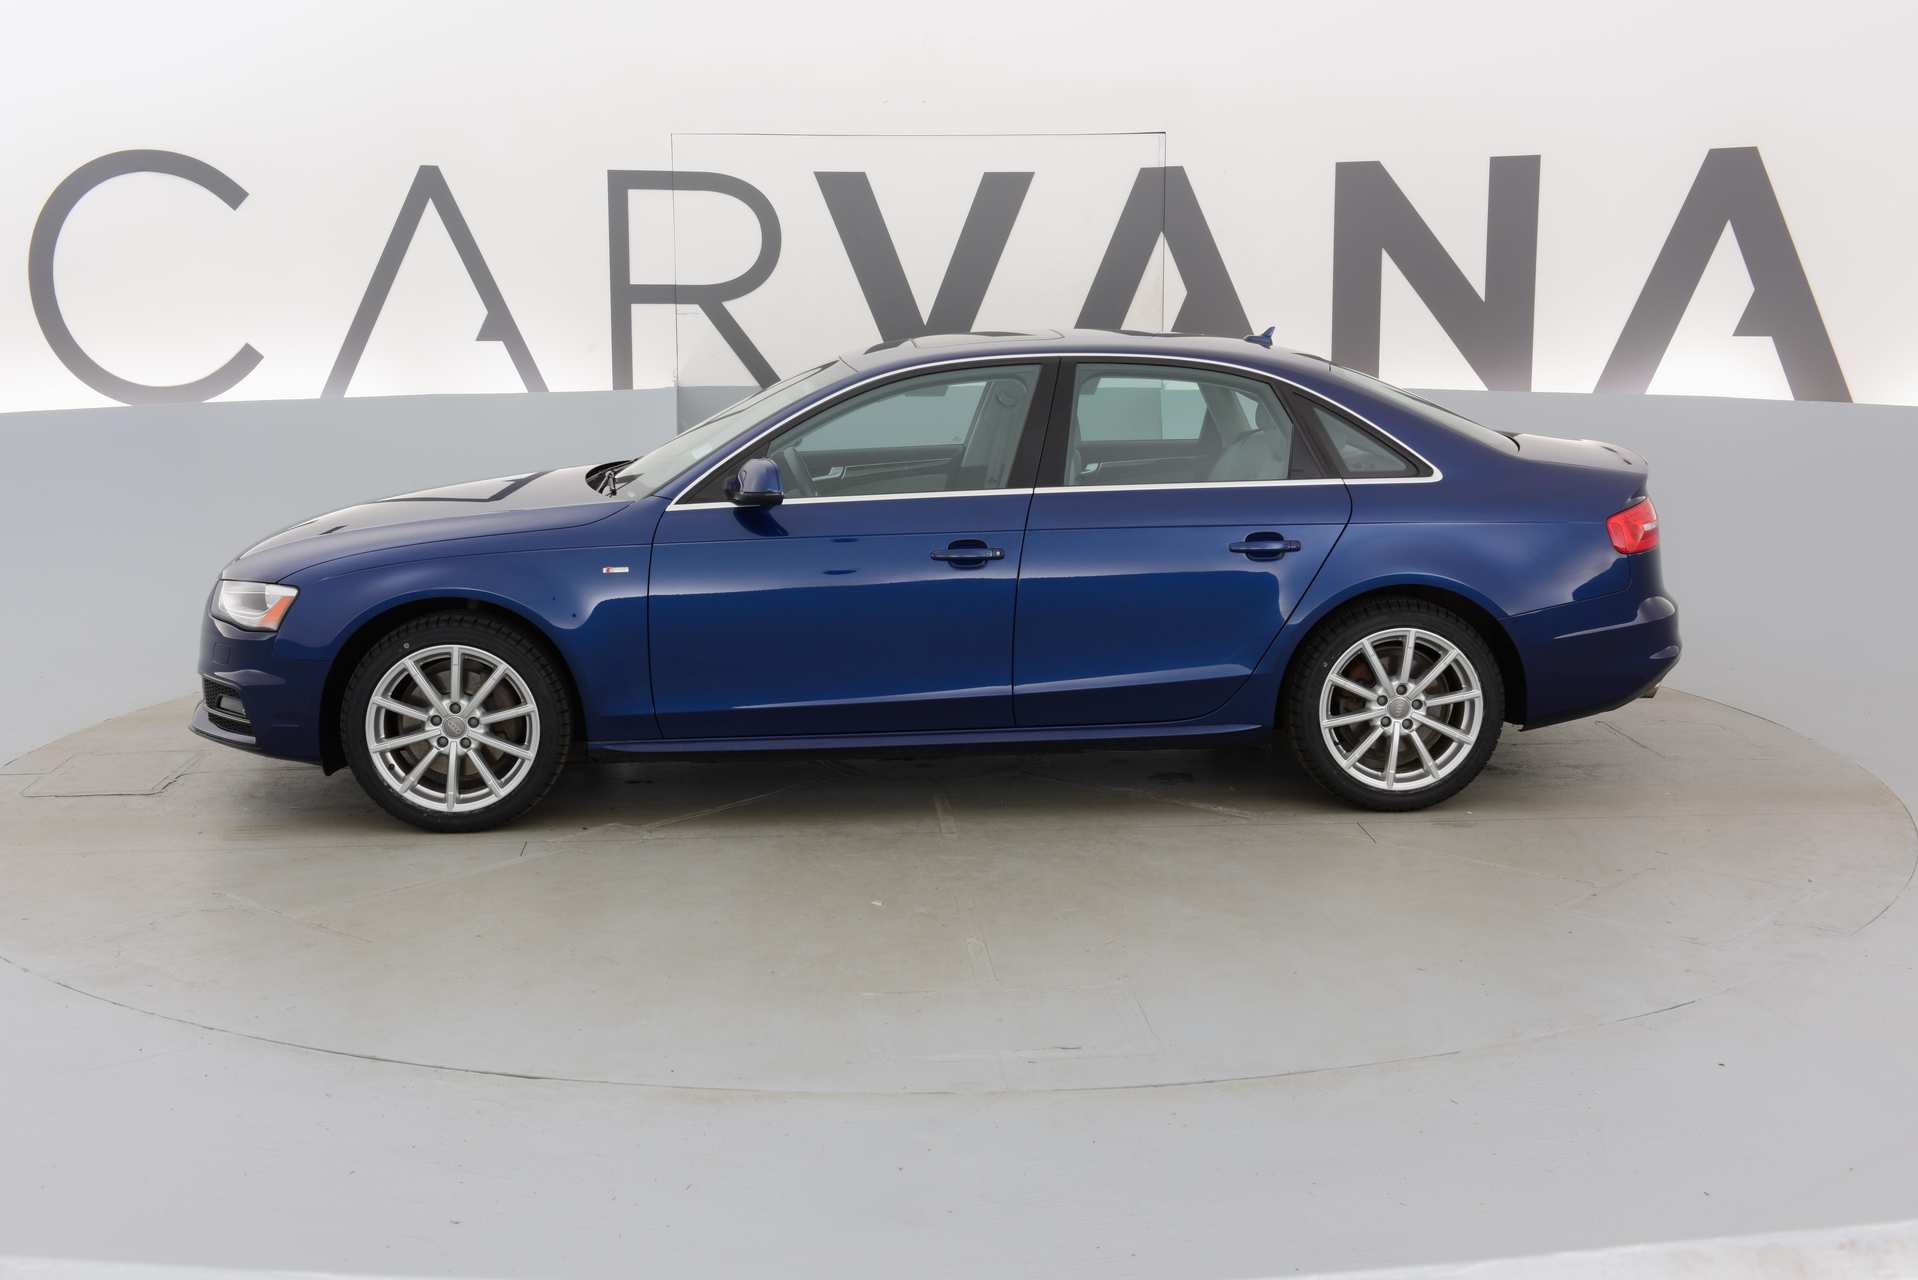
$ export LD_LIBRARY_PATH=./build/install/lib
$ ./build/install/bin/tm_unet -m models/unet_sim3.tmfile -i images/carvana01.jpg -r 1 -t 1
结果如下:
Image height not specified, use default 512
Image width not specified, use default 512
Scale value not specified, use default 0.00392, 0.00392, 0.00392
tengine-lite library version: 1.4-dev
model file : models/unet_sim3.tmfile
image file : images/carvana01.jpg
img_h, img_w, scale[3], mean[3] : 512 512 , 0.004 0.004 0.004, 0.0 0.0 0.0
Repeat 1 times, thread 1, avg time 4861.93 ms, max_time 4861.93 ms, min_time 4861.93 ms
--------------------------------------
segmentatation result is save as unet_out.png

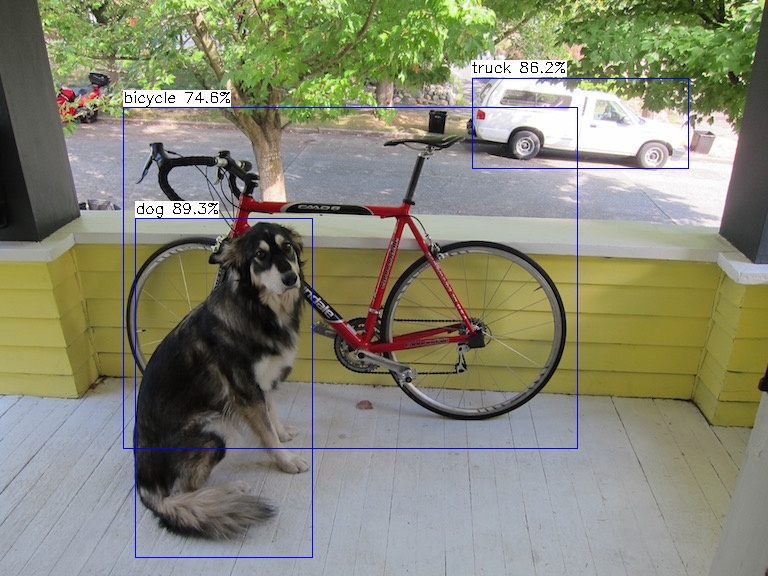
yolov5s目标检测任务 - tm_yolov5s.cpp
使用图片:
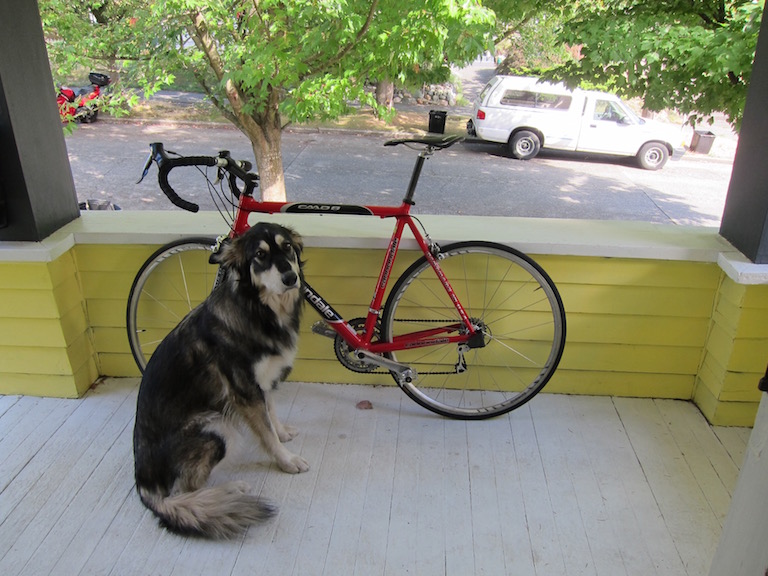
$ export LD_LIBRARY_PATH=./build/install/lib
$ ./build/install/bin/tm_yolov5s -m models/yolov5s.tmfile -i images/ssd_dog.jpg -r 1 -t 1
结果如下:
tengine-lite library version: 1.4-dev
Repeat 1 times, thread 1, avg time 462.94 ms, max_time 462.94 ms, min_time 462.94 ms
--------------------------------------
detection num: 3
16: 89%, [ 135, 218, 313, 558], dog
7: 86%, [ 472, 78, 689, 169], truck
1: 75%, [ 123, 107, 578, 449], bicycle
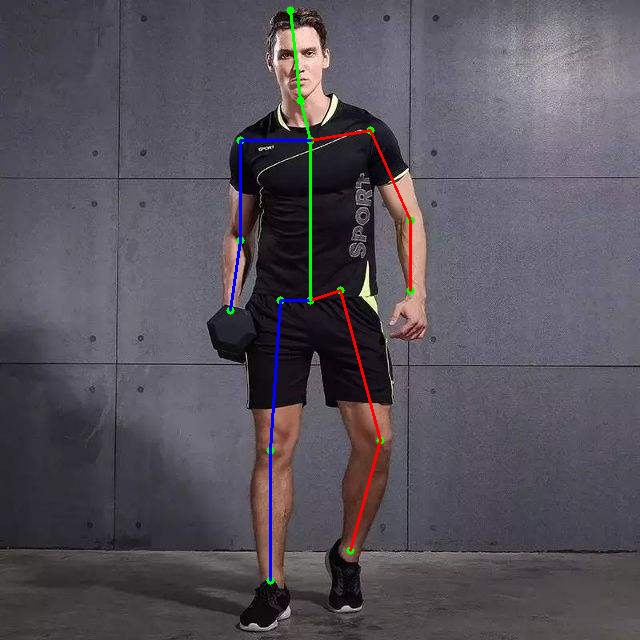
hrnet人体姿态识别任务 - tm_hrnet.cpp
使用图片:

$ export LD_LIBRARY_PATH=./build/install/lib
$ ./build/install/bin/tm_hrnet -m models/hrnet.tmfile -i images/pose.jpg -r 1 -t 1
结果如下:
tengine-lite library version: 1.4-dev
Repeat [1] min 416.223 ms, max 416.223 ms, avg 416.223 ms
x: 27, y: 58, score: 0.91551
x: 27, y: 45, score: 0.865156
x: 28, y: 30, score: 0.831916
x: 34, y: 29, score: 0.839507
x: 38, y: 44, score: 0.88559
x: 35, y: 55, score: 0.891349
x: 31, y: 30, score: 0.873104
x: 31, y: 14, score: 0.928233
x: 30, y: 10, score: 0.948434
x: 29, y: 1, score: 0.915752
x: 23, y: 31, score: 0.811694
x: 24, y: 24, score: 0.935574
x: 24, y: 14, score: 0.899991
x: 37, y: 13, score: 0.908696
x: 41, y: 22, score: 0.902927
x: 41, y: 29, score: 0.847032
汉字识别任务 - tm_crnn.cpp
模型文件:crnn_lite_dense.tmfile
测试图片:o2_resize.jpg
字库文件:keys.txt
测试图片:

$ export LD_LIBRARY_PATH=./build/install/lib
$ ./build/install/bin/tm_crnn -m models/crnn_lite_dense.tmfile -i images/o2_resize.jpg -l files/keys.txt
结果如下:
tengine-lite library version: 1.4-dev
Repeat 1 times, thread 1, avg time 23.30 ms, max_time 23.30 ms, min_time 23.30 ms
--------------------------------------
如何突破自己的颜值上限
--------------------------------------
其中ocr的识别结果会直接打印到终端中, 同时如果需要保存为txt文件可以修改源码使其重定向到文件。
我们将持续更新各种有趣的 demo ,敬请期待……
模型转换工具
Tengine Convert Tool 支持将多种训练框架模型转换成 Tengine 推理框架适配的模型格式 tmfile。最新版本已支持以下框架模型:
Caffe
MXNet
PyTorch(ONNX)
TensorFlow
TFLite
Darknet
MegEngine
OneFlow
PaddlePalle 2.0
同时 Tengine Convert Tool 还支持将其他优秀的端侧框架模型转换成 Tengine 推理框架适配的模型格式 tmfile。最新版本已支持以下框架模型:
ncnn
依赖库安装
sudo apt install libprotobuf-dev protobuf-compiler
源码编译
mkdir build && cd build
cmake ..
make -j`nproc` && make install
编译完成后,生成的可执行文件 tm_convert_tool 存放在 ./build/install/bin/ 目录下。
执行模型转换
命令解析
$ ./tm_convert_tool -h
[Convert Tools Info]: optional arguments:
-h help show this help message and exit
-f input type path to input float32 tmfile
-p input structure path to the network structure of input model(*.prototxt, *.symbol, *.cfg)
-m input params path to the network params of input model(*.caffemodel, *.params, *.weight, *.pb, *.onnx, *.tflite)
-o output model path to output fp32 tmfile
Caffe
./tm_convert_tool -f caffe -p mobilenet.prototxt -m mobilenet.caffemodel -o mobilenet.tmfile
MXNet
./tm_convert_tool -f mxnet -p mobilenet.json -m mobilene.params -o mobileent.tmfile
ONNX
./tm_convert_tool -f onnx -m mobilenet.onnx -o mobilenet.tmfile
TensorFlow
./tm_convert_tool -f tensorflow -m mobielenet_v1_1.0_224_frozen.pb -o mobilenet.tmfile
TFLite
./tm_convert_tool -f tflite -m mobielenet.tflite -o mobilenet.tmfile
Darknet
./tm_convert_tool -f darknet -p yolov3.cfg -m yolov3.weights -o yolov3.tmfile
MegEngine
./tm_convert_tool -f megengine -m mobilenet.pkl -o mobilenet.tmfile
OneFlow
./tm_convert_tool -f oneflow -p mobilenet.prototxt -m mobilenet/ -o mobilenet.tmfile
ncnn
./tm_convert_tool -f ncnn -p mobilenet.param -m mobilenet.bin -o mobilenet.tmfile
模型量化-对称量化
为了支持在 AIoT 设备上部署 int8 模型,我们提供了一些通用的 post training quantization 工具,可以将 Float32 tmfile 模型转换为 int8 tmfile 模型。
对称分通道量化
| Type | Note |
|---|---|
| Adaptive | TENGINE_MODE_INT8 |
| Activation data | Int8 |
| Weight date | Int8 |
| Bias date | Int32 |
| Example | tm_classification_int8.c |
| Execution environment | Ubuntu 18.04 |
适配硬件
CPU Int8 mode
TensorRT Int8 mode
下载
当前我们提供预编译好的可执行文件, 您可以从这里获取 quant_tool_int8
安装依赖库
sudo apt install libopencv-dev
运行参数
$ ./quant_tool_int8 -h
[Quant Tools Info]: optional arguments:
-h help show this help message and exit
-m input model path to input float32 tmfile
-i image dir path to calibration images folder
-o output model path to output int8 tmfile
-a algorithm the type of quant algorithm(0:min-max, 1:kl, default is 1)
-g size the size of input image(using the resize the original image,default is 3,224,224
-w mean value of mean (mean value, default is 104.0,117.0,123.0
-s scale value of normalize (scale value, default is 1.0,1.0,1.0)
-b swapRB flag which indicates that swap first and last channels in 3-channel image is necessary(0:OFF, 1:ON, default is 1)
-c center crop flag which indicates that center crop process image is necessary(0:OFF, 1:ON, default is 0)
-y letter box flag which indicates that letter box process image is necessary(maybe using for YOLO, 0:OFF, 1:ON, default is 0)
-t num thread count of processing threads(default is 4)
示例
使用量化工具前, 你需要 Float32 tmfile 和 Calibration Dataset(量化校准数据集)。
校准数据内容,尽可能的覆盖该模型的所有应用场景,一般我们的经验是从训练集中随机抽取;
校准数据张数,根据经验我们建议使用 500-1000 张。
$ .quant_tool_int8 -m ./mobilenet_fp32.tmfile -i ./dataset -o ./mobilenet_int8.tmfile -g 3,224,224 -w 104.007,116.669,122.679 -s 0.017,0.017,0.017
---- Tengine Post Training Quantization Tool ----
Version : v1.0, 17:32:30 Dec 24 2020
Status : int8, per-channel, symmetric
Input model : ./mobilenet_fp32.tmfile
Output model: ./mobilenet_int8.tmfile
Calib images: ./dataset
Algorithm : KL
Dims : 3 224 224
Mean : 104.007 116.669 122.679
Scale : 0.017 0.017 0.017
BGR2RGB : ON
Center crop : OFF
Letter box : OFF
Thread num : 1
[Quant Tools Info]: Step 0, load FP32 tmfile.
[Quant Tools Info]: Step 0, load FP32 tmfile done.
[Quant Tools Info]: Step 0, load calibration image files.
[Quant Tools Info]: Step 0, load calibration image files done, image num is 55.
[Quant Tools Info]: Step 1, find original calibration table.
[Quant Tools Info]: Step 1, find original calibration table done, output ./table_minmax.scale
[Quant Tools Info]: Step 2, find calibration table.
[Quant Tools Info]: Step 2, find calibration table done, output ./table_kl.scale
[Quant Tools Info]: Thread 1, image nums 55, total time 1964.24 ms, avg time 35.71 ms
[Quant Tools Info]: Calibration file is using table_kl.scale
[Quant Tools Info]: Step 3, load FP32 tmfile once again
[Quant Tools Info]: Step 3, load FP32 tmfile once again done.
[Quant Tools Info]: Step 3, load calibration table file table_kl.scale.
[Quant Tools Info]: Step 4, optimize the calibration table.
[Quant Tools Info]: Step 4, quantize activation tensor done.
[Quant Tools Info]: Step 5, quantize weight tensor done.
[Quant Tools Info]: Step 6, save Int8 tmfile done, ./mobilenet_int8.tmfile
---- Tengine Int8 tmfile create success, best wish for your INT8 inference has a low accuracy loss...\(^0^)/ ----
模型量化-非对称量化
为了支持在 AIoT 设备上部署 uint8 模型,我们提供了一些通用的 post training quantization 工具,可以将 Float32 tmfile 模型转换为 int8 tmfile 模型。
非对称分层量化
| Type | Note |
|---|---|
| Adaptive | TENGINE_MODE_UINT8 |
| Activation data | UInt8 |
| Weight date | UInt8 |
| Bias date | Int32 |
| Example | tm_classification_uint8.c |
| Execution environment | Ubuntu 18.04 |
适配硬件
CPU Uint8 mode
TIM-VX NPU(such as A311D、i.MX8M Plus、RV1126?)
下载
当前我们提供预编译好的可执行文件, 您可以从这里获取 quant_tool_uint8.
安装依赖库
sudo apt install libopencv-dev
运行参数
$ ./quant_tool_uint8 -h
[Quant Tools Info]: optional arguments:
-h help show this help message and exit
-m input model path to input float32 tmfile
-i image dir path to calibration images folder
-o output model path to output int8 tmfile
-a algorithm the type of quant algorithm(0:min-max, 1:kl, default is 1)
-g size the size of input image(using the resize the original image,default is 3,224,224
-w mean value of mean (mean value, default is 104.0,117.0,123.0
-s scale value of normalize (scale value, default is 1.0,1.0,1.0)
-b swapRB flag which indicates that swap first and last channels in 3-channel image is necessary(0:OFF, 1:ON, default is 1)
-c center crop flag which indicates that center crop process image is necessary(0:OFF, 1:ON, default is 0)
-y letter box flag which indicates that letter box process image is necessary(maybe using for YOLO, 0:OFF, 1:ON, default is 0)
-t num thread count of processing threads(default is 4)
示例
使用量化工具前, 你需要 Float32 tmfile 和 Calibration Dataset(量化校准数据集)。
校准数据内容,尽可能的覆盖该模型的所有应用场景,一般我们的经验是从训练集中随机抽取;
校准数据张数,根据经验我们建议使用 500-1000 张。
$ .quant_tool_uint8 -m ./mobilenet_fp32.tmfile -i ./dataset -o ./mobilenet_uint8.tmfile -g 3,224,224 -w 104.007,116.669,122.679 -s 0.017,0.017,0.017
---- Tengine Post Training Quantization Tool ----
Version : v1.0, 18:06:10 Mar 4 2021
Status : uint8, per-layer, asymmetric
Input model : ./mobilenet_fp32.tmfile
Output model: ./mobilenet_uint8.tmfile
Calib images: ./dataset
Algorithm : MIN MAX
Dims : 3 224 224
Mean : 104.007 116.669 122.679
Scale : 0.017 0.017 0.017
BGR2RGB : ON
Center crop : OFF
Letter box : OFF
Thread num : 1
[Quant Tools Info]: Step 0, load FP32 tmfile.
[Quant Tools Info]: Step 0, load FP32 tmfile done.
[Quant Tools Info]: Step 0, load calibration image files.
[Quant Tools Info]: Step 0, load calibration image files done, image num is 55.
[Quant Tools Info]: Step 1, find original calibration table.
[Quant Tools Info]: Step 1, images 00055 / 00055
[Quant Tools Info]: Step 1, find original calibration table done, output ./table_minmax.scale
[Quant Tools Info]: Step 2, find calibration table.
[Quant Tools Info]: Step 2, images 00001 / 00055
[Quant Tools Info]: Step 2, find calibration table done, output ./table_kl.scale
[Quant Tools Info]: Thread 1, image nums 55, total time 1195.07 ms, avg time 21.73 ms
[Quant Tools Info]: Calibration file is using table_minmax.scale
[Quant Tools Info]: Step 3, load FP32 tmfile once again
[Quant Tools Info]: Step 3, load FP32 tmfile once again done.
[Quant Tools Info]: Step 3, load calibration table file table_minmax.scale.
[Quant Tools Info]: Step 4, optimize the calibration table.
[Quant Tools Info]: Step 4, quantize activation tensor done.
[Quant Tools Info]: Step 5, quantize weight tensor done.
[Quant Tools Info]: Step 6, save Int8 tmfile done, ./mobilenet_uint8.tmfile
---- Tengine Int8 tmfile create success, best wish for your INT8 inference has a low accuracy loss...\(^0^)/ ----
模型可视化工具
简介
Netron 是常用的机器学习模型可视化工具。
目的
适配 Netron 项目,使其支持解析 tmfile,可视化 Tengine 模型。
Tengine模型
Tengine 模型为后缀 ”.tmfile”文件,由 Tengine: Covert Tool 通过其他训练框架转换得到,存储数据格式为二进制。
原理介绍
Netron 是基于 Node.js 开发的 Electron 应用程序,使用的语言是 javascript;
Electron 应用程序是使用 javascript 开发的跨平台、应用程序框架;
Netron 在解析模型文件后,读取到 a) 模型信息,Model Properties; b) 模型输入、输出,Model Inputs/Outputs,包含输入数据尺寸; c) 模型绘图,左侧显示模型结构; d) 节点信息,Node Properties,Attributes,Inputs, Outputs等;
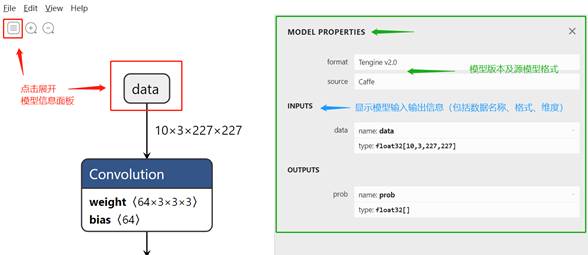
Model Properties
进入Netron界面后,点左上角图标或点击灰色节点(如 图1 中红色标记所示),弹出右侧边栏:Model Properties。
 |
|---|
| 图1 模型信息 Model Properties |
(1) MODEL PROPERTIES
a) format:解析到 Tengine 模型文件时显示 Tengine V2.0; b) source: 源模型格式,如通过 Caffe 转换成 tmfile,则显示 Caffe;如通过TensorFlow 转换成 tmfile,则显示 TensorFlow;
(2) INPUTS
a) data:
name: 输入 tensor 的名称,如此处为 data; type: 数据类型,此处为 FP32 格式;维度信息,此模型为 [10,3,227,227];
(3) OUTPUTS
a) prob:
name: 输出 tensor 的名称,如此处为 prob; type: 数据类型,此处为 FP32 格式;维度信息位置,须经过 infershape 后由 Tengine 计算得到输出尺寸。
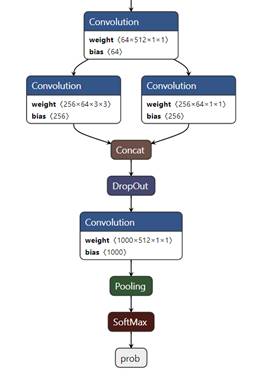
模型绘图
Tengine 中,模型通过 tensor 连接。
节点 Node 连线形成网络,并根据不同算子类型显示不同颜色。如 ”layer” 类型节点显示为蓝色,”Activation” 相关节点显示为深红色,”Normalize” 相关节点显示为深绿色。 Convolution 算子默认显示 weight 和 bias 维度信息。
 |
|---|
| 图2 模型绘图 |
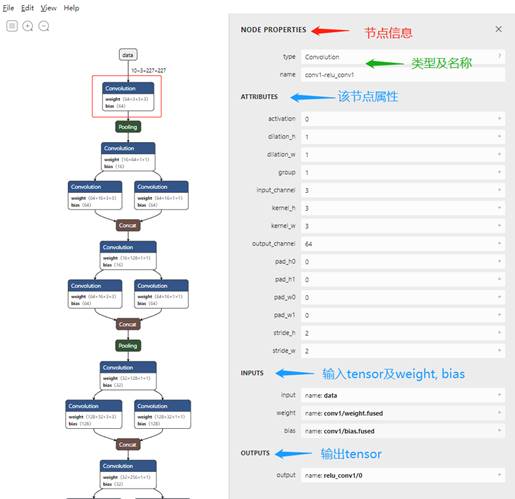
节点信息
节点为 Node,每个节点包含一个算子 Operator。
算子具有类型type、名称name、属性ATTRIBUTES及输入INPUTS、输出OUTPUTS。
 |
|---|
| 图2 模型绘图 |
点击绘图区的Node,右侧弹出该节点的详细信息,其中包括:
(1) NODE PROPERTIES:
a) type: 算子类型,如Convolution算子则显示Convolution;
b) name: 节点名称,如节点名为conv-relu_conv1(绘图区被选中、红色标记的Convolution节点);
(2) ATTRIBUTIES: 有参数的算子会显示,无参数的算子不显示;根据算子类型的不同,显示不同的ATTRIBUTES列表;如【5 不同算子的Attributes】根据不同算子类型有详细列表。
(3) INPUTS: 显示该节点的输入,其中:
a) input:显示输入tensor名称,即前一个 Node 的输出;
b) weight/bias/…:为输入的其他参数,如 weight,bias等。在Tengine中,weight、bias等作为 Node,以输出 tensor 的形式,传递数据给其对应的节点。
(4) OUTPUTS: 输出tensor:
此处conv-relu_conv1节点的输出实际为Convolution后Relu的输出,其中 Relu 节点在模型转换时被融合进Convolution节点,此处不影响计算;
此输出 tensor 对应下一个 Node 的输入。
不同算子的Attributes
目前提供92个 Node 类型(即算子类型,但包括了对 INPUT 和 Const 的处理)的解析。
算子列表
其中无参数算子如下表:
| 编号 | 算子 | 分类 |
|---|---|---|
| 0 | Accuracy | / |
| 4 | Const | / |
| 8 | DropOut | Dropout |
| 12 | INPUT | INPUT |
| 17 | Prelu | Activation |
| 21 | ReLU6 | Activation |
| 29 | Split | Shape |
| 33 | Logistic | Activation |
| 36 | TanH | Activation |
| 37 | Sigmoid | Activation |
| 39 | FusedbnScaleRelu | Activation |
| 46 | Max | Layer |
| 47 | Min | Layer |
| 62 | Noop | Layer |
| 68 | Absval | Data |
| 74 | BroadMul | Layer |
| 81 | Reverse | Shape |
| 83 | Ceil | Layer |
| 84 | SquaredDifference | Layer |
| 85 | Round | Layer |
| 86 | ZerosLike | Layer |
| 90 | Mean | Layer |
| 91 | MatMul | Layer |
| 94 | Shape | Shape |
| 95 | Where | / |
| 97 | Mish | Activation |
| 98 | Num | Layer |
(表中“分类”一栏对算子进行了分类,与其显示颜色有关,“/”代表未知分类。)
有参数算子如下表:
| 编号 | 算子 | 分类 |
|---|---|---|
| 1 | BatchNormalization | Normalization |
| 2 | BilinearResize | Shape |
| 3 | Concat | Shape |
| 5 | Convolution | Layer |
| 6 | DeConvolution | Layer |
| 7 | DetectionOutput | Layer |
| 9 | Eltwise | / |
| 10 | Flatten | Shape |
| 11 | FullyConnected | Layer |
| 13 | LRN | Normalization |
| 14 | Normalize | Normalization |
| 15 | Permute | Shape |
| 16 | Pooling | Pool |
| 18 | PriorBox | / |
| 19 | Region | / |
| 20 | ReLU | Activation |
| 22 | Reorg | Shape |
| 23 | Reshape | Shape |
| 24 | RoiPooling | Pool |
| 25 | RPN | / |
| 26 | Scale | Layer |
| 27 | Slice | Shape |
| 28 | SoftMax | Activation |
| 30 | DetectionPostProcess | Layer |
| 31 | Gemm | / |
| 32 | Generic | / |
| 34 | LSTM | Layer |
| 35 | RNN | Layer |
| 38 | Squeeze | Shape |
| 40 | Pad | Layer |
| 41 | StridedSlice | Shape |
| 42 | ArgMax | Layer |
| 43 | ArgMin | Layer |
| 44 | TopKV2 | Layer |
| 45 | Reduction | / |
| 48 | GRU | Layer |
| 49 | Addn | / |
| 50 | SwapAxis | Shape |
| 51 | Upsample | Data |
| 52 | SpaceToBatchND | Shape |
| 53 | BatchToSpaceND | Shape |
| 54 | Resize | Data |
| 55 | ShuffleChannel | Shape |
| 56 | Crop | Shape |
| 57 | ROIAlign | / |
| 58 | Psroipooling | Pool |
| 59 | Unary | / |
| 60 | Expanddims | Shape |
| 61 | Bias | Layer |
| 63 | Threshold | Activation |
| 64 | Hardsigmoid | Activation |
| 65 | Embed | Transform |
| 66 | InstanceNorm | Normalization |
| 67 | MVN | / |
| 69 | Cast | / |
| 70 | HardSwish | Activation |
| 71 | Interp | Layer |
| 72 | SELU | Activation |
| 73 | ELU | Activation |
| 75 | Logical | Layer |
| 76 | Gather | Data |
| 77 | Transpose | Transform |
| 78 | Comparison | Layer |
| 79 | SpaceToDepth | Shape |
| 80 | DepthToSpace | Shape |
| 82 | SparseToDense | Shape |
| 87 | Clip | Layer |
| 88 | Unsqueeze | Transform |
| 89 | ReduceL2 | Layer |
| 92 | Expand | Layer |
| 93 | Scatter | Layer |
| 96 | Tile | Layer |
(表中“分类”一栏对算子进行了分类,与其显示颜色有关,“/”代表未知分类。)
有参数算子属性列表
BatchNormalization
| 参数 | 数据类型 | 说明 |
|---|---|---|
| rescale_factor | float32 | 默认值 1 |
| eps | float32 | 默认值 1e-5 |
| caffe_flavor | int32 | 默认值 0 |
BilinearResize
| 参数 | 数据类型 | 说明 |
|---|---|---|
| scale_x | float32 | 水平方向变换因子 |
| scale_y | float32 | 垂直方向变换因子 |
| type | int32 | 0: NEAREST_NEIGHBOR 1: BILIEAR |
Concat
| 参数 | 数据类型 | 说明 |
|---|---|---|
| axis | int32 | 合并操作轴,支持“0,1,2,3”,NCHW 默认为1, NHWC 默认为3. |
Convolution
| 参数 | 数据类型 | 说明 |
|---|---|---|
| kernel_h | int32 | 垂直方向 Kernel 大小,默认值为1 |
| kernel_w | int32 | 水平方向 Kernel 大小,默认值为1 |
| stride_h | int32 | 垂直方向 Stride 大小,默认值为1 |
| stride_w | int32 | 水平方向 Stride 大小,默认值为1 |
| dilation_h | int32 | 垂直方向空洞因子值,默认值为1 |
| dilation_w | int32 | 水平方向空洞因子值, 默认值为1 |
| input_channel | int32 | 输入特征图通道数(creat_graph后) |
| output_channel | int32 | 输出特征图通道数 |
| group | int32 | 分组数,默认值为 1 |
| activation | int32 | 是否和Relu合并,0:RELU 1: RELU1 6: RELU6,默认值为-1 |
| pad_h0 | int32 | top padding rows,默认值为0 |
| pad_w0 | int32 | left padding columns,默认值为0 |
| pad_h1 | int32 | bottom padding rows,默认值为0 |
| pad_w1 | int32 | right padding columns,默认值为0 |
DeConvolution
| 参数 | 数据类型 | 说明 |
|---|---|---|
| num_output | int32 | 输出元素个数 |
| kernel_h | int32 | 垂直方向 Kernel 大小 |
| kernel_w | int32 | 水平方向 Kernel 大小 |
| stride_h | int32 | 垂直方向 Stride 大小 |
| stride_w | int32 | 水平方向 Stride 大小 |
| pad_w0 | int32 | left padding columns |
| pad_h0 | int32 | top padding rows |
| pad_w1 | int32 | right padding columns |
| pad_h1 | int32 | bottom padding rows |
| dilation_h | int32 | 垂直方向空洞因子值 |
| dilation_w | int32 | 水平方向空洞因子值 |
| group | int32 | 分组数,默认值为 1 |
| activation | int32 | 是否和Relu合并,0:RELU 1: RELU1 6: RELU6 |
DetectionOutput
| 参数 | 数据类型 | 说明 |
|---|---|---|
| num_classes | int32 | 检测类别数 |
| keep_top_k | int32 | NMS操作后, bounding box 个数 |
| nms_top_k | int32 | NMS操作前,置信度高的预测框的个数 |
| confidence_threshold | float32 | 置信度阈值 |
| nms_threshold | float32 | 非极大值抑制阈值 |
Eltwise
| 参数 | 数据类型 | 说明 |
|---|---|---|
| type | uint32 | 0: ELT_PROD 1: ELT_PROD_SCALAR 2: ELT_SUM 3: ELT_SUM_SCALAR 4: ELT_SUB 5: ELT_SUB_SCALAR 6: ELT_MAX 7: ELT_RSQRT 8: ELT_DIV 9: ELT_LOG 10: ELT_EXP 11: ELT_SQRT 12: ELT_FLOOR 13: ELT_SQUARE 14: ELT_POW 15: ELT_POWER |
| caffe_flavor | int32 | 是否支持caffe 格式 1:表示caffe 框架计算模式 |
Flatten
| 参数 | 数据类型 | 说明 |
|---|---|---|
| axis | int32 | 起始轴 |
| end_axis | int32 | 终止轴 |
FullyConnected
| 参数 | 数据类型 | 说明 |
|---|---|---|
| num_output | int32 | 输出特征图大小 |
LRN
| 参数 | 数据类型 | 说明 |
|---|---|---|
| local_size | int32 | 归一化区域大小 |
| alpha | float32 | 默认为1e-05 |
| beta | float32 | 默认为0.75 |
| norm_region | int32 | Norm 范围 |
| k | float32 | 默认为2 |
Normalize
| 参数 | 数据类型 | 说明 |
|---|---|---|
| across_spatial | int32 | 表示是否对整个图片进行归一化 |
| channel_shared | int32 | 表示 scale 是否相同 |
Permute
| 参数 | 数据类型 | 说明 |
|---|---|---|
| flag | int32 | 未使用 |
| order0 | int32 | permute 之前的轴 |
| order1 | int32 | permute 之前的轴 |
| order2 | int32 | permute 之前的轴 |
| order3 | int32 | permute 之前的轴 |
Pooling
| 参数 | 数据类型 | 说明 |
|---|---|---|
| alg | int32 | 说明 pooling的计算方法,0 :MaxPooling 1:AvgPooling |
| kernel_h | int32 | 垂直方向 Kernel 大小 |
| kernel_w | int32 | 水平方向 Kernel 大小 |
| stride_h | int32 | 垂直方向 Stride 大小 |
| stride_w | int32 | 水平方向 Stride 大小 |
| global | int32 | 1:Global Pooling 标志 |
| caffe_flavor | int32 | 1:Caffe 框架特殊处理标志 |
| pad_h0 | int32 | top padding columns |
| pad_w0 | int32 | left padding rows |
| pad_h1 | int32 | bottom padding columns |
| pad_w1 | int32 | right padding rows |
PriorBox
| 参数 | 数据类型 | 说明 |
|---|---|---|
| offset_vf_min_size | tm_uoffset_t | offset of TM2_Vector_floats |
| offset_vf_max_size | tm_uoffset_t | offset of TM2_Vector_floats |
| offset_vf_variance | tm_uoffset_t | offset of TM2_Vector_floats |
| offset_vf_aspect_ratio | tm_uoffset_t | offset of TM2_Vector_floats |
| flip | int32 | 是否翻转,默认值为 0 |
| clip | int32 | 是否裁剪,默认值为 0 |
| img_size | int32 | 候选框大小 |
| img_h | int32 | 候选框在 height 上的偏移 |
| img_w | int32 | 候选框在 width 上的偏移 |
| step_w | float32 | 候选框在 width 上的步长 |
| step_h | float32 | 候选框在 height 上的步长 |
| offset | float32 | 候选框中心位移 |
| num_priors | int32 | 默认候选框个数 |
| out_dim | int32 | 输出个数 |
Region
| 参数 | 数据类型 | 说明 |
|---|---|---|
| num_classes | int32 | 检测类别总数 |
| side | int32 | NULL |
| num_box | int32 | 候选框数 |
| coords | int32 | 坐标个数 |
| confidence_threshold | float32 | 置信度阈值 |
| nms_threshold | float32 | 非极大值抑制阈值 |
| offset_vf_biases | tm_uoffset_t | offset of TM2_Vector_floats |
ReLU
| 参数 | 数据类型 | 说明 |
|---|---|---|
| negative_slope | float32 | 对标准的ReLU函数进行变化,默认值为0 |
Reorg
| 参数 | 数据类型 | 说明 |
|---|---|---|
| Stride | int32 | 步进大小 |
Reshape
| 参数 | 数据类型 | 说明 |
|---|---|---|
| dim_0 | int32 | Batch |
| dim_1 | int32 | Channel |
| dim_2 | int32 | Height |
| dim_3 | int32 | Width |
| dim_size | int32 | Dim 大小 |
| axis | int32 | 指定 reshape 维度 |
RoiPooling
| 参数 | 数据类型 | 说明 |
|---|---|---|
| pooled_h | int32 | 池化高度 |
| pooled_w | int32 | 池化宽度 |
| spatial_scale | float32 | 用于将 cords 从输入比例转换为池化时使用的比例 |
RPN
| 参数 | 数据类型 | 说明 |
|---|---|---|
| offset_vf_ratios | tm_uoffset_t | pointer to TM2_Vector_floats |
| offset_vf_anchor_scales | tm_uoffset_t | pointer to TM2_Vector_floats |
| feat_stride | int32 | 特征值步进大小 |
| basesize | int32 | 基础尺寸 |
| min_size | int32 | 最小尺寸 |
| per_nms_topn | int32 | NMS操作后, bounding box 个数 |
| post_nms_topn | int32 | NMS操作前,置信度高的预测框的个数 |
| nms_thresh | float32 | 非极大值抑制阈值 |
| offset_va_anchors | tm_uoffset_t | offset of TM2_Vector_anchors |
Scale
| 参数 | 数据类型 | 说明 |
|---|---|---|
| axis | int32 | 操作轴 |
| num_axes | int32 | 缩放的比例 |
| bias_term | int32 | 缩放的偏置 |
Slice
| 参数 | 数据类型 | 说明 |
|---|---|---|
| axis | int32 | 操作轴 |
| offset_vi_slice_points | tm_uoffset_t | offset of TM2_Vector_dims |
| offset_vi_begins | tm_uoffset_t | offset of TM2_Vector_dims |
| offset_vi_sizes | tm_uoffset_t | offset of TM2_Vector_dims |
| iscaffe | int32 | True: 表明是 caffe 框架中的 slice |
| ismxnet | int32 | True: 表明是 mxnet 框架中的slice |
| begin | int32 | 各个轴上切片的起始索引值 |
| end | int32 | 各个轴上切片的结束索引值 |
SoftMax
| 参数 | 数据类型 | 说明 |
|---|---|---|
| axis | int32 | 操作轴 |
DetectionPostProcess
| 参数 | 数据类型 | 说明 |
|---|---|---|
| max_detections | int32 | 最大检测数量 |
| max_classes_per_detection | int32 | 每个检测框中的最大分类类别数 |
| nms_score_threshold | float32 | 非极大值抑制得分阈值 |
| nms_iou_threshold | float32 | 非极大值抑制IOU阈值 |
| num_classes | int32 | 检测类别总数 |
| offset_vf_scales | tm_uoffset_t | Scale参数 |
Gemm
| 参数 | 数据类型 | 说明 |
|---|---|---|
| alpha | float32 | 生成矩阵A |
| beta | float32 | 生成矩阵B |
| transA | int32 | 矩阵A是否转置变换 |
| transB | int32 | 矩阵B是否转置变换 |
Generic
| 参数 | 数据类型 | 说明 |
|---|---|---|
| max_input_num | int32 | 最大输入 Tensor 个数 |
| max_output_num | int32 | 最小输入 Tensor 个数 |
| offset_s_opname | tm_uoffset_t | Operator Name 索引 |
LSTM
| 参数 | 数据类型 | 说明 |
|---|---|---|
| forget_bias | float32 | 未使用 |
| clip | float32 | 未使用 |
| output_len | int32 | 输出长度 |
| sequence_len | int32 | 序列长度 |
| input_size | int32 | 输入大小 |
| hidden_size | int32 | 隐藏层大小 |
| cell_size | int32 | 单元大小 |
| has_peephole | int32 | 是否支持 peephole |
| has_projection | int32 | 是否支持 projection |
| has_clip | int32 | 是否支持 clip |
| has_bias | int32 | 是否支持 bias |
| has_init_state | int32 | 是否支持 init_state |
| forget_act | int32 | 未使用 |
| input_act | int32 | 未使用 |
| output_act | int32 | 未使用 |
| cellin_act | int32 | 未使用 |
| cellout_act | int32 | 未使用 |
| mxnet_flag | int32 | 未使用 |
RNN
| 参数 | 数据类型 | 说明 |
|---|---|---|
| clip | float32 | 裁剪值 |
| output_len | int32 | 输出长度 |
| sequence_len | int32 | 序列长度 |
| input_size | int32 | 输入大小 |
| hidden_size | int32 | 隐藏层大小 |
| has_clip | int32 | 是否支持 clip |
| has_bias | int32 | 是否支持 bias |
| has_init_state | int32 | 是否支持 init state |
| activation | int32 | 激活层类别 |
Squeeze
| 参数 | 数据类型 | 说明 |
|---|---|---|
| dim_0 | int32 | Batch |
| dim_1 | int32 | Channel |
| dim_2 | int32 | Height |
| dim_3 | int32 | Width |
Pad
| 参数 | 数据类型 | 说明 |
|---|---|---|
| pad_n_0 | int32 | 未使用,默认为0 |
| pad_n_1 | int32 | 未使用,默认为0 |
| pad_c_0 | int32 | 未使用,默认为0 |
| pad_c_1 | int32 | 未使用,默认为0 |
| pad_h_0 | int32 | top padding rows |
| pad_h_1 | int32 | bottom padding rows |
| pad_w_0 | int32 | left padding columns |
| pad_w_1 | int32 | right padding columns |
| mode | int32 | 0: CONSTANT 1: REFLECT 2: SYMMETRIC 3. EDGE |
| value | float32 | 当 mode 为CONSTANT时,设置的常量值 |
StridedSlice
| 参数 | 数据类型 | 说明 |
|---|---|---|
| begine_n | int32 | Batch 起始索引 |
| end_n | int32 | Batch 结束索引 |
| stride_n | int32 | Batch Slice 步进 |
| begine_c | int32 | Channel 起始索引 |
| end_c | int32 | Channel 结束索引 |
| stride_c | int32 | Channel Slice 步进 |
| begine_h | int32 | Height 起始索引 |
| end_h | int32 | Height 结束索引 |
| stride_h | int32 | Height Slice 步进 |
| begine_w | int32 | Width 起始索引 |
| end_w | int32 | Width 结束索引 |
| stride_w | int32 | Width Slice 步进 |
ArgMax
| 参数 | 数据类型 | 说明 |
|---|---|---|
| axis | int32 | 操作轴,默认值为0 |
ArgMin
| 参数 | 数据类型 | 说明 |
|---|---|---|
| axis | int32 | 操作轴,默认值为0 |
TopKV2
| 参数 | 数据类型 | 说明 |
|---|---|---|
| k | int32 | top 的个数 |
| Sorted | int32 | true: 降序排列 false: 升序排序 |
Reduction
| 参数 | 数据类型 | 说明 |
|---|---|---|
| dim_0 | int32 | Batch |
| dim_1 | int32 | Channel |
| dim_2 | int32 | Height |
| dim_3 | int32 | Width |
| type | int32 | 类别 |
| keepdim | int32 | 指定 dim 不变 |
GRU
| 参数 | 数据类型 | 说明 |
|---|---|---|
| clip | float32 | Clip 值 |
| output_len | int32 | 输出长度 |
| sequence_len | int32 | 序列长度 |
| input_size | int32 | 输入大小 |
| hidden_size | int32 | 隐藏层大小 |
| has_clip | int32 | 是否支持 clip |
| has_gate_bias | int32 | 是否支持 gate_bias |
| has_candidate_bias | int32 | 是否支持 candidate_bias |
| has_init_state | int32 | 是否支持 init_state |
| mxnet_flag | int32 | 未使用 |
Addn
| 参数 | 数据类型 | 说明 |
|---|---|---|
| axis | int32 | 操作轴,默认值为0 |
SwapAxis
| 参数 | 数据类型 | 说明 |
|---|---|---|
| dim_0 | int32 | 待交换的轴0 |
| dim_1 | int32 | 待交换的轴1 |
Upsample
| 参数 | 数据类型 | 说明 |
|---|---|---|
| scale | int32 | 采样因子 |
SpaceToBatchND
| 参数 | 数据类型 | 说明 |
|---|---|---|
| dilation_x | int32 | Width 膨胀值 |
| dilation_y | int32 | Height 膨胀值 |
| pad_top | int32 | top padding rows |
| pad_bottom | int32 | bottom padding rows |
| pad_left | int32 | left padding columns |
| pad_right | int32 | right padding columns |
BatchToSpaceND
| 参数 | 数据类型 | 说明 |
|---|---|---|
| dilation_x | int32 | Width 膨胀值 |
| dilation_y | int32 | Height 膨胀值 |
| crop_top | int32 | top crop rows |
| crop_bottom | int32 | bottom crop rows |
| crop_left | int32 | left crop columns |
| crop_right | int32 | right crop columns |
Resize
| 参数 | 数据类型 | 说明 |
|---|---|---|
| scale_x | float32 | 水平方向变换因子 |
| scale_y | float32 | 垂直方向变换因子 |
| type | int32 | 0: NEAREST_NEIGHBOR 1: BILIEAR |
ShuffleChannel
| 参数 | 数据类型 | 说明 |
|---|---|---|
| group | int32 | group 值 |
Crop
| 参数 | 数据类型 | 说明 |
|---|---|---|
| num_args | int32 | 参数数目 |
| offset_c | int32 | C 维度方向offset |
| offset_h | int32 | 垂直方向上方offset |
| offset_w | int32 | 垂直方向左方offset |
| crop_h | int32 | 输出垂直方向大小 |
| crop_w | int32 | 输出水平方向大小 |
| center_crop | bool | True: 中心crop False: 按照offset crop,默认为false |
| axis | int32 | 操作轴,默认值为1,用于Caffe 框架 |
| flag | int32 | 未使用 |
ROIAlign
| 参数 | 数据类型 | 说明 |
|---|---|---|
| pooled_width | int32 | 池化后的输出宽度 |
| pooled_height | int32 | 池化后的输出高度 |
| spatial_scale | int32 | 乘法性质空间标尺因子 |
Psroipooling
| 参数 | 数据类型 | 说明 |
|---|---|---|
| pooled_w | int32 | 池化后的输出宽度 |
| pooled_h | int32 | 池化后的输出高度 |
| spatial_scale | float32 | 乘法性质空间标尺因子 |
| output_dim | int32 | 输出 dims 大小 |
Unary
| 参数 | 数据类型 | 说明 |
|---|---|---|
| type | int32 | 0: UNARY_ABS 1: UNARY_NEG 2: UNARY_FLOOR 3: UNARY_CEIL 4: UNARY_SQUARE 5: UNARY_SQRT 6: UNARY_RSQRT 7: UNARY_EXP 8: UNARY_LOG 9: UNARY_SIN 10: UNARY_COS 11: UNARY_TAN 12: UNARY_ASIN 13: UNARY_ACOS 14: UNARY_ATAN 15: UNARY_RECIPROCAL 16: UNARY_TANH |
Expanddims
| 参数 | 数据类型 | 说明 |
|---|---|---|
| axis | int32 | 操作轴 |
Bias
| 参数 | 数据类型 | 说明 |
|---|---|---|
| bias_size | int32 | Bias 参数个数 |
Threshold
| 参数 | 数据类型 | 说明 |
|---|---|---|
| Threshold | float32 | 阈值 |
Hardsigmoid
| 参数 | 数据类型 | 说明 |
|---|---|---|
| alpha | float32 | alpha 因子 |
| beta | float32 | 偏移参数 |
Embed
| 参数 | 数据类型 | 说明 |
|---|---|---|
| num_output | int32 | 输出元素个数 |
| input_dim | int32 | 输入数据长度 |
| bias_term | int32 | 1 : 表示有bias |
| weight_data_size | int32 | Weight 数据长度 必须小于等于input_dim |
InstanceNorm
| 参数 | 数据类型 | 说明 |
|---|---|---|
| eps | float32 | Eps 值 |
MVN
| 参数 | 数据类型 | 说明 |
|---|---|---|
| across_channels | int32 | 1:跨channel |
| normalize_variance | int32 | 0:求和方式 1:求方差方式 |
| eps | float32 | normalize_variance = 1,用到的因子 |
Cast
| 参数 | 数据类型 | 说明 |
|---|---|---|
| type_from | int32 | 0为int32 1: float32 2: float16 3:int8 4: uint8 |
| type_to | int32 | 0为int32 1: float32 2: float16 3:int8 4: uint8 |
HardSwish
| 参数 | 数据类型 | 说明 |
|---|---|---|
| alpha | float32 | 乘法因子 默认为1 |
| beta | float32 | 移位参数,默认为3 |
Interp
| 参数 | 数据类型 | 说明 |
|---|---|---|
| resize_type | int32 | 类型,未使用 |
| width_scale | float32 | Width 缩放因子 |
| height_scale | float32 | Height 缩放因子 |
| output_width | int32 | 输出 Width 大小 |
| output_height | int32 | 输出 Height 大小 |
SELU
| 参数 | 数据类型 | 说明 |
|---|---|---|
| alpha | float32 | SeLU 激活函数中的 α 的值 |
| lambda | float32 | 表示SeLU激活函数中的 λ 的值 |
ELU
| 参数 | 数据类型 | 说明 |
|---|---|---|
| alpha | float32 | alpha 因子,默认为1 |
Logical
| 参数 | 数据类型 | 说明 |
|---|---|---|
| type | int32 | 逻辑处理类型 |
Gather
| 参数 | 数据类型 | 说明 |
|---|---|---|
| axis | int32 | 操作轴 |
| indices_num | int32 | Index 的个数 |
Transpose
| 参数 | 数据类型 | 说明 |
|---|---|---|
| dim0 | int32 | Transpose 之前的轴 |
| dim1 | int32 | Transpose 之前的轴 |
| dim2 | int32 | Transpose 之前的轴 |
| dim3 | int32 | Transpose 之前的轴 |
Comparison
| 参数 | 数据类型 | 说明 |
|---|---|---|
| type | int32 | 比较操作类型 |
SpaceToDepth
| 参数 | 数据类型 | 说明 |
|---|---|---|
| block_size | int32 | 水平方向&&垂直方向移动到 C 方向的倍数 |
DepthToSpace
| 参数 | 数据类型 | 说明 |
|---|---|---|
| block_size | int32 | C 方向移动到水平方向&&垂直方向的倍数 |
SparseToDense
| 参数 | 数据类型 | 说明 |
|---|---|---|
| output_shape_size0 | int32 | 输出 Height 大小 |
| output_shape_size1 | int32 | 输出 Width 大小 |
| default_value | int32 | 默认 Value |
Clip
| 参数 | 数据类型 | 说明 |
|---|---|---|
| max | float | 截断操作最大值 |
| min | float | 截断操作最小值 |
Unsqueeze
| 参数 | 数据类型 | 说明 |
|---|---|---|
| offset_vi_axises | tm_uoffset_t | 操作轴偏移量数组 |
ReduceL2
| 参数 | 数据类型 | 说明 |
|---|---|---|
| axis | int32 | 操作轴 |
| keepdim | int32 | 保留的维度大小 |
Expand
| 参数 | 数据类型 | 说明 |
|---|---|---|
| offset_v_shape | tm_uoffset_t | 输出维度数组 |
Scatter
| 参数 | 数据类型 | 说明 |
|---|---|---|
| axis | int32 | 操作轴 |
| is_onnx | tm_bool_t | 是否为ONNX算子 |
Tile
| 参数 | 数据类型 | 说明 |
|---|---|---|
| offset_vi_flag | tm_uoffset_t | caffe: 0, onnx: 1 |
| offset_vi_reps | tm_uoffset_t | 用于 tile 补齐操作的数据 |
调试方法
计算图 Profiler
计算图 Profiler,显示完成 infer shape 操作后的已序列化 ir_graph 信息,用于确认 infer shape 是否正确。
使用方法
程序执行前,添加环境变量
export TG_DEBUG_GRAPH=1,启用计算图 Profiler 功能;删除环境变量
unset TG_DEBUG_GRAPH, 关闭计算图 Profiler 功能。
logo 信息
$./tm_classification -m mobilenet.tmfile -i cat.jpg -r 10
tengine-lite library version: 1.4-dev
graph node_num 86 tensor_num: 86 subgraph_num: 1
graph layout: NCHW model layout: NCHW model_format: tengine
node: 0 op: Const name: conv1-conv1/bn-conv1/scale.bias.bn.fused.fused
output tensors: 1
0: [id: 0] conv1-conv1/bn-conv1/scale.bias.bn.fused.fused type: fp32/const shape: [32] from node: 0 (consumer: 1)
node: 1 op: Const name: conv1/weight.fused.fused
output tensors: 1
0: [id: 1] conv1/weight.fused.fused type: fp32/const shape: [32,3,3,3] from node: 1 (consumer: 1)
node: 2 op: InputOp name: input
output tensors: 1
0: [id: 2] data type: fp32/input shape: [1,3,224,224] from node: 2 (consumer: 1)
node: 3 op: Const name: conv2_1/dw-conv2_1/dw/bn-conv2_1/dw/scale.bias.bn.fused.fused
output tensors: 1
0: [id: 3] conv2_1/dw-conv2_1/dw/bn-conv2_1/dw/scale.bias.bn.fused.fused type: fp32/const shape: [32] from node: 3 (consumer: 1)
(#### 太多了,直接跳到末尾 ####)
node: 84 op: Pooling name: pool6
input tensors: 1
0: [id: 81] relu6/sep/0 type: fp32/var shape: [1,1024,7,7] from node: 81 (consumer: 1)
output tensors: 1
0: [id: 84] pool6 type: fp32/var shape: [1,1024,1,1] from node: 84 (consumer: 1)
node: 85 op: Convolution name: fc7
input tensors: 3
0: [id: 84] pool6 type: fp32/var shape: [1,1024,1,1] from node: 84 (consumer: 1)
1: [id: 83] fc7/weight type: fp32/const shape: [1000,1024,1,1] from node: 83 (consumer: 1)
2: [id: 82] fc7/bias type: fp32/const shape: [1000] from node: 82 (consumer: 1)
output tensors: 1
0: [id: 85] fc7 type: fp32/var shape: [1,1000,1,1] from node: 85
graph inputs: 1
input
graph outputs: 1
fc7
model file : mobilenet.tmfile
image file : cat.jpg
img_h, img_w, scale[3], mean[3] : 224 224 , 0.017 0.017 0.017, 104.0 116.7 122.7
Repeat 10 times, thread 1, avg time 44.12 ms, max_time 73.76 ms, min_time 37.14 ms
--------------------------------------
8.574144, 282
7.880117, 277
7.812573, 278
7.286458, 263
6.357486, 281
--------------------------------------
Tengine plugin device CPU is unregistered.
性能 Profiler
性能 Profiler,用于逐层耗时统计,在网络模型运行时统计 CPU 上 kernel 耗时信息,用于分析潜在的耗时问题。
使用方法
程序执行前,添加环境变量
export TG_DEBUG_TIME=1,启用性能 Profiler 功能;删除环境变量
unset TG_DEBUG_TIME, 关闭性能 Profiler 功能。
logo 信息
$./tm_classification -m mobilenet.tmfile -i cat.jpg -r 10
tengine-lite library version: 1.4-dev
model file : mobilenet.tmfile
image file : cat.jpg
img_h, img_w, scale[3], mean[3] : 224 224 , 0.017 0.017 0.017, 104.0 116.7 122.7
Repeat 10 times, thread 1, avg time 42.36 ms, max_time 65.59 ms, min_time 38.26 ms
--------------------------------------
8.574144, 282
7.880117, 277
7.812573, 278
7.286458, 263
6.357486, 281
--------------------------------------
0 [ 3.42% : 1.2 ms] Convolution idx: 5 shape: {1 3 224 224} -> {1 32 112 112} fp32 -> fp32 K: 3x3 | S: 2x2 | P: 1 1 1 1 MFLOPS: 21.68 Rate:17722
1 [ 4.60% : 1.6 ms] Convolution idx: 8 shape: {1 32 112 112} -> {1 32 112 112} fp32 -> fp32 K: 3x3 | S: 1x1 | P: 1 1 1 1 DW( 32) MFLOPS: 7.23 Rate:4392
2 [ 5.66% : 2.0 ms] Convolution idx: 11 shape: {1 32 112 112} -> {1 64 112 112} fp32 -> fp32 K: 1x1 | S: 1x1 | P: 0 0 0 0 MFLOPS: 51.38 Rate:25423
3 [ 3.28% : 1.2 ms] Convolution idx: 14 shape: {1 64 112 112} -> {1 64 56 56} fp32 -> fp32 K: 3x3 | S: 2x2 | P: 1 1 1 1 DW( 64) MFLOPS: 3.61 Rate:3085
4 [ 4.25% : 1.5 ms] Convolution idx: 17 shape: {1 64 56 56} -> {1 128 56 56} fp32 -> fp32 K: 1x1 | S: 1x1 | P: 0 0 0 0 MFLOPS: 51.38 Rate:33824
5 [ 3.13% : 1.1 ms] Convolution idx: 20 shape: {1 128 56 56} -> {1 128 56 56} fp32 -> fp32 K: 3x3 | S: 1x1 | P: 1 1 1 1 DW(128) MFLOPS: 7.23 Rate:6458
6 [ 7.85% : 2.8 ms] Convolution idx: 23 shape: {1 128 56 56} -> {1 128 56 56} fp32 -> fp32 K: 1x1 | S: 1x1 | P: 0 0 0 0 MFLOPS:102.76 Rate:36658
7 [ 1.72% : 0.6 ms] Convolution idx: 26 shape: {1 128 56 56} -> {1 128 28 28} fp32 -> fp32 K: 3x3 | S: 2x2 | P: 1 1 1 1 DW(128) MFLOPS: 1.81 Rate:2937
8 [ 3.37% : 1.2 ms] Convolution idx: 29 shape: {1 128 28 28} -> {1 256 28 28} fp32 -> fp32 K: 1x1 | S: 1x1 | P: 0 0 0 0 MFLOPS: 51.38 Rate:42671
9 [ 1.32% : 0.5 ms] Convolution idx: 32 shape: {1 256 28 28} -> {1 256 28 28} fp32 -> fp32 K: 3x3 | S: 1x1 | P: 1 1 1 1 DW(256) MFLOPS: 3.61 Rate:7655
10 [ 6.45% : 2.3 ms] Convolution idx: 35 shape: {1 256 28 28} -> {1 256 28 28} fp32 -> fp32 K: 1x1 | S: 1x1 | P: 0 0 0 0 MFLOPS:102.76 Rate:44564
11 [ 0.78% : 0.3 ms] Convolution idx: 38 shape: {1 256 28 28} -> {1 256 14 14} fp32 -> fp32 K: 3x3 | S: 2x2 | P: 1 1 1 1 DW(256) MFLOPS: 0.90 Rate:3259
12 [ 3.27% : 1.2 ms] Convolution idx: 41 shape: {1 256 14 14} -> {1 512 14 14} fp32 -> fp32 K: 1x1 | S: 1x1 | P: 0 0 0 0 MFLOPS: 51.38 Rate:43954
13 [ 1.01% : 0.4 ms] Convolution idx: 44 shape: {1 512 14 14} -> {1 512 14 14} fp32 -> fp32 K: 3x3 | S: 1x1 | P: 1 1 1 1 DW(512) MFLOPS: 1.81 Rate:4989
14 [ 6.57% : 2.3 ms] Convolution idx: 47 shape: {1 512 14 14} -> {1 512 14 14} fp32 -> fp32 K: 1x1 | S: 1x1 | P: 0 0 0 0 MFLOPS:102.76 Rate:43767
15 [ 0.96% : 0.3 ms] Convolution idx: 50 shape: {1 512 14 14} -> {1 512 14 14} fp32 -> fp32 K: 3x3 | S: 1x1 | P: 1 1 1 1 DW(512) MFLOPS: 1.81 Rate:5266
16 [ 6.44% : 2.3 ms] Convolution idx: 53 shape: {1 512 14 14} -> {1 512 14 14} fp32 -> fp32 K: 1x1 | S: 1x1 | P: 0 0 0 0 MFLOPS:102.76 Rate:44659
17 [ 1.01% : 0.4 ms] Convolution idx: 56 shape: {1 512 14 14} -> {1 512 14 14} fp32 -> fp32 K: 3x3 | S: 1x1 | P: 1 1 1 1 DW(512) MFLOPS: 1.81 Rate:5003
18 [ 6.44% : 2.3 ms] Convolution idx: 59 shape: {1 512 14 14} -> {1 512 14 14} fp32 -> fp32 K: 1x1 | S: 1x1 | P: 0 0 0 0 MFLOPS:102.76 Rate:44678
19 [ 0.98% : 0.3 ms] Convolution idx: 62 shape: {1 512 14 14} -> {1 512 14 14} fp32 -> fp32 K: 3x3 | S: 1x1 | P: 1 1 1 1 DW(512) MFLOPS: 1.81 Rate:5174
20 [ 6.36% : 2.3 ms] Convolution idx: 65 shape: {1 512 14 14} -> {1 512 14 14} fp32 -> fp32 K: 1x1 | S: 1x1 | P: 0 0 0 0 MFLOPS:102.76 Rate:45249
21 [ 1.02% : 0.4 ms] Convolution idx: 68 shape: {1 512 14 14} -> {1 512 14 14} fp32 -> fp32 K: 3x3 | S: 1x1 | P: 1 1 1 1 DW(512) MFLOPS: 1.81 Rate:4976
22 [ 6.61% : 2.4 ms] Convolution idx: 71 shape: {1 512 14 14} -> {1 512 14 14} fp32 -> fp32 K: 1x1 | S: 1x1 | P: 0 0 0 0 MFLOPS:102.76 Rate:43523
23 [ 0.61% : 0.2 ms] Convolution idx: 74 shape: {1 512 14 14} -> {1 512 7 7} fp32 -> fp32 K: 3x3 | S: 2x2 | P: 1 1 1 1 DW(512) MFLOPS: 0.45 Rate:2062
24 [ 3.36% : 1.2 ms] Convolution idx: 77 shape: {1 512 7 7} -> {1 1024 7 7} fp32 -> fp32 K: 1x1 | S: 1x1 | P: 0 0 0 0 MFLOPS: 51.38 Rate:42853
25 [ 0.74% : 0.3 ms] Convolution idx: 80 shape: {1 1024 7 7} -> {1 1024 7 7} fp32 -> fp32 K: 3x3 | S: 1x1 | P: 1 1 1 1 DW(1024) MFLOPS: 0.90 Rate:3397
26 [ 7.65% : 2.7 ms] Convolution idx: 81 shape: {1 1024 7 7} -> {1 1024 7 7} fp32 -> fp32 K: 1x1 | S: 1x1 | P: 0 0 0 0 MFLOPS:102.76 Rate:37588
27 [ 0.08% : 0.0 ms] Pooling idx: 84 shape: {1 1024 7 7} -> {1 1024 1 1} fp32 -> fp32 K: 7x7 | S: 1x1 | P: 0 0 0 0 Avg
28 [ 1.07% : 0.4 ms] Convolution idx: 85 shape: {1 1024 1 1} -> {1 1000 1 1} fp32 -> fp32 K: 1x1 | S: 1x1 | P: 0 0 0 0 MFLOPS: 2.05 Rate:5360
total time: 422.97 ms. avg time: 42.30 ms. min time: 35.73 ms.
精度 Profiler
精度 Profiler,用于 CPU 后端运行网络模型后,导出每一层的 input/ouput tensor data,用于分析输出结果异常的问题。
使用方法
程序执行前,添加环境变量
export TG_DEBUG_DATA=1,启用精度 Profiler 功能;删除环境变量
unset TG_DEBUG_DATA, 关闭精度 Profiler 功能。
logo 信息
数据导出后,在程序执行的当前路径下生成 ./output 文件夹。
$ ./tm_classification -m models/squeezenet.tmfile -i images/cat.jpg
model file : models/squeezenet.tmfile
image file : images/cat.jpg
label_file : (null)
img_h, img_w, scale[3], mean[3] : 227 227 , 1.000 1.000 1.000, 104.0 116.7 122.7
Repeat 1 times, thread 1, avg time 4402.85 ms, max_time 4402.85 ms, min_time 4402.85 ms
--------------------------------------
0.273199, 281
0.267552, 282
0.181004, 278
0.081799, 285
0.072407, 151
--------------------------------------
$ ls ./output
conv1-conv1-bn-conv1-scale-relu1_in_blob_data.txt
conv1-conv1-bn-conv1-scale-relu1_out_blob_data.txt
conv2_1-dw-conv2_1-dw-bn-conv2_1-dw-scale-relu2_1-dw_in_blob_data.txt
conv2_1-dw-conv2_1-dw-bn-conv2_1-dw-scale-relu2_1-dw_out_blob_data.txt
conv2_1-sep-conv2_1-sep-bn-conv2_1-sep-scale-relu2_1-sep_in_blob_data.txt
conv2_1-sep-conv2_1-sep-bn-conv2_1-sep-scale-relu2_1-sep_out_blob_data.txt
conv2_2-dw-conv2_2-dw-bn-conv2_2-dw-scale-relu2_2-dw_in_blob_data.txt
conv2_2-dw-conv2_2-dw-bn-conv2_2-dw-scale-relu2_2-dw_out_blob_data.txt
conv2_2-sep-conv2_2-sep-bn-conv2_2-sep-scale-relu2_2-sep_in_blob_data.txt
conv2_2-sep-conv2_2-sep-bn-conv2_2-sep-scale-relu2_2-sep_out_blob_data.txt
conv3_1-dw-conv3_1-dw-bn-conv3_1-dw-scale-relu3_1-dw_in_blob_data.txt
conv3_1-dw-conv3_1-dw-bn-conv3_1-dw-scale-relu3_1-dw_out_blob_data.txt
conv3_1-sep-conv3_1-sep-bn-conv3_1-sep-scale-relu3_1-sep_in_blob_data.txt
conv3_1-sep-conv3_1-sep-bn-conv3_1-sep-scale-relu3_1-sep_out_blob_data.txt
conv3_2-dw-conv3_2-dw-bn-conv3_2-dw-scale-relu3_2-dw_in_blob_data.txt
conv3_2-dw-conv3_2-dw-bn-conv3_2-dw-scale-relu3_2-dw_out_blob_data.txt
conv3_2-sep-conv3_2-sep-bn-conv3_2-sep-scale-relu3_2-sep_in_blob_data.txt
conv3_2-sep-conv3_2-sep-bn-conv3_2-sep-scale-relu3_2-sep_out_blob_data.txt
conv4_1-dw-conv4_1-dw-bn-conv4_1-dw-scale-relu4_1-dw_in_blob_data.txt
conv4_1-dw-conv4_1-dw-bn-conv4_1-dw-scale-relu4_1-dw_out_blob_data.txt
conv4_1-sep-conv4_1-sep-bn-conv4_1-sep-scale-relu4_1-sep_in_blob_data.txt
conv4_1-sep-conv4_1-sep-bn-conv4_1-sep-scale-relu4_1-sep_out_blob_data.txt
conv4_2-dw-conv4_2-dw-bn-conv4_2-dw-scale-relu4_2-dw_in_blob_data.txt
conv4_2-dw-conv4_2-dw-bn-conv4_2-dw-scale-relu4_2-dw_out_blob_data.txt
conv4_2-sep-conv4_2-sep-bn-conv4_2-sep-scale-relu4_2-sep_in_blob_data.txt
conv4_2-sep-conv4_2-sep-bn-conv4_2-sep-scale-relu4_2-sep_out_blob_data.txt
conv5_1-dw-conv5_1-dw-bn-conv5_1-dw-scale-relu5_1-dw_in_blob_data.txt
conv5_1-dw-conv5_1-dw-bn-conv5_1-dw-scale-relu5_1-dw_out_blob_data.txt
conv5_1-sep-conv5_1-sep-bn-conv5_1-sep-scale-relu5_1-sep_in_blob_data.txt
conv5_1-sep-conv5_1-sep-bn-conv5_1-sep-scale-relu5_1-sep_out_blob_data.txt
conv5_2-dw-conv5_2-dw-bn-conv5_2-dw-scale-relu5_2-dw_in_blob_data.txt
conv5_2-dw-conv5_2-dw-bn-conv5_2-dw-scale-relu5_2-dw_out_blob_data.txt
conv5_2-sep-conv5_2-sep-bn-conv5_2-sep-scale-relu5_2-sep_in_blob_data.txt
conv5_2-sep-conv5_2-sep-bn-conv5_2-sep-scale-relu5_2-sep_out_blob_data.txt
conv5_3-dw-conv5_3-dw-bn-conv5_3-dw-scale-relu5_3-dw_in_blob_data.txt
conv5_3-dw-conv5_3-dw-bn-conv5_3-dw-scale-relu5_3-dw_out_blob_data.txt
conv5_3-sep-conv5_3-sep-bn-conv5_3-sep-scale-relu5_3-sep_in_blob_data.txt
conv5_3-sep-conv5_3-sep-bn-conv5_3-sep-scale-relu5_3-sep_out_blob_data.txt
conv5_4-dw-conv5_4-dw-bn-conv5_4-dw-scale-relu5_4-dw_in_blob_data.txt
conv5_4-dw-conv5_4-dw-bn-conv5_4-dw-scale-relu5_4-dw_out_blob_data.txt
conv5_4-sep-conv5_4-sep-bn-conv5_4-sep-scale-relu5_4-sep_in_blob_data.txt
conv5_4-sep-conv5_4-sep-bn-conv5_4-sep-scale-relu5_4-sep_out_blob_data.txt
conv5_5-dw-conv5_5-dw-bn-conv5_5-dw-scale-relu5_5-dw_in_blob_data.txt
conv5_5-dw-conv5_5-dw-bn-conv5_5-dw-scale-relu5_5-dw_out_blob_data.txt
conv5_5-sep-conv5_5-sep-bn-conv5_5-sep-scale-relu5_5-sep_in_blob_data.txt
conv5_5-sep-conv5_5-sep-bn-conv5_5-sep-scale-relu5_5-sep_out_blob_data.txt
conv5_6-dw-conv5_6-dw-bn-conv5_6-dw-scale-relu5_6-dw_in_blob_data.txt
conv5_6-dw-conv5_6-dw-bn-conv5_6-dw-scale-relu5_6-dw_out_blob_data.txt
conv5_6-sep-conv5_6-sep-bn-conv5_6-sep-scale-relu5_6-sep_in_blob_data.txt
conv5_6-sep-conv5_6-sep-bn-conv5_6-sep-scale-relu5_6-sep_out_blob_data.txt
conv6-dw-conv6-dw-bn-conv6-dw-scale-relu6-dw_in_blob_data.txt
conv6-dw-conv6-dw-bn-conv6-dw-scale-relu6-dw_out_blob_data.txt
conv6-sep-conv6-sep-bn-conv6-sep-scale-relu6-sep_in_blob_data.txt
conv6-sep-conv6-sep-bn-conv6-sep-scale-relu6-sep_out_blob_data.txt
fc7_in_blob_data.txt
fc7_out_blob_data.txt
pool6_in_blob_data.txt
pool6_out_blob_data.txt
Naive Profiler
Naive Profiler,用于关闭 CPU 性能算子,后端计算只使用 Naive C 实现的 reference op,用于对比分析性能算子的计算结果。
使用方法
程序执行前,添加环境变量
export TG_DEBUG_REF=1,启用 Naive Profiler 功能;删除环境变量
unset TG_DEBUG_REF, 关闭精度 Naive Profiler 功能。
Linux 工程示例
Linux 工程示例用于展示 Tengine 基于 Linux 系统的各种 CPU 架构的硬件后端运行网络模型推理。
编译
参考 源码编译(Linux) 章节生成部署所需要的以下库文件:
build-linux/install/lib/
└── libtengine-lite.so
运行
模型格式
CPU 后端支持加载 Float32/Float16/Uint8/Int8 tmfile,其中 Float16/Uint8/Int8 需要通过相应的模型量化工具获取。
推理精度设置
CPU 支持 Float32/Float16/Uint8/Int8 四种精度模型进行网络模型推理,需要在执行 prerun_graph_multithread(graph_t graph, struct options opt) 之前通过 struct options opt 显式设置推理精度。
Enable CPU FP32 mode
/* set runtime options */
struct options opt;
opt.num_thread = num_thread;
opt.cluster = TENGINE_CLUSTER_ALL;
opt.precision = TENGINE_MODE_FP32;
opt.affinity = 0;
Enable CPU FP16 mode
/* set runtime options */
struct options opt;
opt.num_thread = num_thread;
opt.cluster = TENGINE_CLUSTER_ALL;
opt.precision = TENGINE_MODE_FP16;
opt.affinity = 0;
Enable CPU Uint8 mode
/* set runtime options */
struct options opt;
opt.num_thread = num_thread;
opt.cluster = TENGINE_CLUSTER_ALL;
opt.precision = TENGINE_MODE_UINT8;
opt.affinity = 0;
Enable CPU Int8 mode
/* set runtime options */
struct options opt;
opt.num_thread = num_thread;
opt.cluster = TENGINE_CLUSTER_ALL;
opt.precision = TENGINE_MODE_INT8;
opt.affinity = 0;
参考 Demo
源码请参考 tm_classification.c
源码请参考 tm_classification_fp16.c
源码请参考 tm_classification_int8.c
使用 C API 预测
Linux demo 大多数基于 C API 开发,调用 C API 大致分为以下几个步骤。更详细的 API 描述请参考:Tengine C API。
/* set runtime options */
struct options opt;
opt.num_thread = num_thread;
opt.cluster = TENGINE_CLUSTER_ALL;
opt.precision = TENGINE_MODE_FP32;
opt.affinity = affinity;
/* inital tengine */
init_tengine();
/* create graph, load tengine model xxx.tmfile */
graph_t graph = create_graph(NULL, "tengine", model_file);
/* set the shape, data buffer of input_tensor of the graph */
int img_size = img_h * img_w * 3;
int dims[] = {1, 3, img_h, img_w}; // nchw
float* input_data = ( float* )malloc(img_size * sizeof(float));
tensor_t input_tensor = get_graph_input_tensor(graph, 0, 0);
set_tensor_shape(input_tensor, dims, 4);
set_tensor_buffer(input_tensor, input_data, img_size * 4);
/* prerun graph, set work options(num_thread, cluster, precision) */
prerun_graph_multithread(graph, opt);
/* prepare process input data, set the data mem to input tensor */
get_input_data(image_file, input_data, img_h, img_w, mean, scale);
/* run graph */
run_graph(graph, 1);
/* get the result of classification */
tensor_t output_tensor = get_graph_output_tensor(graph, 0, 0);
float* output_data = ( float* )get_tensor_buffer(output_tensor);
/* release tengine */
free(input_data);
postrun_graph(graph);
destroy_graph(graph);
release_tengine();
使用 C++ API 预测
Linux demo 同时提供 C++ API 简化开发流程,调用 C++ API 大致分为以下几个步骤。更详细的 API 描述请参考:Tengine C++ API。
/* inital tengine */
init_tengine();
tengine::Net somenet;
tengine::Tensor input_tensor;
tengine::Tensor output_tensor;
/* set runtime options of Net */
somenet.opt.num_thread = num_thread;
somenet.opt.cluster = TENGINE_CLUSTER_ALL;
somenet.opt.precision = TENGINE_MODE_FP32;
somenet.opt.affinity = affinity;
/* load model */
somenet.load_model(nullptr, "tengine", model_file.c_str());
/* prepare input data */
input_tensor.create(1, 3, img_h, img_w);
get_input_data(image_file.c_str(), ( float* )input_tensor.data, img_h, img_w, mean, scale);
/* set input data */
somenet.input_tensor("data", input_tensor);
/* forward */
somenet.run();
/* get result */
somenet.extract_tensor("prob", output_tensor);
/* release tengine */
release_tengine();
执行结果
start to run register cpu allocator
tengine-lite library version: 1.0-dev
model file : ./temp/models/mobilenet.tmfile
image file : ./temp/images/cat.jpg
img_h, img_w, scale[3], mean[3] : 224 224 , 0.017 0.017 0.017, 104.0 116.7 122.7
Repeat 1 times, thread 1, avg time 656.76 ms, max_time 656.76 ms, min_time 656.76 ms
--------------------------------------
8.574148, 282
7.880116, 277
7.812579, 278
7.286453, 263
6.357488, 281
--------------------------------------
Android 工程示例
Android工程示例用于展示 Tengine 基于 Android 系统的各种 CPU 架构的硬件后端运行网络模型推理。
编译
参考 源码编译(Android) 章节生成部署所需要的以下库文件:
build-android/install/lib/
└── libtengine-lite.so
运行
模型格式
CPU 后端支持加载 Float32/Float16/Uint8/Int8 tmfile,其中 Float16/Uint8/Int8 需要通过相应的模型量化工具获取。
推理精度设置
CPU 支持 Float32/Float16/Uint8/Int8 四种精度模型进行网络模型推理,需要在执行 prerun_graph_multithread(graph_t graph, struct options opt) 之前通过 struct options opt 显式设置推理精度。
Enable CPU FP32 mode
/* set runtime options */
struct options opt;
opt.num_thread = num_thread;
opt.cluster = TENGINE_CLUSTER_ALL;
opt.precision = TENGINE_MODE_FP32;
opt.affinity = 0;
Enable CPU FP16 mode
/* set runtime options */
struct options opt;
opt.num_thread = num_thread;
opt.cluster = TENGINE_CLUSTER_ALL;
opt.precision = TENGINE_MODE_FP16;
opt.affinity = 0;
Enable CPU Uint8 mode
/* set runtime options */
struct options opt;
opt.num_thread = num_thread;
opt.cluster = TENGINE_CLUSTER_ALL;
opt.precision = TENGINE_MODE_UINT8;
opt.affinity = 0;
Enable CPU Int8 mode
/* set runtime options */
struct options opt;
opt.num_thread = num_thread;
opt.cluster = TENGINE_CLUSTER_ALL;
opt.precision = TENGINE_MODE_INT8;
opt.affinity = 0;
参考 Demo
源码请参考 tm_classification.c
源码请参考 tm_classification_fp16.c
源码请参考 tm_classification_int8.c
使用 C API 预测
Android demo 大多数基于 C API 开发,调用 C API 大致分为以下几个步骤。更详细的 API 描述请参考:Tengine C API。
/* set runtime options */
struct options opt;
opt.num_thread = num_thread;
opt.cluster = TENGINE_CLUSTER_ALL;
opt.precision = TENGINE_MODE_FP32;
opt.affinity = affinity;
/* inital tengine */
init_tengine();
/* create graph, load tengine model xxx.tmfile */
graph_t graph = create_graph(NULL, "tengine", model_file);
/* set the shape, data buffer of input_tensor of the graph */
int img_size = img_h * img_w * 3;
int dims[] = {1, 3, img_h, img_w}; // nchw
float* input_data = ( float* )malloc(img_size * sizeof(float));
tensor_t input_tensor = get_graph_input_tensor(graph, 0, 0);
set_tensor_shape(input_tensor, dims, 4);
set_tensor_buffer(input_tensor, input_data, img_size * 4);
/* prerun graph, set work options(num_thread, cluster, precision) */
prerun_graph_multithread(graph, opt);
/* prepare process input data, set the data mem to input tensor */
get_input_data(image_file, input_data, img_h, img_w, mean, scale);
/* run graph */
run_graph(graph, 1);
/* get the result of classification */
tensor_t output_tensor = get_graph_output_tensor(graph, 0, 0);
float* output_data = ( float* )get_tensor_buffer(output_tensor);
/* release tengine */
free(input_data);
postrun_graph(graph);
destroy_graph(graph);
release_tengine();
使用 C++ API 预测
Android demo 同时提供 C++ API 简化开发流程,调用 C++ API 大致分为以下几个步骤。更详细的 API 描述请参考:Tengine C++ API。
/* inital tengine */
init_tengine();
tengine::Net somenet;
tengine::Tensor input_tensor;
tengine::Tensor output_tensor;
/* set runtime options of Net */
somenet.opt.num_thread = num_thread;
somenet.opt.cluster = TENGINE_CLUSTER_ALL;
somenet.opt.precision = TENGINE_MODE_FP32;
somenet.opt.affinity = affinity;
/* load model */
somenet.load_model(nullptr, "tengine", model_file.c_str());
/* prepare input data */
input_tensor.create(1, 3, img_h, img_w);
get_input_data(image_file.c_str(), ( float* )input_tensor.data, img_h, img_w, mean, scale);
/* set input data */
somenet.input_tensor("data", input_tensor);
/* forward */
somenet.run();
/* get result */
somenet.extract_tensor("prob", output_tensor);
/* release tengine */
release_tengine();
执行结果
使用adb 连接上Android 设备,以ubuntu环境为例,命令如下:
sudo apt install adb #安装adb,使电脑可以与Android设备通信。并查看Android设备的ip。
adb connect [安卓设备ip]
adb devices #确保可以看到设备
adb push tm_classification /data/local/tmp/
adb push cat.jpg /data/local/tmp/
adb push mobilenet.tmfile /data/local/tmp/
adb push libtengine-lite.so /data/local/tmp/
adb shell
#此时进入了Android设备的终端
cd /data/local/tmp
./tm_classification -m mobilenet.tmfile -i cat.jpg -g 224,224 -s 0.017,0.017,0.017 -w 104.007,116.669,122.679
start to run register cpu allocator
tengine-lite library version: 1.0-dev
model file : ./temp/models/mobilenet.tmfile
image file : ./temp/images/cat.jpg
img_h, img_w, scale[3], mean[3] : 224 224 , 0.017 0.017 0.017, 104.0 116.7 122.7
Repeat 1 times, thread 1, avg time 656.76 ms, max_time 656.76 ms, min_time 656.76 ms
--------------------------------------
8.574148, 282
7.880116, 277
7.812579, 278
7.286453, 263
6.357488, 281
--------------------------------------
Tengine 使用 OpenCL 进行部署
How to build
Setup Tengine project ROOT_PATH
$ export ROOT_PATH={Path of tengine-lite}
Build
-DOPENCL_LIBRARY: libOpenCL.so 路径。可通过 <sudo find /usr -name "libOpenCL.so"> 命令查询
-DOPENCL_INCLUDE_DIRS:指定CL/cl.h 路径。可通过 <sudo find /usr -name "cl.h"> 命令查询
$ cd <tengine-lite-root-dir>
$ mkdir -p build-linux-opencl
$ cmake \
-DTENGINE_ENABLE_OPENCL=ON \
-DOPENCL_LIBRARY=/usr/lib/aarch64-linux-gnu/libOpenCL.so \
-DOPENCL_INCLUDE_DIRS=/usr/include ..
$ make -j4
$ make install
Tengine 使用 TIM-VX 进行部署
编译
参考 源码编译(TIM-VX) 章节,编译生成或从第三方获取部署所需要的以下库文件:
3rdparty/tim-vx/lib/
├── libArchModelSw.so
├── libCLC.so
├── libGAL.so
├── libNNArchPerf.so
├── libOpenVX.so
├── libOpenVXU.so
└── libVSC.so
build-tim-vx-arm64/install/lib/
└── libtengine-lite.so
在 Khadas VIM3 上运行时,需要使用上诉动态库替代板上
/lib目录下的已有库文件;需要使用 TIM-VX 提供的 A311D 预编译包中的
galcore.ko( /prebuild-sdk-a311d/lib/galcore.ko)内核驱动文件进行更新。
运行
模型格式
TIM-VX 后端只支持加载 Uint8 tmfile,因此需要使用模型量化工具将 Float32 tmfile 量化成 Uint8 tmfile。
模型量化
Float32 量化成 Uint8 tmfile 具体实现步骤及相关工具获取请参考以下链接:
推理精度设置
TIM-VX 只支持 Uint8 精度模型进行网络模型推理,需要在执行 prerun_graph_multithread(graph_t graph, struct options opt) 之前通过 struct options opt 显式设置推理精度。
Enable Uint8 mode
/* set runtime options */
struct options opt;
opt.num_thread = num_thread;
opt.cluster = TENGINE_CLUSTER_ALL;
opt.precision = TENGINE_MODE_UINT8;
opt.affinity = 0;
后端硬件绑定
在加载模型前,需要显式指定 TIM-VX 硬件后端 context,并在调用 graph_t create_graph(context_t context, const char* model_format, const char* fname, ...) 时传入该参数。
/* create VeriSilicon TIM-VX backend */
context_t timvx_context = create_context("timvx", 1);
add_context_device(timvx_context, "TIMVX");
/* create graph, load tengine model xxx.tmfile */
create_graph(timvx_context, "tengine", model_file);
参考 Demo
源码请参考 tm_classification_timvx.c
执行结果
运行硬件为 Khadas VIM3,内置 5Tops 算力 AI 加速器。
[khadas@Khadas tengine-lite]# ./tm_classification_timvx -m squeezenet_uint8.tmfile -i cat.jpg -r 1 -s 0.017,0.017,0.017 -r 10
Tengine plugin allocator TIMVX is registered.
Image height not specified, use default 227
Image width not specified, use default 227
Mean value not specified, use default 104.0, 116.7, 122.7
tengine-lite library version: 1.2-dev
TIM-VX prerun.
model file : squeezenet_uint8.tmfile
image file : cat.jpg
img_h, img_w, scale[3], mean[3] : 227 227 , 0.017 0.017 0.017, 104.0 116.7 122.7
Repeat 10 times, thread 1, avg time 2.95 ms, max_time 3.42 ms, min_time 2.76 ms
--------------------------------------
34.786182, 278
33.942883, 287
33.732056, 280
32.045452, 277
30.780502, 282
支持硬件列表
| 芯片厂家 | 设备 |
|---|---|
| Amlogic | A311D、S905D3 |
| NXP | iMX 8M Plus |
| JLQ | JA310 |
| X86-64 | Simulator |
支持算子列表
Tengine 使用 ACL 进行部署
编译
参考 源码编译(ACL) 章节生成部署所需要的以下库文件:
3rdparty/acl/lib/
├── libarm_compute.so
├── libarm_compute_core.so
└── libarm_compute_graph.so
build-acl-arm64/install/lib/
└── libtengine-lite.so
运行
模型格式
ACL 支持直接加载 Float32 tmfile,如果工作在 Float16 推理精度模式下,Tengine 框架将在加载 Float32 tmfile 后自动在线转换为 Float16 数据进行推理。
推理精度设置
ACL 支持 Float32 和 Float16 两种精度模型进行网络模型推理,需要在执行 prerun_graph_multithread(graph_t graph, struct options opt) 之前通过 struct options opt 显式设置推理精度。
Enable GPU FP32 mode
/* set runtime options */
struct options opt;
opt.num_thread = num_thread;
opt.cluster = TENGINE_CLUSTER_ALL;
opt.precision = TENGINE_MODE_FP32;
opt.affinity = 0;
Enable GPU FP16 mode
/* set runtime options */
struct options opt;
opt.num_thread = num_thread;
opt.cluster = TENGINE_CLUSTER_ALL;
opt.precision = TENGINE_MODE_FP16;
opt.affinity = 0;
后端硬件绑定
在加载模型前,需要显式指定 ACL 硬件后端 context,并在调用 graph_t create_graph(context_t context, const char* model_format, const char* fname, ...) 时传入该参数。
/* create arm acl backend */
acl_context = create_context("acl", 1);
add_context_device(acl_context, "ACL");
/* create graph, load tengine model xxx.tmfile */
create_graph(acl_context, "tengine", model_file);
参考 Demo
源码请参考 tm_classification_acl.c
执行结果
[root@localhost tengine-lite]# ./tm_mssd_acl -m mssd.tmfile -i ssd_dog.jpg -t 1 -r 10
start to run register cpu allocator
start to run register acl allocator
tengine-lite library version: 1.0-dev
run into gpu by acl
Repeat 10 times, thread 2, avg time 82.32 ms, max_time 135.70 ms, min_time 74.10 ms
--------------------------------------
detect result num: 3
dog :99.8%
BOX:( 138 , 209 ),( 324 , 541 )
car :99.7%
BOX:( 467 , 72 ),( 687 , 171 )
bicycle :99.6%
BOX:( 106 , 141 ),( 574 , 415 )
======================================
[DETECTED IMAGE SAVED]:
======================================
Tengine 使用 TensorRT 进行部署
编译
参考 源码编译(TensorRT) 章节。
运行
模型格式
TensorRT 支持加载 Float32 tmfile,如果工作在 Float16 推理精度模式下,Tengine 框架将在加载 Float32 tmfile 后自动在线转换为 Float16 数据进行推理。
推理精度设置
TensorRT 支持 Float32 、 Float16 、 Int8 三种精度模型进行网络模型推理,需要在执行 prerun_graph_multithread(graph_t graph, struct options opt) 之前通过 struct options opt 显式设置推理精度。
Enable GPU FP32 mode
/* set runtime options */
struct options opt;
opt.num_thread = num_thread;
opt.cluster = TENGINE_CLUSTER_ALL;
opt.precision = TENGINE_MODE_FP32;
opt.affinity = 0;
Enable GPU FP16 mode
/* set runtime options */
struct options opt;
opt.num_thread = num_thread;
opt.cluster = TENGINE_CLUSTER_ALL;
opt.precision = TENGINE_MODE_FP16;
opt.affinity = 0;
Enable GPU Int8 mode
/* set runtime options */
struct options opt;
opt.num_thread = num_thread;
opt.cluster = TENGINE_CLUSTER_ALL;
opt.precision = TENGINE_MODE_INT8;
opt.affinity = 0;
后端硬件绑定
在加载模型前,需要显式指定 TensorRT 硬件后端 context,并在调用 graph_t create_graph(context_t context, const char* model_format, const char* fname, ...) 时传入该参数。
/* create NVIDIA TensorRT backend */
context_t trt_context = create_context("trt", 1);
add_context_device(trt_context, "TRT");
/* create graph, load tengine model xxx.tmfile */
create_graph(trt_context, "tengine", model_file);
参考 Demo
源码请参考 tm_classification_trt.cpp
执行结果
nvidia@xaiver:~/tengine-lite-tq/build-linux-trt$ ./tm_classification_trt -m mobilenet_v1.tmfile -i cat.jpg -g 224,224 -s 0.017,0.017,0.017 -w 104.007,116.669,122.679 -r 10
Tengine plugin allocator TRT is registered.
tengine-lite library version: 1.2-dev
Tengine: Try using inference precision TF32 failed, rollback.
model file : /home/nvidia/tengine-test/models/mobilenet_v1.tmfile
image file : /home/nvidia/tengine-test/images/cat.jpg
img_h, img_w, scale[3], mean[3] : 224 224 , 0.017 0.017 0.017, 104.0 116.7 122.7
Repeat 1 times, thread 1, avg time 2.10 ms, max_time 3.10 ms, min_time 2.03 ms
--------------------------------------
8.574147, 282
7.880117, 277
7.812574, 278
7.286457, 263
6.357487, 281
--------------------------------------
Tengine 使用 CUDA 进行部署
编译
参考 源码编译(CUDA) 章节生成部署所需要的以下库文件:
待补充
运行
模型格式
CUDA 当前仅支持加载 Float32 tmfile。
推理精度设置
CUDA 支持 Float32 一种精度模型进行网络模型推理,需要在执行 prerun_graph_multithread(graph_t graph, struct options opt) 之前通过 struct options opt 显式设置推理精度。
Enable GPU FP32 mode
/* set runtime options */
struct options opt;
opt.num_thread = num_thread;
opt.cluster = TENGINE_CLUSTER_ALL;
opt.precision = TENGINE_MODE_FP32;
opt.affinity = 0;
后端硬件绑定
在加载模型前,需要显式指定 CUDA 硬件后端 context,并在调用 graph_t create_graph(context_t context, const char* model_format, const char* fname, ...) 时传入该参数。
/* create NVIDIA CUDA backend */
context_t cuda_context = create_context("cuda", 1);
add_context_device(cuda_context, "CUDA");
/* create graph, load tengine model xxx.tmfile */
create_graph(cuda_context, "tengine", model_file);
参考 Demo
源码请参考 tm_classification_tensorrt.c
执行结果
nvidia@xaiver:~/tengine-lite-tq/build-linux-cuda$ ./tm_classification_cuda -m mobilenet_v1.tmfile -i cat.jpg -g 224,224 -s 0.017,0.017,0.017 -w 104.007,116.669,122.679 -r 10
Tengine plugin allocator CUDA is registered.
tengine-lite library version: 1.2-dev
model file : /home/nvidia/tengine-test/models/mobilenet_v1.tmfile
image file : /home/nvidia/tengine-test/images/cat.jpg
img_h, img_w, scale[3], mean[3] : 224 224 , 0.017 0.017 0.017, 104.0 116.7 122.7
Repeat 10 times, thread 1, avg time 4.58 ms, max_time 5.72 ms, min_time 4.24 ms
--------------------------------------
8.574145, 282
7.880118, 277
7.812578, 278
7.286452, 263
6.357486, 281
--------------------------------------
源码编译环境准备
依赖工具安装
编译 Tengine 依赖 git, g++, cmake, make 等以下基本工具,如果没有安装,
Ubuntu18.04 系统命令如下:
sudo apt-get install cmake make g++ git
Fedora28 系统命令如下:
sudo dnf install cmake make g++ git
编译选项说明
基础选项
| 编译选项 | 说明 | 默认值 |
|---|---|---|
| TENGINE_ENABLE_ALL_SYMBOL | 编译时是否打开所有符号 | ON |
| TENGINE_OPENMP | 编译时启用 OpenMP 并行单元 | ON |
| TENGINE_BUILD_BENCHMARK | 编译性能测试模块 | ON |
| TENGINE_BUILD_EXAMPLES | 编译 Example 模块 | ON |
| TENGINE_BUILD_TESTS | 编译单元测试模块 | OFF |
| TENGINE_COVERAGE | 编译时启用代码覆盖率测试功能 | OFF |
| TENGINE_BUILD_CPP_API | 编译时启用 C++ API | OFF |
| TENGINE_DEBUG_DATA | 编译时启用调试选项,数据提取 | OFF |
| TENGINE_DEBUG_TIME | 编译时启用调试选项,单层耗时分析 | OFF |
| TENGINE_DEBUG_MEM_STAT | 编译时启用调试选项,内存状态分析 | OFF |
| TENGINE_ARCH_ARM_82 | 编译时启用 ARM 架构的 armv8.2 指令 | OFF |
HCL 选项
| 编译选项 | 说明 | 默认值 |
|---|---|---|
| TENGINE_STANDALONE_HCL | 编译时单独生成 HCL 库 | OFF |
| TENGINE_STANDALONE_HCL_AUTO_LOAD | 编译时指定 HCL 库自动加载 | ON |
插件选项
| 编译选项 | 说明 | 默认值 |
|---|---|---|
| TENGINE_ENABLE_ACL | 编译 ACL 插件 | OFF |
| TENGINE_ENABLE_VULKAN | 编译 Vulkan插件 | OFF |
| TENGINE_ENABLE_TENSORRT | 编译 TensorRT 插件 | OFF |
| TENGINE_ENABLE_CUDABACKEND | 编译 CUDA 插件 | OFF |
| TENGINE_ENABLE_OPENCL | 编译 OpenCL 插件 | OFF |
| TENGINE_ENABLE_TIM_VX | 编译 TIM-VX 插件 | OFF |
| TENGINE_ENABLE_NNIE | 编译 NNIE 插件 | OFF |
源码编译(Linux)
本地编译
下载 Tengine 源码
下载 Tengine 源码,位于 Tengine 的分支 tengine-lite 上:
git clone -b tengine-lite https://github.com/OAID/Tengine.git Tengine
编译 Tengine
cd Tengine
mkdir build
cd build
cmake ..
make
make install
编译完成后 build/install/lib 目录会生成 libtengine-lite.so 文件,如下所示:
install
├── bin
│ ├── tm_benchmark
│ ├── tm_classification
│ └── tm_mobilenet_ssd
├── include
│ └── tengine_c_api.h
└── lib
└── libtengine-lite.so
交叉编译 Arm32/64 Linux 版本
下载源码
git clone -b tengine-lite https://github.com/OAID/Tengine.git Tengine
安装交叉编译工具链
Arm64 Linux 交叉编译工具链为:
sudo apt install g++-aarch64-linux-gnu
Arm32 Linux 交叉编译工具链为:
sudo apt install g++-arm-linux-gnueabihf
编译 Tengine
Arm64 Linux 交叉编译
cd Tengine
mkdir build
cd build
cmake -DCMAKE_TOOLCHAIN_FILE=../toolchains/aarch64-linux-gnu.toolchain.cmake ..
make
make install
Arm32 Linux 交叉编译
cd Tengine
mkdir build
cd build
cmake -DCMAKE_TOOLCHAIN_FILE=../toolchains/arm-linux-gnueabihf.toolchain.cmake ..
make
make install
编译完成后会生成 libtengine-lite.so 文件,并且会把相关的头文件、libtengine-lite.so 文件和相关的测试程序复制到 build/install 目录中。
源码编译(Android)
安装 Android NDK
准备 android toolchain 文件
(可选) 删除debug编译参数,缩小二进制体积 android-ndk issue ,android.toolchain.cmake 这个文件可以从 $ANDROID_NDK/build/cmake 找到:
# 用编辑器打开 $ANDROID_NDK/build/cmake/android.toolchain.cmake
# 删除 "-g" 这行
list(APPEND ANDROID_COMPILER_FLAGS
-g
-DANDROID
...)
下载 Tengine 源码
git clone -b tengine-lite https://github.com/OAID/Tengine.git Tengine
编译 Tengine
Arm64 Android
cd Tengine
mkdir build-android-aarch64
cd build-android-aarch64
cmake -DCMAKE_TOOLCHAIN_FILE=$ANDROID_NDK/build/cmake/android.toolchain.cmake -DANDROID_ABI="arm64-v8a" -DANDROID_ARM_NEON=ON -DANDROID_PLATFORM=android-21 ..
make -j$(nproc)
make install
Arm32 Android
cd Tengine
mkdir build-android-armv7
cd build-android-armv7
cmake -DCMAKE_TOOLCHAIN_FILE=$ANDROID_NDK/build/cmake/android.toolchain.cmake -DANDROID_ABI="armeabi-v7a" -DANDROID_ARM_NEON=ON -DANDROID_PLATFORM=android-19 ..
make -j$(nproc)
make install
源码编译(ACL)
简介
ARM计算库(ACL)是一套计算机视觉和机器学习功能,使用SIMD技术为ARM cpu和gpu优化。 Tengine支持与ACL的OpenCL库集成,通过ARM-Mail GPU对CNN进行推理。
support check:
sudo apt install clinfo
clinfo
结果:
Number of platforms 1
.....
Build
ACL GPU Library
下载 ACL
$ git clone https://github.com/ARM-software/ComputeLibrary.git
$ git checkout v20.05
构建 ACL
$ scons Werror=1 -j4 debug=0 asserts=1 neon=0 opencl=1 embed_kernels=1 os=linux arch=arm64-v8a
下载 Tengine
$ git clone https://github.com/OAID/Tengine.git Tengine
$ cd Tengine
创建依赖文件
$ cd <tengine-lite-root-dir>
$ mkdir -p ./3rdparty/acl/lib
$ mkdir -p ./3rdparty/acl/include
$ cp -rf ComputeLibrary/include/* Tengine/3rdparty/acl/include
$ cp -rf ComputeLibrary/arm_compute Tengine/3rdparty/acl/include
$ cp -rf ComputeLibrary/support Tengine/3rdparty/acl/include
$ cp -rf ComputeLibrary/build/libarm_compute*.so Tengine/3rdparty/acl/lib/
构建选项
$ mkdir build-acl-arm64 && cd build-acl-arm64
$ cmake -DCMAKE_TOOLCHAIN_FILE=../toolchains/aarch64-linux-gnu.toolchain.cmake \
-DTENGINE_ENABLE_ACL=ON ..
$ make -j4
$ make install
示例
依赖库
3rdparty/acl/lib/
├── libarm_compute.so
├── libarm_compute_core.so
└── libarm_compute_graph.so
build-acl-arm64/install/lib/
└── libtengine-lite.so
Set FP16 Inference mode
Enable GPU FP16 mode
/* set runtime options */
struct options opt;
opt.num_thread = num_thread;
opt.cluster = TENGINE_CLUSTER_ALL;
opt.precision = TENGINE_MODE_FP16;
opt.affinity = 0;
结果
[root@localhost tengine-lite]# ./tm_mssd_acl -m mssd.tmfile -i ssd_dog.jpg -t 1 -r 10
start to run register cpu allocator
start to run register acl allocator
tengine-lite library version: 1.0-dev
run into gpu by acl
Repeat 10 times, thread 2, avg time 82.32 ms, max_time 135.70 ms, min_time 74.10 ms
--------------------------------------
detect result num: 3
dog :99.8%
BOX:( 138 , 209 ),( 324 , 541 )
car :99.7%
BOX:( 467 , 72 ),( 687 , 171 )
bicycle :99.6%
BOX:( 106 , 141 ),( 574 , 415 )
======================================
[DETECTED IMAGE SAVED]:
======================================
支持硬件列表
| 芯片厂家 | 型号 |
|---|---|
| arm-mali | T-860、G31、G52 |
支持算子列表
源码编译(CUDA)
How to build
Build for Linux
On Ubuntu
setup nvcc enva
$ export CUDACXX=/usr/local/cuda/bin/nvcc
build
$ cd <tengine-lite-root-dir>
$ mkdir -p build-linux-cuda && cd build-linux-cuda
$ cmake -DTENGINE_ENABLE_CUDA=ON ..
$ make -j4
$ make install
源码编译(OpenCL)
How to build
Setup Tengine project ROOT_PATH
$ export ROOT_PATH={Path of tengine-lite}
Build
-DOPENCL_LIBRARY: libOpenCL.so 路径。可通过 <sudo find /usr -name "libOpenCL.so"> 命令查询
-DOPENCL_INCLUDE_DIRS:指定CL/cl.h 路径。可通过 <sudo find /usr -name "cl.h"> 命令查询
$ cd <tengine-lite-root-dir>
$ mkdir -p build-linux-opencl
$ cmake \
-DTENGINE_ENABLE_OPENCL=ON \
-DOPENCL_LIBRARY=/usr/lib/aarch64-linux-gnu/libOpenCL.so \
-DOPENCL_INCLUDE_DIRS=/usr/include ..
$ make -j4
$ make install
源码编译(TensorRT)
How to build
Build for Linux
On Ubuntu
build
$ cd <tengine-lite-root-dir>
$ mkdir -p build-linux-trt && cd build-linux-trt
$ cmake -DTENGINE_ENABLE_TENSORRT=ON \
-DTENSORRT_INCLUDE_DIR=/usr/include/aarch64-linux-gnu \
-DTENSORRT_LIBRARY_DIR=/usr/lib/aarch64-linux-gnu ..
$ make -j4
$ make install
源码编译(TIM-VX )
1. 简介
TIM-VX 是 VeriSilicon 的 OpenVX 张量接口模块(Tensor Interface Module for OpenVX,可以视作 OpenVX 的扩展支持)。 Tengine Lite 已经完成 TIM-VX 的支持和集成, 在典型的 VeriSilicon Vivante NPU 硬件设备上,比如 Khadas VIM3 (Amlogic A311D)、Khadas VIM3L 上已经可以完成 Tengine 模型的推理。 目前支持的芯片平台有:
2. 如何编译
2.1 依赖项
依赖项有三部分:
第一部分是 TIM-VX 的源码,代码仓库在下方;目前TIM-VX版本更新较快,Tengine适配的TIM-VX版本为68b5acb,下载完TIM-VX后,需要切换至该版本。 第二部分是 芯片对应板卡的 galcore.ko 的版本,对于 linux 平台,最低版本是 6.4.3.p0.286725;对于 Android 平台,最低版本是 6.4.3.279124+1。 第三部分是 TIM-VX 的依赖库,主要是直接依赖的 libCLC.so libGAL.so libOpenVX.so libOpenVXU.so libVSC.so libArchModelSw.so 等,不同的芯片最后的库文件依赖有可能是不完全相同的(比如 Android 上依赖的是 libarchmodelSw.so),要根据拿到的 SDK 进行灵活调整。
2.2 编译过程
为了方便理解全流程的过程,首先描述编译的完整过程的流程。 在编译过程中,Tengine 将会先编译 TIM-VX 的代码,然后编译 Tengine-lite 的代码,并进行链接,链接时需要找到对应的各个芯片的用户态依赖库。需要注意的是,芯片板卡内部已经集成好的 galcore.ko 可能并不和依赖 so 的版本一致,编译时成功了也会有运行时错误打印提示版本不匹配。 此外,较早发布的系统,通常集成有较早版本的库文件,此时可以考虑烧入最新的镜像或运行升级命令进行更新。
2.3 拉取代码
这里假设是直接从 github 拉取代码,并且是拉取到同一个文件夹里。
2.3.1 拉取 TIM-VX
$ git clone https://github.com/VeriSilicon/TIM-VX.git
$ cd TIM-VX
$ git checkout 68b5acb
2.3.2 拉取 Tengine-Lite
$ git clone https://github.com/OAID/Tengine.git tengine-lite
$ cd tengine-lite
2.4 选择 Tengine-Lite 集成编译 TIM-VX 方法
Tengine-Lite 支持三种 TIM-VX 的集成编译方法,具体如下:
第一种是将 TIM-VX 代码主要部分包含在 Tengine-Lite 的代码里,一并编译,最后得到单一 libtengine-lite.so,该 so 依赖 libCLC.so 等一系列 so;
第二种是不进行代码复制,但指定 CMake 选项
-DTIM_VX_SOURCE_DIR=<你的拉取位置>/TIM-VX,此时 Tengine-Lite 会查找TIM_VX_SOURCE_DIR指定的位置,并自动引用正确的 TIM-VX 代码文件,其他方面和第一种一致;
第三种是不进行集成编译,指定 CMake 选项
-DTENGINE_ENABLE_TIM_VX_INTEGRATION=OFF,TIM-VX 编译为单独的 libtim-vx.so,编译完成后,libtegine-lite.so 依赖 libtim-vx.so,libtim-vx.so 依赖其他的用户态驱动 libCLC.so 等一系列 so。
一般地,Tengine 推荐第一种方法以获得单一 so,并进行集成,这样可以在 Android APK 编译时减少一个依赖。这三种方法里,都需要准备 3rdparty 依赖,对于 Linux 和 Android 准备是有区别的,请注意分别进行区分。下面的几部分编译都是按照方法一进行描述的,其他方法的编译请根据方法一进行适当修改。
2.4 准备编译 x86_64 仿真环境
TIM-VX 提供了在 x86_64 宿主系统上的预编译依赖库,此部分依赖库可以在没有 NPU 的情况下,在 PC 上进行算法的开发和验证,其功能和板卡中是一致的,精度因计算路径区别略有影响但不影响验证。
2.4.1 准备代码
这部分的目的是将 TIM-VX 的 include 和 src 目录复制到 Tengine-Lite 的 source/device/tim-vx 目录下,以便于 CMake 查找文件完成编译,参考命令如下:
$ cd <tengine-lite-root-dir>
$ cp -rf ../TIM-VX/include ./source/device/tim-vx/
$ cp -rf ../TIM-VX/src ./source/device/tim-vx/
2.4.3 准备 x86_64 3rdparty 依赖
这部分的目的是将 TIM-VX 的 x86_64 平台用户态驱动和其他头文件放入 Tengine-Lite 的 3rdparty 准备好,以便于链接阶段查找。预编译好的库文件和头文件已经在拉取下来的 TIM-VX 的 prebuilt-sdk/x86_64_linux 文件夹下,复制的参考命令如下:
$ cd <tengine-lite-root-dir>
$ mkdir -p ./3rdparty/tim-vx/include
$ mkdir -p ./3rdparty/tim-vx/lib/x86_64
$ cp -rf ../TIM-VX/prebuilt-sdk/x86_64_linux/include/* ./3rdparty/tim-vx/include/
$ cp -rf ../TIM-VX/prebuilt-sdk/x86_64_linux/lib/* ./3rdparty/tim-vx/lib/x86_64/
2.4.4 执行编译
编译时需要打开 TIM-VX 后端的支持,参考命令如下:
$ cd <tengine-lite-root-dir>
$ mkdir build && cd build
$ cmake -DTENGINE_ENABLE_TIM_VX=ON ..
$ make -j`nproc` && make install
编译完成后,在 build 目录下的 install 文件夹里就有编译好的 libtengine-lite.so 库文件和头文件,可用于集成开发了。
需要注意的是,如果此时还想直接运行测试 example,需要手动指定一下 LD_LIBRARY_PATH 以便找到依赖的预编译好的用户态驱动。参考命令如下,需要根据实际情况调整:
$ export LD_LIBRARY_PATH=<tengine-lite-root-dir>/3rdparty/tim-vx/lib/x86_64${LD_LIBRARY_PATH:+:${LD_LIBRARY_PATH}}
2.5 准备编译 Khadas VIM3/VIM3L Linux 平台
VIM3/VIM3L 的 linux 平台是有 NPU 预置驱动的,可以通过 sudo apt list --installed 查看已经安装的版本:
khadas@Khadas:~$ sudo apt list --installed | grep aml-npu
WARNING: apt does not have a stable CLI interface. Use with caution in scripts.
aml-npu/now 6.4.3CB-2 arm64
khadas@Khadas:~$
对于 6.4.3CB-2 的版本(galcore 内核打印为 6.4.3.279124CB),推荐进行联网执行升级:
sudo apt-get update
sudo apt-get upgrade
sudo apt-get full-upgrade
当前的升级版本是 6.4.4.3AAA(galcore 的内核打印是 6.4.4.3.310723AAA),升级后编译时不需要准备 3rdparty 的对应 so,系统默认的版本就可以满足要求。
下面针对这两种情况,分别会进行讨论;然而新的 npu 驱动版本支持更多的 OP,升级总是没错的(如果烧录的是较早的镜像,NPU 版本可能是 6.4.2,和 6.4.3CB-2 一样不支持 TIM-VX,视同 6.4.3CB-2 进行编译即可,或进行推荐的升级按 6.4.4 及以上版本的流程进行编译)。
2.5.1 准备代码
准备代码环节不用考虑 VIM3/VIM3L 的 NPU 版本,参考命令如下:
$ cd <tengine-lite-root-dir>
$ cp -rf ../TIM-VX/include ./source/device/tim-vx/
$ cp -rf ../TIM-VX/src ./source/device/tim-vx/
2.5.2 准备 VIM3/VIM3L 较早版本 3rdparty 依赖
如果是较早版本的 NPU 依赖库 (6.4.3.p0.286725),不打算/不可能进行升级,那么参考准备步骤如下:
$ wget -c https://github.com/VeriSilicon/TIM-VX/releases/download/v1.1.28/aarch64_A311D_D312513_A294074_R311680_T312233_O312045.tgz
$ tar zxvf aarch64_A311D_D312513_A294074_R311680_T312233_O312045.tgz
$ mv aarch64_A311D_D312513_A294074_R311680_T312233_O312045 prebuild-sdk-a311d
$ cd <tengine-lite-root-dir>
$ mkdir -p ./3rdparty/tim-vx/include
$ mkdir -p ./3rdparty/tim-vx/lib/aarch64
$ cp -rf ../prebuild-sdk-a311d/include/* ./3rdparty/tim-vx/include/
$ cp -rf ../prebuild-sdk-a311d/lib/* ./3rdparty/tim-vx/lib/aarch64/
上面的命令是假设板子是 VIM3,对于 VIM3L,参考命令如下:
$ wget -c https://github.com/VeriSilicon/TIM-VX/releases/download/v1.1.28/aarch64_S905D3_D312513_A294074_R311680_T312233_O312045.tgz
$ tar zxvf aarch64_S905D3_D312513_A294074_R311680_T312233_O312045.tgz
$ mv aarch64_S905D3_D312513_A294074_R311680_T312233_O312045 prebuild-sdk-s905d3
$ cd <tengine-lite-root-dir>
$ mkdir -p ./3rdparty/tim-vx/include
$ mkdir -p ./3rdparty/tim-vx/lib/aarch64
$ cp -rf ../prebuild-sdk-s905d3/include/* ./3rdparty/tim-vx/include/
$ cp -rf ../prebuild-sdk-s905d3/lib/* ./3rdparty/tim-vx/lib/aarch64/
注意,以上步骤都是假设 PC 的操作系统是 Linux,或者准备在板卡的 Linux 系统上编译;如果宿主系统是 WSL,请务必全部流程在 WSL 的命令行里面执行,不要在 windows 下执行,避免软连接问题。
2.5.3 准备 VIM3/VIM3L 较早版本的编译
在这一步骤里,需要注意区分是要在 PC 上进行交叉编译还是在板卡上进行本地编译,本地编译比较简单,交叉编译复杂一些,但比较快。 假定前面的操作都是在板卡上进行的,那么执行的就是本地编译。本地编译时,尤其要注意,系统中的 lib 如果和 3rdparty 里面的有所不同时,那么链接时有可能链接到系统里面的版本,而不是 3rdparty 下面的版本。运行出错时需要用 ldd 命令检查一下链接情况。优先推荐先进行一下文件替换,然后再进行本地编译(如何替换请见 FAQ)。假设准备工作已经参考命令如下:
$ cd <tengine-lite-root-dir>
$ mkdir build && cd build
$ cmake -DTENGINE_ENABLE_TIM_VX=ON ..
$ make -j`nproc` && make install
编译完成后,在 build 目录下的 install 文件夹里就有编译好的 libtengine-lite.so 库文件和头文件,可用于集成开发了。
需要注意的是,如果此时还想直接运行测试 example,并且没有替换文件,需要手动指定一下 LD_LIBRARY_PATH 以便找到依赖的预编译好的用户态驱动。参考命令如下,需要根据实际情况调整:
$ export LD_LIBRARY_PATH=<tengine-lite-root-dir>/3rdparty/tim-vx/lib/x86_64${LD_LIBRARY_PATH:+:${LD_LIBRARY_PATH}}
执行后,请再用 ldd libtengine-lite.so 命令检查一下,确保 NPU 驱动指向 3rdparty 目录的 so 一系列文件(替换是优先的选择)。
如果是交叉编译,那么请注意检查交叉编译的编译器不要高于板卡上的 gcc 版本,否则会导致在班子运行时,符号找不到的问题。确认这一点后,就可以进行交叉编译了。 如果手头没有合适的交叉编译工具,或者系统安装的版本较高,可以使用如下命令进行下载 linaro aarch64 工具链(或 arm release 的版本,二选一即可):
$ wget -c http://releases.linaro.org/components/toolchain/binaries/7.3-2018.05/aarch64-linux-gnu/gcc-linaro-7.3.1-2018.05-x86_64_aarch64-linux-gnu.tar.xz
$ tar xf gcc-linaro-7.3.1-2018.05-x86_64_aarch64-linux-gnu.tar.xz
下载完成后,进行交叉编译,参考命令如下:
$ cd <tengine-lite-root-dir>
$ mkdir build && cd build
$ cmake -DTENGINE_ENABLE_TIM_VX=ON -DCMAKE_SYSTEM_NAME=Linux -DCMAKE_SYSTEM_PROCESSOR=aarch64 -DCMAKE_C_COMPILER=`pwd`/../../gcc-linaro-7.3.1-2018.05-x86_64_aarch64-linux-gnu/bin/aarch64-linux-gnu-gcc -DCMAKE_CXX_COMPILER=`pwd`/../../gcc-linaro-7.3.1-2018.05-x86_64_aarch64-linux-gnu/bin/aarch64-linux-gnu-g++ ..
$ make -j`nproc` && make install
如果系统安装的 gcc-aarch64-linux-gnu/g++-aarch64-linux-gnu 满足板子的 gcc 版本要求,也可以通过如下参考命令进行编译:
$ cd <tengine-lite-root-dir>
$ mkdir build && cd build
$ cmake -DTENGINE_ENABLE_TIM_VX=ON -DCMAKE_TOOLCHAIN_FILE=../toolchains/aarch64-linux-gnu.toolchain.cmake ..
$ make -j`nproc` && make install
2.5.4 准备 VIM3/VIM3L 最新版本 3rdparty 依赖
最佳实践是升级系统到最新版本,使得 NPU 的版本 >= 6.4.4。此时没有预置的 3rdparty,所以优先推荐的是采用在板上编译的方式进行编译,这时由于必要的 TIM-VX 依赖用户态驱动的 so 都已在系统目录下,不用准备 3rdparty 下的 lib 目录。参考命令如下:
$ wget -c https://github.com/VeriSilicon/TIM-VX/releases/download/v1.1.28/aarch64_S905D3_D312513_A294074_R311680_T312233_O312045.tgz
$ tar zxvf aarch64_S905D3_D312513_A294074_R311680_T312233_O312045.tgz
$ mv aarch64_S905D3_D312513_A294074_R311680_T312233_O312045 prebuild-sdk-s905d3
$ cd <tengine-lite-root-dir>
$ mkdir -p ./3rdparty/tim-vx/include
$ mkdir -p ./3rdparty/tim-vx/lib/aarch64
$ cp -rf ../prebuild-sdk-s905d3/include/* ./3rdparty/tim-vx/include/
可以看出,只需要准备 include 文件夹到 3rdparty 即可。
如果确要进行交叉编译,此时下载到的 lib 目录下的 so 和板子是不匹配的,那么只需要按文件列表进行提取,这些文件在板卡的 /usr/lib 目录下;提取完成后,放入 ./3rdparty/tim-vx/lib/aarch64 目录下即可。文件列表可见下载到的压缩包里面的 lib 目录,或 FAQ 部分的文件列表。
2.5.5 准备 VIM3/VIM3L 最新版本的编译
在板子上进行本地编译很简单,参考命令如下:
$ cd <tengine-lite-root-dir>
$ mkdir build && cd build
$ cmake -DTENGINE_ENABLE_TIM_VX=ON ..
$ make -j`nproc` && make install
如果是交叉编译,那么请参考前面 [2.5.3 准备 VIM3/VIM3L 较早版本的编译] 部分准备交叉工具链并进行编译即可。
2.5.5.6 准备 VIM3/VIM3L 最新版本的编译(更新于2022.04.14)
VIM3近期有过一次系统升级,升级版本是 6.4.6.2.5.3.2(galcore 的内核打印是 6.4.6.2.5.3.2),该版本驱动和库存在一些问题,不能直接编译。经验证后,需要借助TIM-VX提供的驱动和npu相关库文件,下面提供一个可行的办法:
- 更新khadas vim3驱动和库
$ wget https://github.com/VeriSilicon/TIM-VX/releases/download/v1.1.37/aarch64_A311D_6.4.9.tgz
$ tar zxvf aarch64_A311D_6.4.9.tgz
$ cd vim3_aarch64/lib
$ sudo rmmod galcore
$ sudo insmod galcore.ko
$ sudo cp -r `ls -A | grep -v "galcore.ko"` /usr/lib
请反复确认驱动是否加载成功,或者多执行几次
- 下载TIM-VX仓库
$ git clone https://github.com/VeriSilicon/TIM-VX.git
$ cd TIM-VX && git checkout v1.1.37
- 下载Tengine仓库并编译
$ git clone https://github.com/OAID/Tengine
$ cd Tengine && git checkout 8c9a85a
$ cp -rf ../TIM-VX/include ./source/device/tim-vx/
$ cp -rf ../TIM-VX/src ./source/device/tim-vx/
$ mkdir -p ./3rdparty/tim-vx/include
$ mkdir -p ./3rdparty/tim-vx/lib/aarch64
$ cp -rf ../vim3_aarch64/include/* ./3rdparty/tim-vx/include/
$ mkdir build && cd build
$ cmake -DTENGINE_ENABLE_TIM_VX=ON ..
$ make -j`nproc` && make install
2.6 编译 EAIS-750E Linux平台
EAIS-750E是OPEN AI LAB官方推出的工业智能盒子,主控使用Amlogic A311D芯片,也是Tengine的参考开发平台。系统Linux系统包含 NPU 驱动(6.4.4.3AAA)和Tengine-Lite v1.5库( /usr/lib 目录下),可以直接调用。如果为了学习调试Tengine或者为了升级Github最新版本,可以手动在盒子上本地编译。
- 下载TIM-VX和Tengine代码仓库
$ git clone https://github.com/VeriSilicon/TIM-VX.git
$ git clone https://github.com/OAID/Tengine.git
$ cd Tengine
$ cp -rf ../TIM-VX/include ./source/device/tim-vx/
$ cp -rf ../TIM-VX/src ./source/device/tim-vx/
- 准备编译环境 编译依赖的系统库在EAIS-750E板载/usr/lib/下能搜索到,因此只需要拷贝头文件
$ wget -c https://github.com/VeriSilicon/TIM-VX/releases/download/v1.1.28/aarch64_A311D_D312513_A294074_R311680_T312233_O312045.tgz
$ tar zxvf aarch64_A311D_D312513_A294074_R311680_T312233_O312045.tgz
$ mv aarch64_A311D_D312513_A294074_R311680_T312233_O312045 prebuild-sdk-a311d
$ cd <tengine-lite-root-dir>
$ mkdir -p ./3rdparty/tim-vx/include
$ mkdir -p ./3rdparty/tim-vx/lib/aarch64
$ cp -rf ../prebuild-sdk-a311d/include/* ./3rdparty/tim-vx/include/
- 如遇到cmake版本不够,更新板子上的cmake版本
$ sudo apt-get autoremove cmake
$ wget https://cmake.org/files/v3.22/cmake-3.22.0-linux-aarch64.tar.gz
$ tar -xzvf cmake-3.22.0-linux-aarch64.tar.gz
$ sudo mv cmake-3.22.0-linux-aarch64 /opt/cmake-3.22
$ ln -sf /opt/cmake-3.22/bin/* /usr/bin/
$ cmake --version
- 编译Tengine
$ cd <tengine-lite-root-dir>
$ mkdir build && cd build
$ cmake -DTENGINE_ENABLE_TIM_VX=ON ..
$ make -j`nproc` && make install
编译完成后,将build/install/lib/libtengine-lite.so 文件拷贝到/usr/lib/下替换原有库完成安装。
2.7 编译 NXP i.MX 8M Plus linux 平台
以 i.MX 8M Plus 的官方开发板 8MPLUSLPD4-EVK 为例,优先推荐在板子上本地编译的方法进行编译,准备工作较为简单。
2.7.1 准备代码
和前面 VIM3/VIM3L 的本地编译准备过程相同,参考代码如下:
$ cd <tengine-lite-root-dir>
$ cp -rf ../TIM-VX/include ./source/device/tim-vx/
$ cp -rf ../TIM-VX/src ./source/device/tim-vx/
2.7.2 准备 3rdparty 依赖
准备过程和 VIM3/VIM3L 本地编译 NPU 最新版本相同,只需要准备 3rdparty 的 include 文件夹即可。
$ wget -c https://github.com/VeriSilicon/TIM-VX/releases/download/v1.1.28/aarch64_S905D3_D312513_A294074_R311680_T312233_O312045.tgz
$ tar zxvf aarch64_S905D3_D312513_A294074_R311680_T312233_O312045.tgz
$ mv aarch64_S905D3_D312513_A294074_R311680_T312233_O312045 prebuild-sdk-s905d3
$ cd <tengine-lite-root-dir>
$ mkdir -p ./3rdparty/tim-vx/include
$ mkdir -p ./3rdparty/tim-vx/lib/aarch64
$ cp -rf ../prebuild-sdk-s905d3/include/* ./3rdparty/tim-vx/include/
2.7.3 编译
$ cd <tengine-lite-root-dir>
$ mkdir build && cd build
$ cmake -DTENGINE_ENABLE_TIM_VX=ON ..
$ make -j`nproc` && make install
完成编译后,即可考虑测试一下 example 的内容,或进行其他相关开发工作了。
2.8 编译 Rockchip RV1109/RV1126 buildroot 平台
瑞芯微的 RV1109/RV1126 芯片只有 buildroot,没有完整系统的概念,所以不能进行本地编译,只能交叉编译。
解压缩 RockChip 提供(或板卡厂商代为提供)的 RV1109/RV1126 SDK 后,在 prebuilt 目录里面可以找到交叉编译的工具链 gcc-arm-8.3-2019.03-x86_64-arm-linux-gnueabihf (另一套 linaro 的不是用来编译应用的,忽略)。
在 SDK 的 external/rknpu/drivers/linux-armhf-puma/usr/lib 目录下的文件,就是我们需要的 NPU 编译依赖库。
2.8.1 准备代码
和前面 VIM3/VIM3L 的本地编译准备过程相同,参考命令如下:
$ cd <tengine-lite-root-dir>
$ cp -rf ../TIM-VX/include ./source/device/tim-vx/
$ cp -rf ../TIM-VX/src ./source/device/tim-vx/
2.8.2 准备3rdparty 依赖
准备的 include 目录和 VIM3/VIM3L 本地编译 NPU 最新版本相同,下载一份 perbuild SDK,将其中的 include 文件夹复制到 3rdparty/tim-vx 目录。
依赖的 lib 目录下的文件需要从前面 SDK 中解压出来的 external/rknpu/drivers/linux-armhf-puma/usr/lib 目录提取。将该目录下的文件全部(实际上不需要全部复制,FAQ 有文件列表)复制到 3rdparty/tim-vx/lib/aarch32 文件夹下即可。
完整过程的参考命令如下:
$ wget -c https://github.com/VeriSilicon/TIM-VX/releases/download/v1.1.28/aarch64_S905D3_D312513_A294074_R311680_T312233_O312045.tgz
$ tar zxvf aarch64_S905D3_D312513_A294074_R311680_T312233_O312045.tgz
$ mv aarch64_S905D3_D312513_A294074_R311680_T312233_O312045 prebuild-sdk-s905d3
$ cd <tengine-lite-root-dir>
$ mkdir -p ./3rdparty/tim-vx/include
$ mkdir -p ./3rdparty/tim-vx/lib/aarch32
$ cp -rf ../prebuild-sdk-s905d3/include/* ./3rdparty/tim-vx/include/
$ cp -rf <rk_sdk_npu_lib>/* ./3rdparty/tim-vx/lib/aarch32/
注意,<rk_sdk_npu_lib> 是指 SDK 解压出来的 external/rknpu/drivers/linux-armhf-puma/usr/lib 的完整路径,需要按实际情况进行修改。
2.8.3 编译
准备交叉编译工具链,需要设置环境变量 PATH 使其能够找到工具链的 gcc/g++,参考命令如下:
export PATH=<cross_tool_chain>/bin:$PATH
需要注意,<cross_tool_chain> 是指工具链 gcc-arm-8.3-2019.03-x86_64-arm-linux-gnueabihf 从 SDK 解压后的实际位置,需按实际情况修改。
开发板上不一定有 OpenMP 的运行时库 libgomp.so,因此在 CMake 配置时需要给 CMake关闭 OpenMP 选项。完整编译过程参考命令如下:
$ cd <tengine-lite-root-dir>
$ mkdir build && cd build
$ export PATH=<cross_tool_chain>/bin:$PATH
$ ln -s ../3rdparty/tim-vx/lib/aarch32/libOpenVX.so.1.2 ../3rdparty/tim-vx/lib/aarch32/libOpenVX.so
$ cmake -DCMAKE_TOOLCHAIN_FILE=../toolchains/arm-linux-gnueabihf.toolchain.cmake -DTENGINE_ENABLE_TIM_VX=ON -DTENGINE_OPENMP=OFF ..
$ make -j`nproc` && make install
编译完成后,提取 install 目录下的文件到板子上测试即可。需要注意的是,部分 OpenCV 依赖的 example 在这个过程中不会编译,需要先准备好交叉编译的 OpenCV,并正确设置 OpenCV_DIR 到环境变量中方可打开这部分 example 的编译。
2.9 编译 Amlogic C305X/C308X buildroot 平台
TODO:还没拿到最新的 SDK(如果您有欢迎提供我们测试,自行测试请参考 RV1109/RV1126 的编译过程)…
2.10 编译 Android 32bit 平台
目前只有 VIM3/VIM3L 和 i.MX 8M Plus 的 EVK 正式支持 Android 系统,编译时需要使用 NDK 进行编译。编译之前需要准备 3rdparty 的全部文件。
3rdparty 的结构同前面 Linux 的情况一致,但此时提取到的 so 放置的目录是 3rdparty/tim-vx/lib/android。
2.10.1 准备代码
代码准备和前面典型的 Linux 准备过程相同,参考代码如下:
$ cd <tengine-lite-root-dir>
$ cp -rf ../TIM-VX/include ./source/device/tim-vx/
$ cp -rf ../TIM-VX/src ./source/device/tim-vx/
2.10.2 准备 3rdparty
假定采用下载的预编译 Android 库,参考准备的命令如下:
$ wget -c https://github.com/VeriSilicon/TIM-VX/releases/download/v1.1.28/arm_android9_A311D_6.4.3.tgz
$ tar zxvf arm_android9_A311D_6.4.3.tgz
$ mv arm_android9_A311D_6.4.3 prebuild-sdk-android
$ cd <tengine-lite-root-dir>
$ mkdir -p ./3rdparty/tim-vx/include
$ mkdir -p ./3rdparty/tim-vx/lib/android
$ cp -rf ../prebuild-sdk-android/include/* ./3rdparty/tim-vx/include/
$ cp -rf ../prebuild-sdk-android/lib/* ./3rdparty/tim-vx/lib/android/
使用的 Android 系统内置的 NPU 驱动版本和相关的 so 不一定和下载到的 6.4.3 版本匹配,只需要保证不低于这个版本即可。如果确有问题,可以根据下载到的压缩包解压缩出来的 lib 目录里面的文件做列表,从板卡中用 adb pull 命令从 /vendor/lib/ 目录中提取一套出来,放入 3rdparty 的相应目录里。
2.10.3 编译
$ export ANDROID_NDK=<your-ndk-root-dir>
$ cd <tengine-lite-root-dir>
$ mkdir build && cd build
$ cmake -DTENGINE_ENABLE_TIM_VX=ON -DCMAKE_TOOLCHAIN_FILE=$ANDROID_NDK/build/cmake/android.toolchain.cmake -DANDROID_ABI="armeabi-v7a" -DANDROID_ARM_NEON=ON -DANDROID_PLATFORM=android-25 ..
$ make -j`nproc` && make install
完成编译后,建议使用 ADB Shell 跑测一下 example,确保板卡环境正确。APK 能够运行还需要放行 NPU 驱动的 so,具体参见 FAQ 章节。
3. 演示
3.1 依赖库
build-tim-vx-arm64/install/lib/
└── libtengine-lite.so
On the Khadas VIM3, it need to replace those libraries in the /lib/
3.2 设置 uint8 推理模式
TIM-VX Library needs the uint8 network model
/* set runtime options */
struct options opt;
opt.num_thread = num_thread;
opt.cluster = TENGINE_CLUSTER_ALL;
opt.precision = TENGINE_MODE_UINT8;
opt.affinity = 0;
3.3 结果
[khadas@Khadas tengine-lite]# ./example/tm_classification_timvx -m squeezenet_uint8.tmfile -i cat.jpg -r 1 -s 0.017,0.017,0.017 -r 10
Tengine plugin allocator TIMVX is registered.
Image height not specified, use default 227
Image width not specified, use default 227
Mean value not specified, use default 104.0, 116.7, 122.7
tengine-lite library version: 1.2-dev
TIM-VX prerun.
model file : squeezenet_uint8.tmfile
image file : cat.jpg
img_h, img_w, scale[3], mean[3] : 227 227 , 0.017 0.017 0.017, 104.0 116.7 122.7
Repeat 10 times, thread 1, avg time 2.95 ms, max_time 3.42 ms, min_time 2.76 ms
--------------------------------------
34.786182, 278
33.942883, 287
33.732056, 280
32.045452, 277
30.780502, 282
4. uint8 量化模型
The TIM-VX NPU backend needs the uint8 tmfile as it’s input model file, you can quantize the tmfile from float32 to uint8 from here.
FAQ
Q:如何查看 NPU 驱动已经加载?A:用 lsmod 命令查看相关的驱动模块加载情况;以 VIM3 为例,检查 Galcore 内核驱动是否正确加载:
khadas@Khadas:~$ sudo lsmod
Module Size Used by
iv009_isp_sensor 270336 0
iv009_isp_lens 69632 0
iv009_isp_iq 544768 0
galcore 663552 0
mali_kbase 475136 0
iv009_isp 540672 2
vpu 49152 0
encoder 53248 0
# 中间打印略过
dhd 1404928 0
sunrpc 446464 1
btrfs 1269760 0
xor 20480 1 btrfs
raid6_pq 106496 1 btrfs
khadas@Khadas:~$
可以看到,galcore 663552 0 的打印说明了 galcore.ko 已经成功加载。
Q:如何查看 Galcore 的版本?A:使用 dmesg 命令打印驱动加载信息,由于信息较多,可以通过 grep 命令进行过滤。Linux 系统典型命令和打印如下:
khadas@Khadas:~$ sudo dmesg | grep Galcore
[sudo] password for khadas:
[ 17.817600] Galcore version 6.4.3.p0.286725
khadas@Khadas:~$
Android 典型命令打印如下:
kvim3:/ $ dmesg | grep Galcore
[ 25.253842] <6>[ 25.253842@0] Galcore version 6.4.3.279124+1
kvim3:/ $
可以看出,这个 linux 的 A311D 板卡加载的 galcore.ko 版本是 6.4.3.p0.286725,满足 linux 的版本最低要求。
Q:如何替换 galcore.ko?A:在 SDK 和内核版本升级过程中,有可能有需要升级对应的 NPU 部分的驱动,尽管推荐这一部分由板卡厂商完成,但实际上也有可能有测试或其他需求,需要直接使用最新的 NPU 版本进行测试。这时需要注意的是首先卸载 galcore.ko,然后再加载新的版本。具体命令为(假设新版本的 galcore.ko 就在当前目录):
khadas@Khadas:~$ ls
galcore.ko
khadas@Khadas:~$ sudo rmmod galcore
khadas@Khadas:~$ sudo insmod galcore.ko
khadas@Khadas:~$ sudo dmesg | grep Galcore
[ 17.817600] Galcore version 6.4.3.p0.286725
khadas@Khadas:~$
这样完成的是临时替换,临时替换在下次系统启动后就会加载回系统集成的版本;想要直接替换集成的版本可以通过 sudo find /usr/lib -name galcore.ko 查找一下默认位置,一个典型的路径是 /usr/lib/modules/4.9.241/kernel/drivers/amlogic/npu/galcore.ko,将 galcore.ko 替换到这个路径即可。
替换完成后,还需要替换用户态的相关驱动文件,一般有:
libGAL.so
libNNGPUBinary.so
libOpenCL.so
libOpenVXU.so
libVSC.so
libCLC.so
libNNArchPerf.so
libNNVXCBinary.so
libOpenVX.so
libOvx12VXCBinary.so
libarchmodelSw.so
其中部分文件大小写、文件名、版本扩展名等可能不尽相同,需要保证替换前后旧版本的库及其软连接清理干净,新版本的库和软连接正确建立不疏失(有一两个 so 可能在不同的版本间是多出来或少掉的,是正常情况)。
这些文件一般在 /usr/lib/ 文件夹里面(一些板卡可能没有预置用户态的驱动和内核驱动,这时自行添加后增加启动脚本加载内核驱动即可)。
Q:替换 galcore.ko 后,怎么检查细节状态?A:有时 insmod galcore.ko 后,lsmod 时还是有 galcore 模块的,但确实没加载成功。此时可以用 dmesg 命令确认下返回值等信息,核查是否有其他错误发生。Linux 典型打印如下:
khadas@Khadas:~$ sudo dmesg | grep galcore
[ 0.000000] OF: reserved mem: initialized node linux,galcore, compatible id shared-dma-pool
[ 17.793965] galcore: no symbol version for module_layout
[ 17.793997] galcore: loading out-of-tree module taints kernel.
[ 17.817595] galcore irq number is 37.
khadas@Khadas:~$
Android 典型打印如下:
kvim3:/ $ dmesg | grep galcore
[ 0.000000] <0>[ 0.000000@0] c6c00000 - c7c00000, 16384 KB, linux,galcore
[ 25.253838] <4>[ 25.253838@0] galcore irq number is 53.
kvim3:/ $
Q:打印提示依赖库是未识别的 ELF 格式?A:目前 3rdparty 目录下的 include 目录几乎是通用的,lib 目录和平台有关;提示这个问题有可能是解压缩或复制过程中软连接断掉了(windows 系统下常见),或者是准备的相关库文件和平台不匹配。
Q:为什么我的 Android 跑不起来对应的 APK,但 ADB Shell 跑测试程序却可以(ADB Shell 现在没放行也不可以了)?A:Android 系统不同于 Linux 系统,可以很方便的通过 GDB Server 进行远程调试,所以建议 APP 里面的集成算法部分,先在 ADB Shell 里验证一下正确性后再进行 APK 的集成。如果已经在 ADB Shell 里验证了典型的用例是正确的,APK 里面的 JNI 部分也没有其他问题,那么 APP 运行不了可以检查一下对应的 NPU 用户态驱动是否已经放行。许可文件路径是 /vendor/etc/public.libraries.txt 。许可没有放行一般提示包含有 java.lang.UnsatisfiedLinkError 错误。已经放行的 Android 许可文件大致如下图所示,libCLC.so 等已经包含进来:
kvim3:/vendor/etc $ cat public.libraries.txt
libsystemcontrol_jni.so
libtv_jni.so
libscreencontrol_jni.so
libCLC.so
libGAL.so
libOpenVX.so
libOpenVXU.so
libVSC.so
libarchmodelSw.so
libNNArchPerf.so
kvim3:/vendor/etc $
如果没有放行,需要在 ADB Shell 里面转到 root 权限,并重新挂载文件系统;重新进入 ADB Shell 后,修改完成后重启一次系统。大致操作如下:
adb root # 获取 root 权限
adb remount # 重新挂载文件系统
adb shell # 进入 ADB Shell
vi /vendor/etc/public.libraries.txt # 编辑许可文件
如果对 vi 和相关命令不熟悉,可以考虑 adb pull /vendor/etc/public.libraries.txt 拉到 PC 上进行修改,然后再 adb push public.libraries.txt /vendor/etc/ 推送回板卡。
附:部分支持的板卡链接
A311D: Khadas VIM3 EAIS-750E S905D3: Khadas VIM3Li.MX 8M Plus: 8MPLUSLPD4-EVKC308X: 桐烨 C308X AI IPC
附:其他
限于许可,Tengine-Lite 不能二次分发已经准备好的 3rdparty,请谅解。
如果本文档描述的过程和 FAQ 没有覆盖您的问题,也欢迎加入 QQ 群 829565581 进一步咨询。
不同版本的 TIM-VX 和 Tengine 对 OP 支持的情况有一定区别,请尽可能拉取最新代码进行测试评估。
如果已有 OP 没有满足您的应用需求,可以分别在 TIM-VX 和 Tengine 的 issue 里创建一个新的 issue 要求支持;紧急或商业需求可以加入 QQ 群联系管理员申请商业支持。
Tengine 和 OPEN AI LAB 对文档涉及的板卡和芯片不做单独的保证,诸如芯片或板卡工作温度、系统定制、配置细节、价格等请与各自芯片或板卡供应商协商。
如果贵司有板卡想要合作,可以加入 OPEN AI LAB 的 QQ 群联系管理员进一步沟通。
交叉编译 Arm64 OHOS(鸿蒙系统)版本
1 安装 DevEco Studio 和 OHOS NDK
下载安装 DevEco Studio,传送门。若没有华为开发者账号,需到HarmonysOS应用开发门户注册。
打开 DevEco Studio,Configure(或File)-> Settings -> Appearance & Behavior -> System Settings -> HarmonyOS SDK,勾选并下载 Native,完成 OHOS NDK 下载。
2 准备 OHOS NDK cmake toolchain 文件
ohos.toolchain.cmake 这个文件可以从 $OHOS_NDK/build/cmake 找到,例如 E:\soft\Huawei\sdk\native\3.0.0.80\build\cmake\ohos.toolchain.cmake
(可选) 删除debug编译参数,缩小二进制体积,方法和 android ndk相同 android-ndk issue
# 用编辑器打开 $ANDROID_NDK/build/cmake/android.toolchain.cmake
# 删除 "-g" 这行
list(APPEND ANDROID_COMPILER_FLAGS
-g
-DANDROID
3 下载 Tengine Lite 源码
git clone https://github.com/OAID/Tengine.git tengine-lite
4 编译 Tengine Lite
Arm64 OHOS 编译脚本如下(Windows)
build/ohos-arm64-v8a.bat:
@ECHO OFF
@SETLOCAL
:: Set OHOS native toolchain root
@SET OHOS_NDK=<your-ndk-root_path, such as D:/Program/DevEcoStudio/SDK/native/2.0.1.93>
:: Set ninja.exe and cmake.exe
@SET NINJA_EXE=%OHOS_NDK%/build-tools/cmake/bin/ninja.exe
@SET CMAKE_EXE=%OHOS_NDK%/build-tools/cmake/bin/cmake.exe
@SET PATH=%OHOS_NDK%/llvm/bin;%OHOS_NDK%/build-tools/cmake/bin;%PATH%
mkdir build-ohos-armeabi-v7a
pushd build-ohos-armeabi-v7a
%CMAKE_EXE% -G Ninja -DCMAKE_TOOLCHAIN_FILE="%OHOS_NDK%/build/cmake/ohos.toolchain.cmake" -DCMAKE_MAKE_PROGRAM=%NINJA_EXE% -DOHOS_ARCH="armeabi-v7a" -DCMAKE_BUILD_WITH_INSTALL_RPATH=ON ..
%CMAKE_EXE% --build . --parallel %NUMBER_OF_PROCESSORS%
%CMAKE_EXE% --build . --target install
popd
mkdir build-ohos-arm64-v8a
pushd build-ohos-arm64-v8a
%CMAKE_EXE% -G Ninja -DCMAKE_TOOLCHAIN_FILE="%OHOS_NDK%/build/cmake/ohos.toolchain.cmake" -DCMAKE_MAKE_PROGRAM=%NINJA_EXE% -DOHOS_ARCH="arm64-v8a" -DCMAKE_BUILD_WITH_INSTALL_RPATH=ON ..
%CMAKE_EXE% --build . --parallel %NUMBER_OF_PROCESSORS%
%CMAKE_EXE% --build . --target install
popd
@ENDLOCAL
源码编译(Microsoft Visual Studio)
简介
Visual Studio开发工具和服务使任何平台和语言的应用程序开发变得容易。Tengine支持在Windows上编译。
准备
CMake >= 3.13, Visual Studio >= 2015
Before the very begging, please check CMake and Visual Studio already has been installed. CMake >= 3.13, Visual Studio Version 2017 or 2019 is recommended. For CUDA or TensorRT backend user, CMake >= 3.18 is needed. CUDA or TensorRT needs to be installed or unpackaged.
构建
下载
首先从 GitHub下载 https://github.com/OAID/Tengine.git
CMD shell user
打开 “x86 Native Tools Command Prompt for VS 201x” or “x64 Native Tools Command Prompt for VS 201x”, “201x” 是你的安装版本. 假设安装的是VS2017 ,操作如下:
set PATH=X:/your/cmake/bin;%PATH%
cd /d X:/your/downloaded/Tengine
md build
cd build
cmake.exe -G "Visual Studio 15 2017 Win64" -DTENGINE_OPENMP=OFF -DTENGINE_BUILD_EXAMPLES=OFF ..
::cmake.exe -G "Visual Studio 16 2019" -A x64 -DTENGINE_OPENMP=OFF ..
cmake.exe --build . --parallel %NUMBER_OF_PROCESSORS%
cmake.exe --build . --target install
示例
TODO
源码编译(Vulkan)
简介
Vulkan是新一代图形和计算API,它提供了对现代gpu的高效、跨平台访问,这些gpu用于从pc和控制台到移动电话和嵌入式平台的各种设备。,
如何编译
Build for Linux
在 Debian, Ubuntu 上 安装 vulkan sdk:
sudo apt instal libvulkan-dev
下载 Vulkan SDK
# download vulkan sdk
$ wget https://sdk.lunarg.com/sdk/download/1.1.114.0/linux/vulkansdk-linux-x86_64-1.1.114.0.tar.gz?Human=true -O vulkansdk-linux-x86_64-1.1.114.0.tar.gz
$ tar -xf vulkansdk-linux-x86_64-1.1.114.0.tar.gz
# setup env
$ export VULKAN_SDK=`pwd`/1.1.114.0/x86_64
$ cd <tengine-lite-root-dir>
$ mkdir -p build-linux-vulkan
$ cd build-linux-vulkan
$ cmake -DTENGINE_ENABLE_VULKAN=ON ..
$ make -j4
$ make install
Build Android Library
$ cd <tengine-lite-root-dir>
$ mkdir -p build-android-aarch64-vulkan
$ cd build-android-aarch64-vulkan
$ cmake -DCMAKE_TOOLCHAIN_FILE=$ANDROID_NDK/build/cmake/android.toolchain.cmake \
-DANDROID_ABI="arm64-v8a" \
-DANDROID_PLATFORM=android-24 -DTENGINE_ENABLE_VULKAN=ON ..
$ make -j4
$ make install
示例:
violet:/data/local/tmp/tengine/vulkan $ ./tm_classification_vulkan -m mobilenet.tmfile -i cat.jpg -g 224,224 -s 0.017,0.017,0.017 -r 10
start to run register cpu allocator
start to run register vk allocator
Mean value not specified, use default 104.0, 116.7, 122.7
tengine-lite library version: 1.0-dev
model file : mobilenet.tmfile
image file : cat.jpg
img_h, img_w, scale[3], mean[3] : 224 224 , 0.017 0.017 0.017, 104.0 116.7 122.7
Repeat 10 times, thread 1, avg time 114.83 ms, max_time 169.14 ms, min_time 107.62 ms
--------------------------------------
8.574147, 282
7.880115, 277
7.812572, 278
7.286460, 263
6.357491, 281
--------------------------------------
Tengine Video Capture User Manual
约束
当前版本仅支持基于 Khadas VIM3 SBC 上的 NPU 网络模型推理演示,我们后续会逐步完善,支持基于更多硬件平台的功能演示。
默认大家手上的 Khadas VIM3 中的固件为最新版本。
硬件说明
| 物品 | 描述 |
|---|---|
| Khadas VIM3 | 内置 A311D SoC 的单板计算机,内置 5Tops NPU 加速器 |
| USB 摄像头 | 输入实时视频流 |
| 液晶显示器 | 控制台操作,实时输出示例运行结果 |
| HDMI连接线 | 由于Khadas VIM3 的 TYPE C 接口与 HDMI 接口过于紧凑,需要寻找小一点接口的 HMDI 连接线 |
软件说明
以下均为 Khadas VIM3 单板计算机上的软件描述。
Ubuntu 20.04
OpenCV 4.2
gcc 9.3.0
cmake 3.16.3
操作说明
后续步骤中的命令行操作均为基于 Khadas VIM3 单板计算机上的操作,其中:
下载、编译步骤 可以过 SSH 登陆或者直接在 Khadas VIM3 的 Ubuntu 桌面启动控制台中执行;
运行步骤仅在 Khadas VIM3 的 Ubuntu 桌面启动控制台中执行。
编译
下载 NPU 依赖库 TIM-VX
$ git clone https://github.com/VeriSilicon/TIM-VX.git
下载 Tengine
$ git clone https://github.com/OAID/Tengine.git tengine-lite
$ cd tengine-lite
准备代码
$ cd <tengine-lite-root-dir>
$ cp -rf ../TIM-VX/include ./source/device/tim-vx/
$ cp -rf ../TIM-VX/src ./source/device/tim-vx/
执行编译
$ cd <tengine-lite-root-dir>
$ mkdir build && cd build
$ cmake -DTENGINE_ENABLE_TIM_VX=ON -DTENGINE_ENABLE_MODEL_CACHE=ON -DTENGINE_BUILD_DEMO=ON ..
$ make demo_yolo_camera -j`nproc`
编译完成后,libtengine-lite.so 和 demo_yolo_camera 存放在以下路径:
<tengine-lite-root-dir>/build/source/libtengine-lite.so<tengine-lite-root-dir>/build/demos/demo_yolo_camera
运行
模型文件 yolov3_uint8.tmfile 可从 Model ZOO 中下载,按照以下顺序方式存放文件:
......
├── demo_yolo_camera
├── libtengine-lite.so
├── models
│ └── yolov3_uint8.tmfile
......
执行当前路径下的 demo_yolo_camera :
./demo_yolo_camera
P.S. :第一次运行因为会在线编译生成 NPU 运行依赖的 kernel file,会有一定的等待时间(大约30秒),后续运行直接加载所在目录下的 cache file 文件(小于1秒)。
关于容器
我们提供了基于 Khadas VIM3 平台的容器版本,具体操作可以参考 deploy_superedge;
我们提供了腾讯云的 SuperEdge 版本,请参考(待补充)。
FAQ
Khadas VIM3 编译 Tengine + TIMVX 其余问题(包括 Khadas VIM3 购买渠道)可以参考 compile_timvx。
Tengine + SuperEdge 一条指令跨平台部署边缘AI应用
案例说明
案例基于开源AI推理框架Tengine 实现容器调用边缘硬件NPU资源,完成高效物体检测的推理任务,并通过开源边缘容器方案 SuperEdge 轻松将应用调度到边缘计算节点,实现一条指令部署边缘计算跨平台AI应用案例。
Tengine 由 OPEN AI LAB 主导开发,该项目实现了深度学习神经网络模型在嵌入式设备上的快速、高效部署需求。为实现在众多AIoT应用中的跨平台部署,本项目使用C语言进行核心模块开发,针对嵌入式设备资源有限的特点进行了深度框架裁剪。同时采用了完全分离的前后端设计,有利于 CPU、GPU、NPU 等异构计算单元的快速移植和部署,降低评估、迁移成本。
SuperEdge 是基于原生 Kubernetes 的边缘容器管理系统。该系统把云原生能力扩展到边缘侧,很好的实现了云端对边缘端的管理和控制,极大简化了应用从云端部署到边缘端的过程。SuperEdge 为应用实现边缘原生化提供了强有力的支持。
 img
img
硬件环境准备
| 物品 | 描述 |
|---|---|
| Master服务器 | SuperEdge Master 服务器, 用于应用调度,可采用X86 or Arm 架构,本例中采用X86服务器 |
| Khadas VIM3 | 应用负载工作节点,内置 A311D SoC 的单板计算机,内置 5Tops NPU 加速器,各大商城有售 |
| USB 摄像头 | 连接Khadas VIM3,输入实时视频流 |
| 液晶显示器 | 连接Khadas VIM3,控制台操作,实时输出示例运行结果 |
| HDMI连接线 | 由于Khadas VIM3 的 TYPE C 接口与 HDMI 接口过于紧凑,需要寻找小一点接口的 HMDI 连接线 |
操作步骤
1.安装SuperEdge环境
安装SuperEdge Master节点(x86_64)
wget https://superedge-1253687700.cos.ap-guangzhou.myqcloud.com/v0.4.0/amd64/edgeadm-linux-amd64-v0.4.0.tgz
tar -zxvf edgeadm-linux-amd64-v0.4.0.tgz
cd edgeadm-linux-amd64-v0.4.0
./edgeadm init --kubernetes-version=1.18.2 --image-repository superedge.tencentcloudcr.com/superedge --service-cidr=10.96.0.0/12 --pod-network-cidr=10.224.0.0/16 --install-pkg-path ./kube-linux-*.tar.gz --apiserver-cert-extra-sans=<Master Public IP> --apiserver-advertise-address=<Master Intranet IP> --enable-edge=true
#复制k8s配置文件到用户目录下
mkdir -p $HOME/.kube
sudo cp -i /etc/kubernetes/admin.conf $HOME/.kube/config
sudo chown $(id -u):$(id -g) $HOME/.kube/config
#去掉资源限制,解决khadas VIM3安装SuperEdge导致设备重启的问题
kubectl patch DaemonSet kube-proxy -n kube-system --type='json' -p='[{"op": "replace", "path": "/spec/template/spec/containers/0/resources", "value":{}}]'
kubectl patch DaemonSet kube-flannel-ds -n kube-system --type='json' -p='[{"op": "replace", "path": "/spec/template/spec/containers/0/resources", "value":{}}]'
kubectl patch DaemonSet tunnel-edge -n edge-system --type='json' -p='[{"op": "replace", "path": "/spec/template/spec/containers/0/resources", "value":{}}]'
kubectl patch DaemonSet edge-health -n edge-system --type='json' -p='[{"op": "replace", "path": "/spec/template/spec/containers/0/resources", "value":{}}]'
kubectl patch DaemonSet application-grid-wrapper-node -n edge-system --type='json' -p='[{"op": "replace", "path": "/spec/template/spec/containers/0/resources", "value":{}}]'
Khadas VIM3 设备加入集群
# 由于demo使用了桌面GUI画图,开机登录界面导致应用无法正常启动,因此需设置设备开机桌面自动登录
#步骤:打开图形桌面右上角 settings-users-AutoLogin 配置,开机无需输入密码进入桌面,重新启动,无登录画面即可
#Disable fenix-zram-config service to disable the swap
sudo systemctl disable fenix-zram-config
sudo systemctl status fenix-zram-config
# Download edgeadm arm64 version to install SuperEdge Node
wget https://superedge-1253687700.cos.ap-guangzhou.myqcloud.com/v0.4.0/arm64/edgeadm-linux-arm64-v0.4.0.tgz
tar -zxvf edgeadm-linux-arm64-v0.4.0.tgz
cd edgeadm-linux-arm64-v0.4.0
#Upgrade cni-plugins from v0.8.3 to v0.8.6, 解决在Khadas上安装SuperEdge和CNI失败的问题,
tar -zxvf kube-linux-arm64-v1.18.2.tar.gz
wget https://github.com/containernetworking/plugins/releases/download/v0.8.6/cni-plugins-linux-arm64-v0.8.6.tgz
mv cni-plugins-linux-arm64-v0.8.6.tgz edge-install/cni/cni-plugins-linux-arm64-v0.8.3.tgz
sed -i 's/\tload_kernel/# load_kernel/' edge-install/script/init-node.sh
tar -zcvf kube-linux-arm64-v1.18.2.1.tar.gz edge-install/
#加入集群
./edgeadm join <Master Public/Intranet IP Or Domain>:6443 --token xxxx --discovery-token-ca-cert-hash sha256:xxxxxxxxxx --install-pkg-path kube-linux-arm64-v1.18.2.1.tar.gz --enable-edge=true
Khadas VIM3 设备开启Xserver授权
# Access to Xserver
# Execute script on device Terminal
xhost +
2.(可选)构建Tengine demo容器镜像
该步骤介绍如何构建Tengine Demo镜像,如采用Docker Hub镜像, 可跳过。
下载文件包到Khadas VIM3设备上,构建Tengine物体识别应用docker镜像
#Download docker build packeage [~91M] from OPEN AI LAB server
wget http://tengine2.openailab.com:9527/openailab/yolo.tar.gz
tar -zxvf yolo.tar.gz
cd superedge
docker build -t yolo:latest .
Dockerfile文件如下所示
FROM ubuntu:20.04
MAINTAINER openailab
RUN apt-get update
RUN apt-get install -y tzdata
RUN apt-get install -y libopencv-dev
RUN apt-get install -y libcanberra-gtk-module
RUN useradd -m openailab
COPY libtengine-lite.so /root/myapp/
COPY demo_yolo_camera /root/myapp/
COPY tm_330_330_330_1_3.tmcache /root/myapp/
ADD models /root/myapp/models/
COPY tm_88_88_88_1_1.tmcache /root/myapp/
COPY tm_classification_timvx /root/myapp/
COPY libOpenVX.so /lib/
COPY libGAL.so /lib/
COPY libVSC.so /lib/
COPY libArchModelSw.so /lib/
COPY libNNArchPerf.so /lib/
COPY libgomp.so.1 /lib/aarch64-linux-gnu/
COPY libm.so.6 /lib/aarch64-linux-gnu/
WORKDIR /root/myapp/
USER openailab
CMD ["./demo_yolo_camera"]
如果需要自己编译并生成demo_yolo_camera程序,具体操作参考demo_videocapture user manual
3.编写 yolo.yaml 编排文件
在SuperEdge Master节点上编辑k8s编排文件yolo.yaml
apiVersion: apps/v1
kind: Deployment
metadata:
name: yolo
labels:
name: yolo
spec:
replicas: 1
selector:
matchLabels:
name: yolo
template:
metadata:
labels:
name: yolo
spec:
affinity:
nodeAffinity:
requiredDuringSchedulingIgnoredDuringExecution:
nodeSelectorTerms:
- matchExpressions:
- key: kubernetes.io/hostname
operator: In
values:
- khadas
containers:
- name: yolo
image: tengine3/yolo:v1.0
env:
- name: DISPLAY
value: :0
volumeMounts:
- name: dev
mountPath: /dev
- name: unix
mountPath: /tmp/.X11-unix
securityContext:
privileged: true
volumes:
- name: dev
hostPath:
path: /dev
- name: unix
hostPath:
path: /tmp/.X11-unix
4. Tengine物体识别应用应用部署
执行编排文件
kubectl apply -f yolo.yaml
5.案例效果与验证
通过命令查看部署状态
peter@peter-VirtualBox:~$ kubectl get deployment yolo -o wide
NAME READY UP-TO-DATE AVAILABLE AGE CONTAINERS IMAGES SELECTOR
yolo 1/1 1 1 21h yolo tengine3/yolo:v1.0 name=yolo
peter@peter-VirtualBox:~$ kubectl get pod yolo-76d95967bb-zxggk
NAME READY STATUS RESTARTS AGE
yolo-76d95967bb-zxggk 1/1 Running 3 79m
打开Khadas VIM设备的显示器,观察到如下效果
 img
img
Tengine Lite with Opensource DeepLearning Accelerator
1. 简介
opendla是基于英伟达开源的加速器NVDLA,之所以后端的名称叫opendla是因为英伟达官方的仓库已经停止维护两年了,而显然NVDLA还有许多可以改进的空间,改进之后的加速器需要和原来的NVDLA作区分,索性就直接叫opendla了,暂时在 ZYNQ-NVDLA 这个仓库维护。
现在的后端,只对接了 NVDLA 的 small 配置,有如下特点:
ZYNQ 7045 | XCZU9EG-2 可以跑到 100 Mhz
8*8 的 PE 阵列
没有 Global SRAM 缓存
没有查找表电路
没有RUBIK数据重排引擎
目前支持的算子有:Conv|Relu|Min/Max/Avg Pooling|FullyConntected|ElementWise 其它会切给CPU运行
2. 如何编译
2.1 依赖项
依赖项有三部分:
2.2 编译过程
为了方便理解全流程的过程,首先描述编译的完整过程的流程。
为了编译Tengine的opendla后端支持代码,首先需要编译 libcompiler.so 与 libruntime.so,而 libcompiler 依赖 libprotobuf (版本为2.6.1),libruntime 依赖 libjpeg (版本为libjpeg6b)。
2.3 拉取代码
首先,这里演示的整个编译的过程都在开发板卡上运行,否则需要交叉编译;例子都是以root的身份来运行的;如何使用开发板连网可以参考 这篇文章 。
2.3.1 拉取 ZYNQ-NVDLA
$ git clone https://github.com/LeiWang1999/ZYNQ-NVDLA # clone不下来的话就本地下载用sftp传上去吧:D
2.3.2 拉取 Tengine-Lite
$ git clone https://github.com/OAID/Tengine.git Tengine
2.4 Tengine-Lite 集成编译 opendla
Tengine-Lite 目前只支持一种 opendla 的集成编译方法,即编译opendla的软件支持,首先生成.so文件,而在Tengine编译opendla后端的时候进行链接。
其他的方案,例如在Tengine编译的过程中连同opendla的编译器和运行时的源代码一起编译,由于代码肯定是要重构的,所以现在还不支持。
这里不将内核驱动程序opendla.ko是如何编译的,如何在Petalinux里编译看这篇 文章 。
如果是 aarch64 的架构,可以直接使用 prebuilt 的lib。
2.4.0 载入内核驱动程序
$ insmod /lib/modules/4.19.0-xilinx-v2019.1/extra/opendla.ko
使用dmesg查看内核日志:
$ dmesg | tail
[ 12.817877] macb ff0e0000.ethernet eth0: link up (1000/Full)
[ 12.817900] IPv6: ADDRCONF(NETDEV_CHANGE): eth0: link becomes ready
[ 20.661453] opendla: loading out-of-tree module taints kernel.
[ 20.664248] Probe NVDLA config nvidia,nv_small
[ 20.669152] 0.12.5
[ 20.669155] reset engine done
[ 20.671257] [drm] Initialized nvdla 0.0.0 20171017 for a0000000.NV_nvdla_wrapper on minor 1
查看是否注册了nvdla的中断以及nvdla驱动所需的设备renderD128是否存在来确定是否真的安装完成驱动了:
root@arm:~# insmod /lib/modules/4.19.0-xilinx-v2019.1/extra/opendla.ko
root@arm:~# cat /proc/interrupts | grep nvdla
45: 0 0 GIC-0 61 Level 40000000.NV_nvdla_wrapper
root@arm:~# ls /dev/dri/
card0 renderD128
2.4.1 编译libjpeg6b
如果是aarch64,跳过该步骤即可,直接使用仓库里的libjpeg.a.
$ wget http://www.ijg.org/files/jpegsrc.v6b.tar.gz
$ tar -xzvf jpegsrc.v6b.tar.gz
$ cd jpeg-6b/
$ ./configure
$ make -j `nproc`
$ make install
$ cp /usr/local/lib/libjpeg.a ~/ZYNQ-NVDLA/umd/external/
2.4.2 编译libprotobuf.a
$ cd ~/ZYNQ-NVDLA/umd/external/protobuf-2.6/
$ apt-get install -y autoconf automake libtool
$ autoscan & aclocal & autoconf
$ automake --add-missing
$ ./configure
$ make -j `nproc`
$ make install
$ cp /usr/local/lib/libprotobuf.a ~/ZYNQ-NVDLA/umd/apps/compiler/
$ cp /usr/local/lib/libprotobuf.a ~/ZYNQ-NVDLA/umd/core/src/compiler/
2.4.3 编译 Compiler 与 Runtime
$ cd ~/ZYNQ-NVDLA/umd/
$ make -j `nproc` TOP=${PWD} TOOLCHAIN_PREFIX=/usr/bin/ compiler
$ make -j `nproc` TOP=${PWD} TOOLCHAIN_PREFIX=/usr/bin/ runtime
这样在out目录下就会生成所需的lib,将lib和include拷贝到Tengine目录下:
$ cp ~/ZYNQ-NVDLA/include -r ~/Tengine/source/device/opendla
$ cp ~/ZYNQ-NVDLA/umd/out/core/src/compiler/libnvdla_compiler/libnvdla_compiler.so -r ~/Tengine/source/device/opendla/lib/
$ cp ~/ZYNQ-NVDLA/umd/out/core/src/runtime/libnvdla_runtime/libnvdla_runtime.so -r ~/Tengine/source/device/opendla/lib/
$ cp /usr/local/lib/libprotobuf.a ~/Tengine/source/device/opendla/lib/
2.4.4 编译 Tengine
$ cd ~/Tengine
$ mkdir build & cd build
$ cmake .. -DTENGINE_ENABLE_OPENDLA=ON
3. Demo
3.1 Classification
Resnet18-Cifar10
$ cd <tengine-lite-root-dir>/build
$ cmake --build . --target tm_classification_opendla
$ cd examples
$ ./tm_classification_opendla -m /root/Tengine/models/resnet18-cifar10-nosoftmax-relu_int8.tmfile -i /root/Tengine/images/cat.jpg -g 32,32 -s 1,1,1
Mean value not specified, use default 104.0, 116.7, 122.7
tengine-lite library version: 1.4-dev
NVDLA time: 0.012502 seconds
model file : /root/Tengine/models/resnet18-cifar10-nosoftmax-relu_int8.tmfile
image file : /root/Tengine/images/cat.jpg
img_h, img_w, scale[3], mean[3] : 32 32 , 1.000 1.000 1.000, 104.0 116.7 122.7
Repeat 1 times, thread 1, avg time 12.62 ms, max_time 12.62 ms, min_time 12.62 ms
--------------------------------------
10.087049, 3
3.833079, 2
3.026115, 5
2.420892, 4
-0.403482, 0
--------------------------------------
3.2 Detection
Yolox-nano
$ cd <tengine-lite-root-dir>/build
$ cmake --build . --target tm_classification_opendla tm_yolox_opendla
$ cd examples
$ ./tm_yolox_opendla -m /root/Tengine/models/yolox_nano_relu_int8.tmfile -i /root/Tengine/images/dog.jpg -r 1
tengine-lite library version: 1.4-dev
Repeat 1 times, thread 1, avg time 1138.80 ms, max_time 1138.80 ms, min_time 1138.80 ms
--------------------------------------
detection num: 3
2: 70%, [ 463, 80, 676, 163], car
16: 52%, [ 122, 220, 315, 517], dog
1: 48%, [ 180, 181, 564, 430], bicycle
Output:
 yolox_dla_out
附:其他
欢迎加入 QQ 群 829565581 来一起讨论!
C API
Initial
实现 Tengine 框架基础资源初始化、释放功能、版本号查询的功能。
示例:
/* inital tengine */
if (init_tengine() != 0)
{
fprintf(stderr, "Initial tengine failed.\n");
return -1;
}
fprintf(stderr, "tengine-lite library version: %s\n", get_tengine_version());
/* some codes */
/* release tengine */
release_tengine();
int init_tengine(void)
Brief:
Initialize the tengine, only can be called once.
Return:
0: Success, -1: Fail.
void release_tengine(void)
Brief:
Release the tengine, only can be called once.
const char* get_tengine_version(void)
Brief:
Get the version of the tengine.
Return:
const char * of version string.
Graph
实现 Tengine 计算图创建、释放、参数获取等功能。
/* set runtime options */
struct options opt;
opt.num_thread = num_thread;
opt.cluster = TENGINE_CLUSTER_ALL;
opt.precision = TENGINE_MODE_FP32;
opt.affinity = affinity;
/* create graph, load tengine model xxx.tmfile */
graph_t graph = create_graph(NULL, "tengine", model_file);
/* set the shape, data buffer of input_tensor of the graph */
tensor_t input_tensor = get_graph_input_tensor(graph, 0, 0);
/* prerun graph, set work options(num_thread, cluster, precision) */
prerun_graph_multithread(graph, opt);
/* run graph */
run_graph(graph, 1);
/* get the result of classification */
tensor_t output_tensor = get_graph_output_tensor(graph, 0, 0);
/* release tengine */
postrun_graph(graph);
destroy_graph(graph);
graph_t create_graph(context_t context, const char* model_format, const char* file_name, ...)
Brief:
Create the run-time graph for execution from a saved model. If model format is NULL, an empty graph handle will be returned.
Params:
context: The context the graph will run inside could be NULL and the graph is created in a private contextmodel_format: The model format type,such as "caffe","tengine"file_name: The name of model file.
Return:
0: Success, -1: Fail.
int prerun_graph_multithread(graph_t graph, struct options opt)
Brief:
Initialize resource for graph execution, and set cluster and threads count will used.
Params:
graph: The graph handle.opt: The graph exec options
Return:
0: Success, -1: Fail.
int run_graph(graph_t graph, int block)
Brief:
Execute graph.
Params:
graph: The graph handle.block: Blocking or nonlocking.
Return:
0: Success, -1: Fail.
int postrun_graph(graph_t graph)
Brief:
Release the resource for graph execution.
Params:
graph: graph handle.
Return:
0: Success, -1: Fail.
int destroy_graph(graph_t graph)
Brief:
Destory the runtime graph and release allocated resource.
Params:
graph: The graph handle.
Return:
0: Success, -1: Fail.
int set_graph_layout(graph_t graph, int layout_type)
Brief:
Set the layout type of the graph the default layout of graph is NCHW.
Params:
graph, the graph handlelayout_type, the layout type NCHW or NHWC
Return:
0: Success, -1: Fail.
int set_graph_input_node(graph_t graph, const char* input_nodes[], int input_number)
Brief:
designate the input nodes of the graph.
Params:
graph: the graph handleinput_nodes: the node name list of input nodesinput_number: the number of input_nodes
Return:
0: Success, -1: Fail.
int set_graph_output_node(graph_t graph, const char* output_nodes[], int output_number)
Brief:
designate the output nodes of the graph.
Params:
graph: the graph handleoutput_nodes: the node name list of output nodesoutput_number: the number of output_nodes
Return:
0: Success, -1: Fail.
int get_graph_input_node_number(graph_t graph)
Brief:
Get the number of input node of the graph.
Params:
graph: The graph handle.
Return:
the input node number.
node_t get_graph_input_node(graph_t graph, int idx)
Brief:
Get the node handle of #idx of input node of the graph.
Params:
graph: The graph handle.idx: The input node index,starting from zero.
Return:
The node name or NULL on error.
int get_graph_output_node_number(graph_t graph)
Brief:
Get the number of output node of the graph.
Params:
graph: The graph handle.
Return:
The input node number.
node_t get_graph_output_node(graph_t graph, int idx)
Brief:
Get the node handle #idx of a graph output node.
Params:
graph: The graph handle.idx: The input node index, starting from zero.
Return:
The node name or NULL on error.
tensor_t get_graph_output_tensor(graph_t graph, int output_node_idx, int tensor_idx)
Brief:
Get a tensor handle of a graph output node.
Params:
graph: The graph handle.output_node_idx: The output node index.tensor_idx: The output tensor index of the output node.
Return:
The tensor handle or NULL on error.
tensor_t get_graph_input_tensor(graph_t graph, int input_node_idx, int tensor_idx)
Brief:
Get a tensor handle of a graph output node.
Params:
graph: The graph handle.input_node_idx: The input node index, starting from zero.tensor_idx: The output tensor index of the input node, starting from zero.
Return:
The tensor handle or NULL on error.
Node
Node 节点相关操作。
node_t create_graph_node(graph_t graph, const char* node_name, const char* op_name)
Brief:
Create a node for the graph.
Params:
graph: The graph handle.node_name: The name of the node.op_name: The name of the operate.
Return:
The node handle or NULL on error.
node_t get_graph_node(graph_t graph, const char* node_name)
Brief:
Get the node handle of the graph.
Params:
graph: The graph handle.node_name: The name of the node.
Return:
The node handle or NULL on error.
Tensor
Tensor 数据相关操作。
/* set the shape, data buffer of input_tensor of the graph */
int img_size = img_h * img_w * 3;
int dims[] = {1, 3, img_h, img_w}; // nchw
float* input_data = ( float* )malloc(img_size * sizeof(float));
tensor_t input_tensor = get_graph_input_tensor(graph, 0, 0);
set_tensor_shape(input_tensor, dims, 4);
set_tensor_buffer(input_tensor, input_data, img_size * 4);
/* get the result of classification */
tensor_t output_tensor = get_graph_output_tensor(graph, 0, 0);
float* output_data = ( float* )get_tensor_buffer(output_tensor);
int output_size = get_tensor_buffer_size(output_tensor) / sizeof(float);
tensor_t create_graph_tensor(graph_t graph, const char* tensor_name, int data_type)
Brief:
create a tensor handle by tensor name.
Params:
graph: The graph handletensor_name: Tensor name.data_type: the data type.
Return:
The tensor handle or NULL on error.
tensor_t get_graph_tensor(graph_t graph, const char* tensor_name)
Brief:
Get a tensor handle by tensor name.
Params:
graph: The graph handletensor_name: Tensor name.
Return:
The tensor handle or NULL on error.
const char* get_tensor_name(tensor_t tensor)
Brief:
Get the name of the tensor handle.
Params:
tensor: the tensor handle.
Return:
const char * of version string.
int get_tensor_shape(tensor_t tensor, int dims[], int dim_number)
Brief:
Get the shape of tensor.
Params:
tensor: The tensor handle.dims: An int array to get the returned shape.dim_number: The array size.
Return:
>=1 the valid dim number, or -1 Fail.
int set_tensor_shape(tensor_t tensor, const int dims[], int dim_number)
Brief:
Set the shape of tensor.
Params:
tensor: The tensor handle.dims: An int array to get the returned shape.dim_number: The array size.
Return:
0: Success; -1: Fail.
Device
Exection context
设置执行会话模块相关操作,主要用于显示设置各种异构计算的硬件后端。
/* create VeriSilicon TIM-VX backend */
context_t timvx_context = create_context("timvx", 1);
int rtt = add_context_device(timvx_context, "TIMVX");
/* create graph, load tengine model xxx.tmfile */
graph_t graph = create_graph(timvx_context, "tengine", model_file);
context_t create_context(const char* context_name, int empty_context)
Brief:
Create one execution context with name.
Params:
context_name: The name of the created context.empty_context: No device is assigned with this context otherwise, all proved devices will be added into the context.
Return:
Execution context handle. If create Failed, return NULL.
int add_context_device(context_t context, const char* dev_name)
Brief:
Add a device into one context.
Params:
context: The context handle.dev_name: The device name.
Return:
0: Success, -1: Fail.
void destroy_context(context_t context)
Brief:
Destory and reclaim the resource related with the context.
Params:
context: The context handle.
Misc
其他辅助 API
/* set the level of log with INFO */
set_log_level(LOG_INFO);
/* dump the graph to console */
dump_graph(graph);
void set_log_level(enum log_level level)
Brief:
Set the logger level.
Params:
level: The log level.
void dump_graph(graph_t graph)
Brief:
Dump the run-time graph. If the graph is dumpped after prerun(), it will dump the optimized graph instead of the origin one.
Params:
graph: The graph handle.
Plugin
宏定义
结构体
自定义算子
架构详解
设计背景
先行者 Tengine
最早的 Tengine 是使用 C++ 分层设计的,编译采用 make,也就是嵌入系统常常采用的 makefile,编写之初支持的硬件是 CPU。可扩展性是 Tengine 和现在的 Lite 版本的设计核心,不仅仅是 Operator 能够很方便的通过注册宏扩展,各个主要模块也是扩展的。
推出 Tengine 发展一段时间后,市场反馈需要 Tengine 支持 MCU 和 VLIW 架构的 DSP;在一些项目中,编译工具链对 C++ 较新标准支持较差,甚至是没有 C++ 编译器,这就对 Tengine 的架构产生了新的要求。
在这种背景下,项目团队提出重新设计代号 Lite 的 Tengine 纯 C 语言的新主要分支,经过一段时间的开发后,后续项目陆续切换到 Tengine Lite 上。从能力上,Lite 和原分支是一样的。经过一段时间后,全部 Tengine 项目维护周期终结后,Tengine 分支将会进入存档冻结状态,不再维护。
继任者 Tengine Lite
“薪火相传 砥砺前行”,Tengine Lite 的早期版本主题设计和 Tengine 高度相似,较早的 Tengine Lite 版本注册机制依赖 GNU C 扩展,而 GNU C 扩展并不是标准 C 的内容。当社区呼唤需要扩展支持到非 GCC 系列的场景,如 Microsoft Visual Studio 上时,遇到了较多的困难。另一方面,纯 C 的设计使得 Tengine Lite 的入手难度较高,社区和项目反馈需要提高易用性,“Tengine 从入门到‘放弃’”的时间要“显著”缩短。
经过一段时间的磨合后,团队决定重新设计主要模块,重点是解决这几方面的问题。
架构设计
重新设计的设计目标之一是,采用纯 C 设计 Tengine 的 Lite 分支(以下简称 Tengine,不再强调 Lite 分支)最小 Runtime,复杂的功能和逻辑可以使用 C++ 开发。这样保持纯 C Runtime 在局限场景下优势的同时,使用 C++ 开发复杂模块,使注意力集中在开发算法本身上。
架构概览

重要模块介绍
网络描述 graph 和相关结构体
source/graph 目录下是 Convolution Neural Network 的描述结构体和函数。
/*!
* @struct ir_graph_t
* @brief Abstract graph intermediate representation
*/
typedef struct graph
{
struct tensor** tensor_list; //!< the tensor list of a graph
struct node** node_list; //!< the node list of a graph
int16_t* input_nodes; //!< input nodes index array of a graph
int16_t* output_nodes; //!< output nodes index array of a graph
uint16_t tensor_num; //!< the count of all graph tensor
uint16_t node_num; //!< the count of all graph node
uint16_t input_num; //!< input nodes index count of a graph
uint16_t output_num; //!< input nodes index count of a graph
int8_t graph_layout; //!< the data layout of a graph
int8_t model_layout; //!< model layout of graph source model
int8_t model_format; //!< model format of graph source model
uint8_t status; //!< the status of graph
struct serializer* serializer; //!< serializer of graph
void* serializer_privacy; //!< privacy data of serializer
struct device* device; //!< assigned nn_device for this graph
void* device_privacy; //!< privacy data of device
struct attribute* attribute; //<! attribute of graph
struct vector* subgraph_list; //!< subgraph list of this graph
} ir_graph_t;
网络的主体 DAG 由 graph 和其中的 node 节点共同描述;全部需要的 node 在 node->node_list 中存储;node 主要描述了该节点的依赖 tensor 和 operator 情况。所有需要的 tensor 在 graph->tensor_list 中存储。graph->node_num 和 graph->tensor_num 分别描述了 graph 的 node 和 tensor 数量。数据(tensor) + 操作(operator)构成的节点(node)最后构成一个完整的图(graph),根据调度器(scheduler)模块的分配,形成一个完整的运行图运行在 CPU 设备(device)上,这也是典型的 CPU 跑 CNN 模型的应用场景。
/*!
* @struct ir_node_t
* @brief Abstract node intermediate representation
*/
typedef struct node
{
uint16_t index; //!< the index of a node
uint8_t dynamic_shape; //!< flag of dynamic shape
uint8_t input_num; //!< count of input tensor
uint8_t output_num; //!< count of output tensor
uint8_t node_type; //!< type of node: { input, output, intermediate }
int8_t subgraph_idx; //!< id of the owner subgraph
uint16_t* input_tensors; //!< id array of input tensor
uint16_t* output_tensors; //!< id array of output tensor
char* name; //!< name of a node
struct op op; //!< operator of a node
struct graph* graph; //!< pointer of the related graph
} ir_node_t;
node 是网络的节点,不同功能的 node 协助完成数据准备和计算的工作。node->input_tensors 和 node->output_tensors 分别描述了一个 node 的输入输出 tensor 的索引 index,结合 node->input_num 和 node->output_num 就可以完成节点的遍历。实际的 node 是存储在 graph->node_list 中的。
/*!
* @struct ir_tensor_t
* @brief Abstract tensor intermediate representation
*/
typedef struct tensor
{
uint16_t index; //!< the index of a tensor
int16_t producer; //!< node id, '-1' means no producer
int16_t consumer[TE_MAX_CONSUMER_NUM]; //!< consumer nodes array
uint8_t reshaped; //!< the tensor's shape has changed
uint8_t consumer_num; //!< count of consumer nodes
uint8_t tensor_type; //!< tensor_type: { const, input, var, dep }
uint8_t data_type; //!< data_type: { int8, uint8, fp32, fp16, int32 }
uint8_t dim_num; //!< count of dimensions
uint8_t elem_size; //!< size of single element
uint8_t subgraph_num; //!< count of all subgraph those will waiting this tensor ready
uint8_t free_host_mem; //!< should free host memory?
uint8_t internal_allocated; //!< how memory is allocated?
uint8_t layout; //!< tensor layout: { TENGINE_LAYOUT_NCHW, TENGINE_LAYOUT_NHWC }
uint16_t quant_param_num; //!< quantization dimension
uint32_t elem_num; //!< count of total elements
int dims[TE_MAX_SHAPE_DIM_NUM]; //!< shape dimensions
/*!
* @union anonymity data pointer
* @brief give useful pointer pointer
*/
union
{
void* data;
int8_t* i8;
uint8_t* u8;
float* f32;
uint16_t* f16;
int32_t* i32;
};
char* name; //!< tensor name
/*!
* @union anonymity quantization scale union
* @brief scale or its array
*/
union
{
float* scale_list;
float scale;
};
/*!
* @union anonymity quantization zero point union
* @brief zero point or its array
*/
union
{
int zero_point;
int* zp_list;
};
struct dev_mem* dev_mem;
uint8_t* subgraph_list; //!< subgraph index list of those subgraph will waiting this tensor ready
} ir_tensor_t;
tensor 是 node 完成功能的数据基础。tensor->dims 描述了 tensor 的 shape;tensor->quant_param_num, tensor->scale 或 tensor->scale_list,tensor->zero_point 或 tensor->zp_list 三者共同描述了 tensor 的量化情况,具体的数值类型由 tensor->data_type 描述。
当用户通过 API 对函数进行修改后,tensor->free_host_mem 和 tensor->internal_allocated 会进行变化,用来区分是由内部释放还是用户手动释放。
/*!
* @struct ir_op_t
* @brief Abstract operator intermediate representation
*/
typedef struct op
{
uint16_t type; //!< the type of a operator
uint8_t version; //!< the version of a operator
uint8_t same_shape; //!< the flag of weather the operator will keep shape
uint16_t param_size; //!< size of parameter memory buffer
void* param_mem; //!< parameter memory buffer
int (*infer_shape)(struct node*); //!< infer(or broadcast) the shape from input to output(s)
} ir_op_t;
operator 是 node 完成功能的行为基础。op->type 描述了类型,这是这个 op 的行为基础。
/*!
* @struct ir_subgraph_t
* @brief Abstract subgraph intermediate representation
*/
typedef struct subgraph
{
uint8_t index; //!< the index of a subgraph
uint8_t input_ready_count; //!< the count of all in ready input tensors
uint8_t input_wait_count; //!< the count of all out of ready input tensors
uint8_t input_num; //!< the count of input tensors
uint8_t output_num; //!< the count of output tensors
uint8_t status; //!< the execution status of subgraph
uint16_t node_num; //!< the count of nodes in subgraph
uint16_t* node_list; //!< all nodes index list of subgraph
uint16_t* input_tensor_list; //!< input tensors index list of subgraph
uint16_t* output_tensor_list; //!< output tensors index list of subgraph
struct graph* graph; //!< the pointer of the related graph
struct device* device; //!< the device which will the subgraph running on
void* device_graph; //!< the related device graph
} ir_subgraph_t;
subgraph 是设备有关的,一个 subgraph 只工作于一个单一 device。当网络的全部 node 完全运行于单一 device 时,subgraph 就包含全部 graph 中的 node。当运行于多 device 时,根据实际 device 的 operator 支持情况,划分不同的 node 到多个不同的 subgraph 中。最小的 subgraph 只包含一个 node 节点;最大的 subgraph 有全部的 node。
设备描述 device 和相关结构体
source/device 目录下是 Convolution Neural Network 的描述结构体和函数,子目录中是各种 device 的实现。其中 source/device/cpu 是 Tengine 支持的全部 CPU 的相关代码。
/*!
* @struct nn_device_t
* @brief Abstract neural network runnable device description struct
*/
typedef struct device
{
const char* name;
struct interface* interface; //!< device scheduler operation interface
struct allocator* allocator; //!< device allocation operation interface
struct optimizer* optimizer; //!< device optimizer operation interface
struct scheduler* scheduler; //!< device scheduler
void* privacy; //!< device privacy data
} ir_device_t;
device 是由嵌套的结构体构成的,结合描述了三类主要接口。关于详细细节和如何添加 device 还可以参考 扩展硬件后端 文档。
每当实现一个 device 的时候,都需要调用 int register_device(struct device* device); 函数,将 device 注册到 Tengine 中。运行时,可以通过 int add_context_device(context_t context, const char* dev_name); 和 int set_context_device(context_t context, const char* dev_name, const void* dev_option, size_t dev_opt_size); 设置需要使用的 device,对于带有 option 的 device,更推荐用后一个接口一并设置 option。比如,在 TensorRT device 中,需要初始化时指定多个 GPU 以及推理精度时特别有用。CPU device 被假设为总是可用。
模型解析 serializer 和相关结构体
/*!
* @struct serializer_t
* @brief Abstract serializer
*/
typedef struct serializer
{
const char* (*get_name)(struct serializer*);
//!< load model from file
int (*load_model)(struct serializer*, struct graph*, const char* fname, va_list ap);
//!< load model from memory
int (*load_mem)(struct serializer*, struct graph*, const void* addr, int size, va_list ap);
//!< unload model, free serializer and device related resource
int (*unload_graph)(struct serializer*, struct graph*, void* s_priv, void* dev_priv);
//!< interface exposed for register operator extension
int (*register_op_loader)(struct serializer*, int op_type, int op_ver, void* op_load_func, void* op_type_map_func, void* op_ver_map_func);
//!< interface exposed for register operator extension
int (*unregister_op_loader)(struct serializer*, int op_type, int op_ver, void* op_load_func);
//!< interface exposed for initialize serializer
int (*init)(struct serializer*);
//!< interface exposed for release serializer
int (*release)(struct serializer*);
} serializer_t;
支持新的模型格式解析,只需要填充并注册一个 serializer 即可完成。Tengine 正计划通过此模块将主流的模型支持增加进来。
模块注册
Tengine 能够工作有赖于注册的各个模块,这些注册接口和位置可以参考 source/module 目录下的相关代码。
static vector_t* internal_serializer_registry = NULL; //!< registry of model serializer
static vector_t* internal_device_registry = NULL; //!< registry of runnable neural network device
static vector_t* internal_op_method_registry = NULL; //!< registry of operators
static vector_t* internal_op_name_registry = NULL; //!< registry of operators name
从 source/module/module.c 中的 static struct vector 中可以知道, serializer,device 和 operaor 都被注册为 vector 中,在 module.h 中提供了注册和查找的函数。
/*!
* @brief Register a serializer.
*
* @param [in] serializer: The pointer to a struct of serializer.
*
* @return statue value, 0 success, other value failure.
*/
int register_serializer(struct serializer* serializer);
/*!
* @brief Find the serializer via its name.
*
* @param [in] name: The name of serializer.
*
* @return The pointer of the serializer.
*/
struct serializer* find_serializer_via_name(const char* name);
/*!
* @brief Find the serializer via its registered index.
*
* @param [in] index: The index of serializer.
*
* @return The pointer of the serializer.
*/
struct serializer* find_serializer_via_index(int index);
/*!
* @brief Get count of all registered serializer.
*
* @return The count of registered serializer.
*/
int get_serializer_count();
/*!
* @brief Unregister a serializer.
*
* @param [in] serializer: The pointer to a struct of serializer.
*
* @return statue value, 0 success, other value failure.
*/
int unregister_serializer(struct serializer* serializer);
/*!
* @brief Release all serializer.
*
* @return statue value, 0 success, other value failure.
*/
int release_serializer_registry();
/*!
* @brief Register a device.
*
* @param [in] device: The pointer to a struct of device.
*
* @return statue value, 0 success, other value failure.
*/
int register_device(struct device* device);
/*!
* @brief Find the device via its name.
*
* @param [in] name: The name of device.
*
* @return The pointer of the device.
*/
struct device* find_device_via_name(const char* name);
/*!
* @brief Find the default device.
*
* @return The pointer of the device.
*/
struct device* find_default_device();
/*!
* @brief Find the device via its registered index.
*
* @param [in] name: The index of device.
*
* @return The pointer of the device.
*/
struct device* find_device_via_index(int index);
/*!
* @brief Get count of all registered device.
*
* @return The count of registered device.
*/
int get_device_count();
/*!
* @brief Register a device.
*
* @param [in] device: The pointer to a struct of device.
*
* @return statue value, 0 success, other value failure.
*/
int unregister_device(struct device* device);
/*!
* @brief Release all device.
*
* @return statue value, 0 success, other value failure.
*/
int release_device_registry();
/*!
* @brief Register an operator method.
*
* @param [in] type: The type of an operator.
* @param [in] type: The name of an operator.
* @param [in] type: The method of an operator.
*
* @return statue value, 0 success, other value failure.
*/
int register_op(int type, const char* name, struct method* method);
/*!
* @brief Find an operator method.
*
* @param [in] type: The type of an operator method.
* @param [in] version: The version of an operator method.
*
* @return The pointer of the method.
*/
struct method* find_op_method(int type, int version);
/*!
* @brief Find an operator method via its registered index.
*
* @param [in] index: The index of operator method.
*
* @return The pointer of the operator method.
*/
struct method* find_op_method_via_index(int index);
/*!
* @brief Find an operator name.
*
* @param [in] type: The type of an operator method.
*
* @return The char array of the method.
*/
const char* find_op_name(int type);
/*!
* @brief Get count of all registered operator method.
*
* @return The count of registered operator method.
*/
int get_op_method_count();
/*!
* @brief Register an operator.
*
* @param [in] type: The type of an operator method.
* @param [in] version: The version of an operator method.
*
* @return statue value, 0 success, other value failure.
*/
int unregister_op(int type, int version);
/*!
* @brief Release all operator.
*
* @return statue value, 0 success, other value failure.
*/
int release_op_registry();
C 语言是没有 C++ 构造函数概念的,那么如果不做处理,就需要一套运行时注册和反注册的机制。在 Tengine v1.4 以后,注册的另一部分通过 CMake 完成。
通过一定规则扫描和收集到的文件,可以通过 cmake/registry.cmake 文件中添加的 GENERATE_REGISTER_HEADER_FILE(_REG_LEAD_STRING _DEL_LEAD_STRING _BACK_STRING _CONFIG_FILE _TARGET_FILE) 函数进行文件生成。
# generate needed registry
FUNCTION (GENERATE_REGISTER_HEADER_FILE _REG_LEAD_STRING _DEL_LEAD_STRING _BACK_STRING _CONFIG_FILE _TARGET_FILE)
SET (_BGN_NOTICE_STR "// code generation start\n")
SET (_END_NOTICE_STR "// code generation finish\n")
SET (_GEN_REG_DEF_STR "${_BGN_NOTICE_STR}")
SET (_GEN_REG_CAL_STR "${_BGN_NOTICE_STR}")
SET (_GEN_DEL_DEF_STR "${_BGN_NOTICE_STR}")
SET (_GEN_DEL_CAL_STR "${_BGN_NOTICE_STR}")
FOREACH (_VAR ${ARGN})
STRING(REGEX REPLACE ".+/(.+)\\..*" "\\1" _NAME ${_VAR})
SET (_REG_FUNC "${_REG_LEAD_STRING}${_NAME}${_BACK_STRING}()")
SET (_DEL_FUNC "${_DEL_LEAD_STRING}${_NAME}${_BACK_STRING}()")
SET (_GEN_REG_DEF_STR "${_GEN_REG_DEF_STR}extern int ${_REG_FUNC};\n")
SET (_GEN_REG_CAL_STR "${_GEN_REG_CAL_STR} ret = ${_REG_FUNC};\n")
SET (_GEN_REG_CAL_STR "${_GEN_REG_CAL_STR} if(0 != ret)\n")
SET (_GEN_REG_CAL_STR "${_GEN_REG_CAL_STR} {\n")
SET (_GEN_REG_CAL_STR "${_GEN_REG_CAL_STR} TLOG_ERR(\"Tengine FATAL: Call %s failed(%d).\\n\", \"${_REG_FUNC}\", ret);\n")
SET (_GEN_REG_CAL_STR "${_GEN_REG_CAL_STR} }\n")
SET (_GEN_DEL_DEF_STR "${_GEN_DEL_DEF_STR}extern int ${_DEL_FUNC};\n")
SET (_GEN_DEL_CAL_STR "${_GEN_DEL_CAL_STR} ret = ${_DEL_FUNC};\n")
SET (_GEN_DEL_CAL_STR "${_GEN_DEL_CAL_STR} if(0 != ret)\n")
SET (_GEN_DEL_CAL_STR "${_GEN_DEL_CAL_STR} {\n")
SET (_GEN_DEL_CAL_STR "${_GEN_DEL_CAL_STR} TLOG_ERR(\"Tengine FATAL: Call %s failed(%d).\\n\", \"${_REG_FUNC}\", ret);\n")
SET (_GEN_DEL_CAL_STR "${_GEN_DEL_CAL_STR} }\n")
ENDFOREACH()
SET (_GEN_REG_DEF_STR "${_GEN_REG_DEF_STR}${_END_NOTICE_STR}")
SET (_GEN_REG_CAL_STR "${_GEN_REG_CAL_STR} ${_END_NOTICE_STR}")
SET (_GEN_DEL_DEF_STR "${_GEN_DEL_DEF_STR}${_END_NOTICE_STR}")
SET (_GEN_DEL_CAL_STR "${_GEN_DEL_CAL_STR} ${_END_NOTICE_STR}")
CONFIGURE_FILE(${_CONFIG_FILE} ${_TARGET_FILE})
ENDFUNCTION()
这个函数的核心就是根据输入的文件列表,产生两个字符串 _GEN_REG_CAL_STR 和 _GEN_DEL_CAL_STR,这两个字符串将会在生成过程 CONFIGURE_FILE(${_CONFIG_FILE} ${_TARGET_FILE}) 中,替换掉 header_name.h.in 中的 @_GEN_REG_CAL_STR@ 和 @_GEN_DEL_CAL_STR@ 字符串部分,分别完成函数的声明、注册函数的调用、反注册函数的调用,生成的文件一般会保存在 ${CMAKE_BINARY_DIR} 中的对应位置,这由函数的 _TARGET_FILE 指定。
以 serializer 的 CMakeLists.txt 为例,生成函数调用如下:
# generate all serializer
GENERATE_REGISTER_HEADER_FILE("register_" "unregister_" "" "${_SRL_SRC_ROOT}/register.h.in" "${_SRL_BIN_ROOT}/register.h" "${_SRL_TM2_SRL_SOURCE}")
这样就完成了配置过程,生成的头文件进一步的在后续的编译过程中发挥作用。当用户使用静态分析功能的 IDE 审阅代码时,由于相关头文件没有生成,所以可能会发生无法跳转的情况。经过编译配置的 Microsoft Visual Studio Code 等在打开文件夹后,会启动 CMake 进行配置和生成,这时的头文件就会生成,也能进行跳转了。其他 Microsoft Visual Studio 或 JetBrains CLion 等 IDE 也可以完成配置和生成过程,推荐使用。
扩展硬件后端
背景知识
Tengine 在设计上将可扩展性作为第一优先级纳入考量,较早的版本注册机制依赖 GCC GNU 扩展,而 GNU 扩展并不是标准 C 的内容。当社区呼唤需要扩展支持到 Microsoft Visual Studio 上时,遇到了较多的困难。
在决定重新设计后,注册模块的易用性有了很大的提升。新的机制通过 CMake 额外的处理过程,取得类似遍历和注册的效果,完成模块的注册。具体的设计和改进可以参考架构详解中的重要模块介绍。
Tengine 在设计上将所有可以运行 CNN 的硬件单元均视为设备,CPU 就是一个典型的设备,在所有的编译选项里,CPU 设备都是默认包含的。如果描述一个新设备并注册,通常意义上这潜在上意味着要求编译的 Tengine 支持异构设备切图(相关内容可以阅读混合设备部分);如果注册的设备也描述了混合精度的接口,那么设备还支持混合精度。
Tengine 通过一个嵌套的结构体完成一个设备的描述:
/*!
* @struct nn_device_t
* @brief Abstract neural network runnable device description struct
*/
typedef struct device
{
const char* name;
struct interface* interface; //!< device scheduler operation interface
struct allocator* allocator; //!< device allocation operation interface
struct optimizer* optimizer; //!< device optimizer operation interface
struct scheduler* scheduler; //!< device scheduler
void* privacy; //!< device privacy data
} ir_device_t;
从结构体 ir_device_t 上可以看出,设计上将一个设备(device)分成 6 部分,第一部分 name 描述了设备的名字,设备名字不允许重复;interface 描述了设备接口;allocator描述了设备相关子图的操作;optimizer 描述了切图和混合精度的接口;scheduler 描述了设备独特的调度接口。
以上接口通常不需要全部填充,Tengine 提供一组丰富的示例指导如何自定义并添加用户自己的设备。
添加自定义设备
创建目录,编写 CMakeLists 文件
首先在source/device创建一个以用户设备命名的文件夹,文件夹可以是用户的设备缩写或其他用户认为比较酷的名字(这里假设起名为TPU,那么目录就是source/device/tpu),并从其他已经实现的 device/xxx 目录中复制一份 CMakeLists.txt 文件到当前文件夹;现在只需要对此 CMakeLists.txt 做些微的修改,而不需要从头创建。我们以从 source/device/acl/CMakeLists.txt 复制一份为例进行说明。该文件完整示例如下:
# 0. clear var
UNSET (_DEV_ACL_HEADER_PATH)
UNSET (_ACL_BASE_SOURCE)
UNSET (_ACL_OPS_SOURCE)
UNSET (_DEV_ACL_DEVICE_SOURCE)
UNSET (_DEV_ACL_COMPILER_DEFINES)
UNSET (_DEV_ACL_COMPILER_OPTIONS)
UNSET (_DEV_ACL_LINKER_OPTIONS)
UNSET (_DEV_ACL_LINK_LIBRARIES)
# 1. set source root path
SET(_ACL_ROOT ${CMAKE_SOURCE_DIR}/source/device/acl)
# 2. add header file path
LIST (APPEND _DEV_ACL_HEADER_PATH ${_ACL_ROOT})
LIST (APPEND _DEV_ACL_HEADER_PATH ${CMAKE_SOURCE_DIR}/3rdparty/acl/include)
# 3. add linking lib searching path
LIST (APPEND _DEV_ACL_LINK_PATH ${CMAKE_SOURCE_DIR}/3rdparty/acl/lib)
# 4. add source files
AUX_SOURCE_DIRECTORY("${_ACL_ROOT}" _ACL_BASE_SOURCE)
AUX_SOURCE_DIRECTORY("${_ACL_ROOT}/op" _ACL_OPS_SOURCE)
LIST (APPEND _DEV_ACL_DEVICE_SOURCE ${_ACL_BASE_SOURCE})
LIST (APPEND _DEV_ACL_DEVICE_SOURCE ${_ACL_OPS_SOURCE})
# 5. add build options for cpu device
# 5.1 is a gcc or clang like compiler
IF (TENGINE_COMPILER_GCC OR TENGINE_COMPILER_CLANG)
IF (TENGINE_COMPILER_GCC AND (${CMAKE_CXX_COMPILER_VERSION} VERSION_GREATER_EQUAL "6.1"))
LIST (APPEND _DEV_ACL_COMPILER_OPTIONS -Wno-ignored-attributes)
ENDIF()
ENDIF()
# 5.2 is Microsoft Visual C++
IF (TENGINE_COMPILER_MSVC)
ENDIF()
# 6. add link options
# 7. add link libs
LIST (APPEND _DEV_ACL_LINK_LIBRARIES arm_compute)
LIST (APPEND _DEV_ACL_LINK_LIBRARIES arm_compute_core)
# 8. set all to cmake cache
SET (TENGINE_ACL_HEADER_PATH ${_DEV_ACL_HEADER_PATH} CACHE INTERNAL "Tengine Arm Compute Library device header files searching path" FORCE)
SET (TENGINE_ACL_LINK_PATH ${_DEV_ACL_LINK_PATH} CACHE INTERNAL "Tengine Arm Compute Library device link libraries searching path" FORCE)
SET (TENGINE_ACL_DEVICE_SOURCE ${_DEV_ACL_DEVICE_SOURCE} CACHE INTERNAL "Tengine Arm Compute Library device main source files" FORCE)
SET (TENGINE_ACL_COMPILER_DEFINES ${_DEV_ACL_COMPILER_DEFINES} CACHE INTERNAL "Tengine Arm Compute Library about compiler defines" FORCE)
SET (TENGINE_ACL_COMPILER_OPTIONS ${_DEV_ACL_COMPILER_OPTIONS} CACHE INTERNAL "Tengine Arm Compute Library about compiler options" FORCE)
SET (TENGINE_ACL_LINKER_OPTIONS ${_DEV_ACL_LINKER_OPTIONS} CACHE INTERNAL "Tengine Arm Compute Library about linker options" FORCE)
SET (TENGINE_ACL_LINK_LIBRARIES ${_DEV_ACL_LINK_LIBRARIES} CACHE INTERNAL "Tengine Arm Compute Library about link libraries" FORCE)
# 9. install device option
INSTALL (FILES ${_ACL_ROOT}/acl_define.h DESTINATION include/tengine RENAME acl_device.h)
首先需要将使用的 CMake 变量的前缀进行修改,以避免潜在的变量冲突;将所有的 ACL 替换为TPU;然后修改模块的搜索根路径 _TPU_ROOT 为 source/device/tpu。
# 1. set source root path
SET(_TPU_ROOT ${CMAKE_SOURCE_DIR}/source/device/tpu)
自定义设备常常需要一些额外的3rdparty依赖,在 _DEV_TPU_HEADER_PATH 和 _DEV_TPU_LINK_PATH 中进行相应的修改;在 ACL 中,增加了 ACL 预编译库路径 ${CMAKE_SOURCE_DIR}/3rdparty/acl/lib。
# 2. add header file path
LIST (APPEND _DEV_TPU_HEADER_PATH ${_TPU_ROOT})
LIST (APPEND _DEV_TPU_HEADER_PATH ${CMAKE_SOURCE_DIR}/3rdparty/tpu/include)
# 3. add linking lib searching path
LIST (APPEND _DEV_TPU_LINK_PATH ${CMAKE_SOURCE_DIR}/3rdparty/tpu/lib)
源码搜集部分按实际情况修改即可。
# 4. add source files
AUX_SOURCE_DIRECTORY("${_TPU_ROOT}" _TPU_BASE_SOURCE)
AUX_SOURCE_DIRECTORY("${_TPU_ROOT}/op" _TPU_OPS_SOURCE)
LIST (APPEND _DEV_TPU_DEVICE_SOURCE ${_TPU_BASE_SOURCE})
LIST (APPEND _DEV_TPU_DEVICE_SOURCE ${_TPU_OPS_SOURCE})
接下来的部分是编译相关的选项,根据实际情况修改即可。Tengine 默认打开了 C/C++ 支持,并尝试打开标准到 C99/C++14,如果工具链不支持会降级为 C98/C++11;如果用户的代码有其他特殊要求可以根据情况调整 _DEV_TPU_COMPILER_DEFINES,_DEV_TPU_COMPILER_OPTIONS,_DEV_TPU_LINKER_OPTIONS 这 3 个变量。
# 5. add build options for cpu device
# 5.1 is a gcc or clang like compiler
IF (TENGINE_COMPILER_GCC OR TENGINE_COMPILER_CLANG)
ENDIF()
# 5.2 is Microsoft Visual C++
IF (TENGINE_COMPILER_MSVC)
ENDIF()
# 6. add link options
根据实际情况调整链接库情况,修改 _DEV_TPU_LINK_LIBRARIES 变量。
# 7. add link libs
LIST (APPEND _DEV_TPU_LINK_LIBRARIES tpu_runtime)
汇总一下临时变量到模块接口变量,接口变量设计为 cache 的,以便跨模块进行传递(另一方面这也是不同 device 不应重名的原因)。
SET (TENGINE_TPU_HEADER_PATH ${_DEV_TPU_HEADER_PATH} CACHE INTERNAL "Tengine TPU device header files searching path" FORCE)
SET (TENGINE_TPU_LINK_PATH ${_DEV_TPU_LINK_PATH} CACHE INTERNAL "Tengine TPU device link libraries searching path" FORCE)
SET (TENGINE_TPU_DEVICE_SOURCE ${_DEV_TPU_DEVICE_SOURCE} CACHE INTERNAL "Tengine TPU device main source files" FORCE)
SET (TENGINE_TPU_COMPILER_DEFINES ${_DEV_TPU_COMPILER_DEFINES} CACHE INTERNAL "Tengine TPU about compiler defines" FORCE)
SET (TENGINE_TPU_COMPILER_OPTIONS ${_DEV_TPU_COMPILER_OPTIONS} CACHE INTERNAL "Tengine TPU about compiler options" FORCE)
SET (TENGINE_TPU_LINKER_OPTIONS ${_DEV_TPU_LINKER_OPTIONS} CACHE INTERNAL "Tengine TPU about linker options" FORCE)
SET (TENGINE_TPU_LINK_LIBRARIES ${_DEV_TPU_LINK_LIBRARIES} CACHE INTERNAL "Tengine TPU about link libraries" FORCE)
如果设备有特殊选项,可以考虑将其插入到 install 阶段。
# 9. install device option
INSTALL (FILES ${_TPU_ROOT}/tpu_define.h DESTINATION include/tengine RENAME tpu_device.h)
在根目录下的 CMakeLists.txt 中添加 option 以便编译时条件打开。
OPTION (TENGINE_ENABLE_TPU "With Awesome TPU support" OFF)
还需要修改 source/device/CMakeLists.txt 添加 Option 相关的处理。
# Awesome TPU
IF (TENGINE_ENABLE_TPU)
ADD_SUBDIRECTORY (tpu)
LIST (APPEND _TENGINE_DEVICE_HEADER_PATH ${TENGINE_TPU_HEADER_PATH})
LIST (APPEND _TENGINE_DEVICE_LINK_PATH ${TENGINE_TPU_LINK_PATH})
LIST (APPEND _TENGINE_DEVICE_COMPILER_DEFINES ${TENGINE_TPU_COMPILER_DEFINES})
LIST (APPEND _TENGINE_DEVICE_COMPILER_OPTIONS ${TENGINE_TPU_COMPILER_OPTIONS})
LIST (APPEND _TENGINE_DEVICE_LINKER_OPTIONS ${TENGINE_TPU_LINKER_OPTIONS})
LIST (APPEND _TENGINE_DEVICE_LINK_LIBRARIES ${TENGINE_TPU_LINK_LIBRARIES})
LIST (APPEND _TENGINE_DEVICE_SOURCE ${TENGINE_TPU_DEVICE_SOURCE})
LIST (APPEND _REGISTER_DEVICE_LIST "${CMAKE_SOURCE_DIR}/source/device/tpu/tpu_device.cc")
ENDIF()
其中,_REGISTER_DEVICE_LIST 是设备注册的核心文件,需要根据实际情况进行填写。
填充结构体完成设备的注册
从某种意义上说,完成一个新设备的注册,只需要填充 ir_device_t 结构体,所有的其他代码工作都是围绕这个核心展开的。
/*!
* @struct nn_device_t
* @brief Abstract neural network runnable device description struct
*/
typedef struct device
{
const char* name;
struct interface* interface; //!< device scheduler operation interface
struct allocator* allocator; //!< device allocation operation interface
struct optimizer* optimizer; //!< device optimizer operation interface
struct scheduler* scheduler; //!< device scheduler
void* privacy; //!< device privacy data
} ir_device_t;
回顾 ir_device_t 结构体,struct interface 结构体描述了基本 API 接口:
/*!
* @struct ir_interface_t
* @brief Abstract neural network runnable device interface struct
*/
typedef struct interface
{
//!< interface of init this neural network device
int (*init)(struct device* device);
//!< interface of prepare runnable subgraph on device
int (*pre_run)(struct device* device, struct subgraph* subgraph, void* options);
//!< interface of run runnable subgraph on device
int (*run)(struct device* device, struct subgraph* subgraph);
//!< interface of post run runnable subgraph on device
int (*post_run)(struct device* device, struct subgraph* subgraph);
//!< interface of async run runnable subgraph on device
int (*async_run)(struct device* device, struct subgraph* subgraph);
//!< interface of async wait runnable subgraph on device
int (*async_wait)(struct device* device, struct subgraph* subgraph, int try_wait);
//!< interface of release runnable subgraph on device
int (*release_graph)(struct device* device, void* device_graph);
//!< interface of release this neural network device
int (*release_device)(struct device* device);
} ir_interface_t;
参考 ACL,一个可能的 TPU 的实现填充如下:
static struct interface tpu_interface = {
.init = tpu_dev_init,
.pre_run = tpu_dev_prerun,
.run = tpu_dev_run,
.post_run = tpu_dev_postrun,
.async_run = nullptr,
.async_wait = nullptr,
.release_graph = nullptr,
.release_device = tpu_dev_release,
};
tpu_dev_init() 是设备的全局初始化函数,注册设备时调用一次,反注册调用 release_device()。这个函数一般用来预申请设备内存作全局缓存,与设备驱动互操作初始化一些寄存器等。
tpu_dev_prerun() 是网络预处理部分,常见的处理包含申请 tensor 内存、转换数据 layout、创建设备运行图、编译设备 kernel 等。这部分申请的空间等需要在 tpu_release_graph() 中进行清理。
tpu_post_run() 与 tpu_release_graph() 可能会引发混淆,tpu_post_run() 常常用来只是清除运行一次的相关状态,与 tpu_dev_prerun() 相反,真正的释放工作可以放到 tpu_release_graph() 中进行。一个可能的场景是,运行一次分辨率的模型 tpu_dev_prerun() 后,换一个分辨率前运行 tpu_post_run(),然后再运行 tpu_dev_prerun()。当需要真正销毁时,运行 tpu_release_graph()。
ir_device_t 结构体中,struct interface 结构体描述了基本 API 接口, struct allocator 描述了设备能力上报接口和评估和调度的接口,struct optimizer 描述了切图和优化相关的接口,struct scheduler 描述了调度相关的接口。这几个接口的核心是 struct scheduler,设备并不总假设实现一个 struct scheduler,如果设备的这个接口描述是 nullptr,那么引擎会使用默认注册的 sync scheduler 运行网络,详情参考 source/scheduler/scheduler.c 中的 static ir_scheduler_t sync_scheduler。用户也可以实现一份自己的 struct scheduler 来完成特殊的任务;结合 struct allocator 和 struct optimizer 可以产生丰富的可能。下面的描述是假设用户不实现 struct scheduler 的情况下的逻辑。
static struct allocator tpu_allocator = {
.describe = tpu_describe,
.evaluation = tpu_evaluation,
.allocate = tpu_allocate,
.release = tpu_release,
};
在 tpu_allocator 中,tpu_describe() 上报模型的 OP 支持情况和精度支持情况,这里的 OP 和精度支持的描述并不会随网络变化而改变,潜在的含义是这种状态下总是假设用户特定设备是 OP 或精度 全场景支持的。以卷积为例,这意味着用户的设备支持所有模式的卷积,无论 pad、stride 、h 、w 、c 情况如何。如果设备实现确实需要在运行时评估,那么可以自定 struct scheduler 完成自定义过程。
tpu_evaluation() 用来运行前评估一下已经实现的设备子图是否可运行;这在需要编译 kernel 时特别有用。
tpu_allocate() 用来支持设备存储池的相关内容,在默认 scheduler 下无需填充这个入口。tpu_release() 是相反的释放过程。
static struct optimizer tpu_optimizer = {
.split_graph = tpu_split_graph,
.optimize_graph = nullptr,
};
在 tpu_optimizer 结构体中,tpu_split_graph() 用来实现切图,tpu_optimize_graph() 用来实现混合精度,其中 tpu_split_graph() 可以调用默认实现的 split_graph_node_to_sub_graph() 进行普通切图;如果有特殊需求可以结合其他结构体的不同字段形成组合。
最后,需要编写注册函数和反注册函数 int register_tpu_device() 和 int unregister_tpu_device(),需要注意的是注册函数和反注册函数的后半段就是文件名,需要和实际文件名匹配,CMake 会自动的完成注册函数的调用过程的链接。
总结
通过上文的描述,可以知道添加一个自定义设备的核心工作就是填充 ir_device_t 结构体,描述完成后,设备注册的所有工作就完成了。模块化的 device 使得 Tengine 非常易于扩展,并有足够的灵活性。
彩蛋
init_tengine(void) 函数中,当 operator prototype 完成注册后,注册的就是 serializer 和 devices,但在静态代码状态下函数并不会跳转,用户可以安装一款集成开发环境,比如 Microsoft Visual Studio 或 JetBrains CLion,打开文件夹后生成 CMake 过程后即可进行跳转。
OpenCL 后端添加自定义 OP 指南
0. 简介
OpenCL(Open Computing Language) 是第一个面向异构系统通用目的并行编程的开放式、免费标准,也是一个统一的编程环境,便于软件开发人员为高性能计算服务器、桌面计算系统、手持设备编写高效轻便的代码,而且广泛适用于多核心处理器(CPU)、图形处理器(GPU)、Cell 类型架构以及数字信号处理器(DSP)等其他并行处理器,在游戏、娱乐、科研、医疗等各种领域都有广阔的发展前景。
Tengine 已经完成 OpenCL 的支持和集成,在 ARM Mali GPU、NVIDIA GPU 上已经可以完成 Tengine 模型的 FP32 推理。关于 OpenCL 的算子支持及性能优化也在持续进行中。
Tengine 的 DAG 内存结构主要包含三个部分,graph(存储完整的模型架构),node(存储每个 OP 节点的参数信息),tensor(存储每个 OP 节点的输入输出张量)。
Tengine 的 OpenCL 后端主要通过 graph 对接 OpenCL 的执行队列,通过 tensor 的 data 对接 OpenCL 的内存分配,以及通过 node 的参数,完成 OpenCL 的 kernel 实现。大致映射关系如下图所示:
ir_graph >>>>>>>>>>> OCLqueue(OpenCL的执行队列)
|
|---ir_tensor0 >>>>>>>>>>> cl_buffer0(输入buffer0)
|--- | ir_tensor1 >>>>>>>>>>> |___________cl_buffer1(输入buffer1)
| | | |
| |___________| |----- Add OP Node
| | | |
|--- ir_node >>>>>>>>>>> |----- Build OpenCL Kernel
| | |
|--- ir_tensor2 >>>>>>>>>>> cl_buffer2(输出buffer)
为 OpenCL 后端添加新的算子主要包含以下 5 个步骤:
添加 tensor 映射函数。 为新添加OP的输入输出分配内存。OpenCL 的内存分配方式有两种,目前 Tengine 中,通过
OCLEngine::OCLTensorMap函数实现了 buffer 的分配方式。如使用 buffer 这种方式,除 winograd 等需要分配额外内存的实现,其他实现已统一分配好内存,不需要再进行额外操作。如需要使用 image 的内存分配方式,则需在OCLEngine::OCLTensorMap函数中另外添加create_image()相关实现。添加 node 映射函数。 为新添加 OP 的加入对应函数申明及实现,并完成 node 和 tensor 之间的关系衔接。
完成 OpenCL 的 kernel 实现。 为 node 的映射添加完整 .cl 的 kernel 实现。
graph 映射。 完成 OpenCL 执行队列设置,及添加 OpenCL 所必须的参数设置,如
global_work_size和local_work_size等。在
limit.hpp文件中添加新增 OP 枚举。 切图机制需要获知后端 OP 支持情况,所以需要在limit.hpp文件中增加新的 OP 支持声明。
下面将介绍新OP算子添加的具体操作细节,以下内容除单独强调外,都假设在 <tengine-lite-root-dir>/source/device/opencl 目录下进行
1. 添加 tensor 映射
1.1 OpenCL 内存分配方式选择
选择对应的 OpenCL 内存分配方式,buffer 或 image。如选择 image 方式,则在 OCLEngine::OCLTensorMap 函数中添加对应实现,如选择 buffer 方式,这一步不需要进行额外操作。
1.2 OpenCL 内存分配大小设置
如果内存分配大小与 OP 输入输出 shape 一致,这一步不需要进行额外操作。如果 kernel 为类似 winograd 这样需要分配额外的内存做缓存的类型,则需要在 OCLEngine::OCLTensorMap 函数中添加对应内存分配实现。如果不能自动销毁,还需要注意添加析构或释放相关的实现。
2. 添加 node 映射
下面以 Dropout 算子为例,对流程进行说明。
2.1 添加 AddNode 函数申明
在 ocl_executor.hpp 中添加
bool AddDropoutNode(struct node* ir_node);
在 ocl_executor.cc 文件中的 OCLEngine::BuildKernel(struct subgraph* subgraph) 函数中添加
case OP_DROPOUT:
this->AddDropoutNode(ir_node);
break;
需要注意,OP_DROPOUT 是 Tengine 枚举的 OP 类型,其余枚举类型可以参考 <tengine-lite-root-dir>/source/operator/op.h 文件。
2.2 添加 OP 函数实现
在 ./op 文件夹下添加 ocl_droput.cc 内容为 AddDropoutNode(ir_node) 的函数实现。
在 ./cl 文件夹下添加 drouput.cl 内容为 OpenCL 的 kernel 实现。
其中,AddDropoutNode(ir_node) 函数需要包含以下内容:
2.2.1 添加 .cl 文件路径
char* cl_env = getenv("ROOT_PATH");
char cl_kernel_path[500] = "";
strcat(cl_kernel_path, cl_env);
strcat(cl_kernel_path, "/source/device/opencl/cl/dropout.cl");
this->build_kernel(&cl_kernel_path[0], "dropout");
2.2.2 添加 .cl 文件对应 kernel 的参数
int arg_idx = 0;
CHECK_SET_KERNEL_STATUS(clSetKernelArg(kernel, arg_idx, sizeof(cl_mem), (void *)&this->ocl_tensor_map[output_tensor->index]));
CHECK_SET_KERNEL_STATUS(clSetKernelArg(kernel, ++arg_idx, sizeof(cl_mem), (void *)&this->ocl_tensor_map[input_tensor->index]));
CHECK_SET_KERNEL_STATUS(clSetKernelArg(kernel, ++arg_idx, sizeof(int), &output_tensor->elem_num));
2.2.3 设置 OpenCL kernel 执行队列
struct OCLqueue Dropout;
Dropout.name = "Dropout";
Dropout.dims = 1;
Dropout.queue_kernel = this->kernel;
Dropout.queue_global_work_size = (size_t*)malloc(sizeof(size_t));
Dropout.queue_global_work_size[0] = output_tensor->elem_num;
Dropout.queue_local_work_size = (size_t*)malloc(sizeof(size_t));
Dropout.queue_local_work_size[0] = 1;
this->queue_list.push_back(Dropout);
3. 添加 OpenCL 的 kernel 实现
完成.cl后缀的kernel实现。
4. 添加OpenCL可支持op
在./ocl_limit.hpp文件中,找到对应的 OP 枚举,打开注释,标明已经实现了支持。
经过以上流程,一个 OP 的实现就已经完成了。接下来需要在实际 GPU 或其他 OpenCL 设备上运行评估性能,并进行适当调优,逐渐接近理论性能上限。